Refinishing Cabinets? Any experience with gel stains?

nnnnnate

Well-Known Member
Supporting Member
Location
WVC, UT
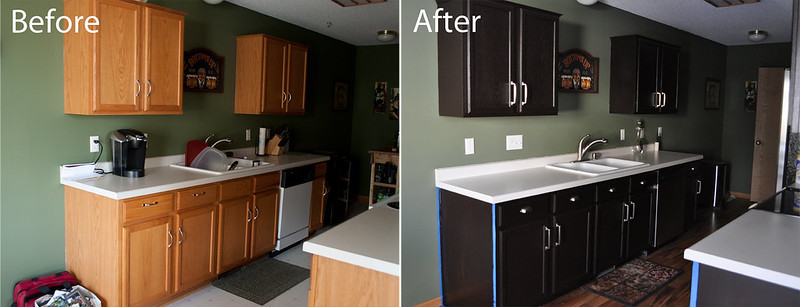
We have honey oak cabinets in our kitchen and bathrooms and we're doing some work on our main floor. We are going to put in faux wood tile on the whole main floor which is a darker brown with some grey hues, the walls are getting painted gray. I painted part of a wall next to the cabinet so we could get a look at how the tile would look with the paint and cabinets and while we really like the paint and tile the honey oak cabinets looked not great.

I have previously looked at refinishing the cabinets and at one point considered painting them white but I think we've moved past that. We'd like to get them darker but I think we still want to be able to see the wood grain. Seems like many people that are in our position have used the General Finishes Java Gel Stain and seem to like it. I wondered if you guys have experience doing this and could give a little guidance. I'll probably go pick up some of it today and maybe do a test on the back of a bathroom drawer to see how we like it.

Seems like there are a couple ways you can apply it. Paint it on and leave it real thick or paint it on and let it sit for a minute then wipe the excess off.

Here is a decent video I found using the paint it on and leave it method.

[video=youtube;plePW69gKcw]https://www.youtube.com/watch?v=plePW69gKcw[/video]

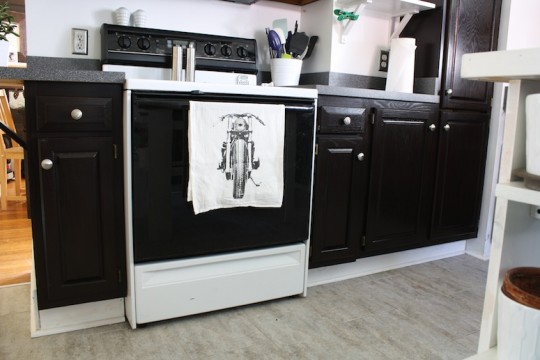
Here are a couple pics of the kitchen as it is now.

2014-02-01 19.42.11.jpg 2014-02-01 19.41.51.jpg 20150525_084609.jpg 20150525_084633.jpg
 

idahoyj

Well-Known Member
Location
Twin Falls Idaho
I've never used that specific finish, but in my experience, this will be a band aid until you get new cabinets. The ones I've seen never seem to hold up as well as the original finish.
 

nnnnnate

Well-Known Member
Supporting Member
Location
WVC, UT
I hope thats not the case. The house was built in 2004 and everything is in really good condition. We were just hoping to get a little darker color. I do plan on putting several coats of poly on top of this finish though to help with durability.
 

jeeper

I live my life 1 dumpster at a time
Location
So Jo, Ut
I see a LOT of painted cabinets. Some look so nice I can't tell if they are new or old. Others are so bad I can't believe people even use them. I am wanting to do our cabinets as well, but an afraid of doing a bad job. My brother used a glossy red gel paint on some cabinets he put into an RV that turned out awesome.

If yours turn out well, maybe that will give me courage to try.
 

nnnnnate

Well-Known Member
Supporting Member
Location
WVC, UT
I pulled off two drawer faces to try and this is how they look right now.

Before:

20150525_112340.jpg

After:

20150525_135122.jpg

I'm blocking some light in that last picture but on the smaller one I rubbed in the gel and let it sit for a bit then wiped it off with an old towel. The bigger one I rubbed it in and didn't wipe it off. Its supposed to dry for 24 hours so I'm going to let it go and then do a second application tomorrow and see how it looks.

I bought the gel at Wood Craft this morning. The guy there said to prep by mixing 50/50 denatured alcohol and warm water with a drop or two of dish soap then dip a 00 3M scrub pad in the solution and scrub the cabinets. He said to scrub but not go crazy and that all we were trying to do is get any grease off, let the alcohol open the pores of the grain a bit, and take the sheen off the top coat. The gel is a urethane so its made to go on top of the top coat.

I like the shade of the larger drawer face, we'll see how things look tomorrow after another coat. I'm hoping that the smaller one will get darker and be a little more even in color after another coat.
 

nnnnnate

Well-Known Member
Supporting Member
Location
WVC, UT
So after doing some more testing we decided to go all in on this project. I had also found some more web pages with finished pictures that I showed my wife that we really liked. We did have one concern about how dark they would be finished and if it would look too dark with the rest of the kitchen but we decided to roll the dice on it. This concern mainly deals with the tile we've picked but haven't installed yet so we can still alter that if we feel like we need to.

The project pics that made us nervous about it being too dark:
kitchen_cabinets_finished_6-540x360.jpg


Another project where we really liked the look:

8374440567_1be8f37d7b_c.jpg

8375515174_44a306fca7_c.jpg


I think maybe the white floors and walls from the first example exaggerated the contrast. We really love how the second set looks.
 
Last edited:

nnnnnate

Well-Known Member
Supporting Member
Location
WVC, UT
So after seeing those pictures and talking to my wife I pulled off the cabinet doors and drawer faces after work yesterday and started to scrub them down for the gel. I don't think we have a huge kitchen but it took a long time to get the hardware off and even longer to scrub them down.

20150527_161357.jpg

After taking a dinner break I got back at it and was able to finish staining the backside of everything.

20150527_223111.jpg20150527_223121.jpg

They look splotchy right now but in the first video I posted the guy said to not worry about it and that it would even out after additional coats. I found that to be the case with the test pieces so I'm not worried.
 

sawtooth4x4

Totally Awesome
I'd like to do that to mine as well. I hate oak.

This is what I did to the ones in my bathroom. I sanded them and gave them a heavy coat of primer. They i used some gloss grey spray paint. I think it came out pretty good. And it save a lot of money compared to buying a new vanity for the kids to just smash up anyway. I put in the tile, painted and added a new light fixture. All in, maybe $300

11028364_10152777616020028_6674347981108851487_n.jpg
 

jeeper

I live my life 1 dumpster at a time
Location
So Jo, Ut
Nate, when you are done I would like to have a personal tour of your finished products. I am working on a plan for remodeling the baths in our house and think I will follow your excellent example.
 

nnnnnate

Well-Known Member
Supporting Member
Location
WVC, UT
I think those are going to look great! Your becoming a real jack of all trades Nate

I'm starting to think I'm just a fool and need a wife that will start to call me out more often.

Nate, when you are done I would like to have a personal tour of your finished products. I am working on a plan for remodeling the baths in our house and think I will follow your excellent example.

Sure thing.

I guess I can add a few thoughts about durability on this stuff. IdahoYJ questioned it durability and thats something I've thought about a lot the last few days as I've been tinkering with it. I found a thread on gardenweb (link here, celticmoon is the one who did the write up) where the person used this gel back in 2006 and said that other than a couple high traffic spots on the cabinets it had held up well. The few spots that were showing wear she was able to touch up and re apply poly to make them look good again. The most recent update was from 2013 where they said things were still looking good.

While I was scrubbing the doors yesterday I cleaned up the two drawer faces that I had tested on. I had a bit of over-run on the sides and I was able to scrub that off without too much trouble. As I kept on working with the gel I continued to think about its durability and how I could describe it. Best I could come up with is that its kind of like shoe polish. You rub it on your nice leather shoes and it conditions the leather and with some polish you can make them look real good. After time as you wear the shoes and bump into things it gradually wears off and you have to re apply it again to get things looking real good. The gel stain alone won't stay on the cabinets long term, to do that you've got to seal them up with several layers of poly that will help protect the gel from wearing or rubbing off. I don't know how many coats its going to take but I'd like to get a decently thick layer on there to act as a buffer and keep these looking good for a long time. I would guess that having drawer and cabinet pulls that get used will help but I'm sure other things will contribute to the finish wearing over time.

If we end up not being happy with it down the road I'll just sell the house.:eek:
 

nnnnnate

Well-Known Member
Supporting Member
Location
WVC, UT
This darker one is two coats on the back of the the doors.

20150529_220537.jpg

Here is one coat on the fronts. The darker smudges are from when I was working on the backs and used my messy hands to move the doors around. I'm confident that these will be hidden with the second coat.

20150529_220551.jpg

After work today I'm going to clean up the cabinet boxes and then do the second coat on the front of the doors. This whole process takes a lot of time, if you don't let them dry enough when you put on the next coat or try to touch up areas the first coat smears with the second and its hard to get back to the first coat shade. (does that make sense?)

The wife is happy (as am I) with how they look so thats a plus.
 

nnnnnate

Well-Known Member
Supporting Member
Location
WVC, UT
Picture dump, work from the last few days.

I mounted these doors to see what we thought of the color. This is after two coats, my wife wanted it darker and more uniform so I did another coat on the fronts of all the doors.

8GlEF96l.jpg

Two coats on the cabinet boxes in the first pic and three on the next two...

h71ic1Il.jpgVSRdcTXl.jpgYPkNpigl.jpg

This is where I stopped for the day. Three coats of gel stain on the fronts and the boxes. I've also put three coats of General Finishes Arm-R-Seal in semi-gloss (oil based) on the boxes and the backs of the doors. This top coat is super thin so it has a tendency to run. If you look real close you can see where I've sanded down parts of a couple doors that had runs on them that I'll be re-staining and then doing the top coat. Also, on the arm-r-seal it says you can buff it with 400 grit sandpaper. This is technically true but when I did this on one set of cabinet boxes I rubbed through the sealer and the stain exposing the yellow wood on a few of the edges. I don't think I was using that much pressure but I'm going to have to re-stain that box as well as touch up a few other places that I missed along the way. I thought it might be a little easier to poly the edges by having the doors hanging to try and manage the runs. I'm not sure if this is a sound idea or not though.

YsMvRXDl.jpglDvHBbPl.jpgYaml8zal.jpg

Thoughts now that the color is done:

It looks black in these pictures but its just a super dark brown. I think its too dark, I liked it better with just two coats and some darker and lighter streaks throughout. The wife wanted it uniform so thats what I did, she absolutely loves it. I am still going to be painting the walls in a few weeks so that may lighten things up as well and change the feeling of the whole kitchen. We are painting the walls gray.

Durability. I'm just not sure about this still. With how easy it came off when I started to sand I would guess that with bumps and scuffs its going to not do that awesome. It really does depend on the top coat though I think. I'm going to be putting on extra coats on the doors and the areas that might get some touching and wear, we have pulls as well that will keep the fingers off the doors. I think the thing to understand and remember though it that this is shoe polish. It doesn't penetrate into the wood, it sits on top of the previous stain and poly and then has a top coat on top of it to protect it. It doesn't seep into the wood. That said it will be very easy to touch up if and when its needed. We're having our first kid in August so you'll have to wait for a "kid approved" rating.

Let me know if you have any questions about any of this. I'm going to try and update the first post with links to the stuff I used for future reference.
 
Last edited:

nnnnnate

Well-Known Member
Supporting Member
Location
WVC, UT
Yeah, about that Brent... I just put on the last coat of poly Saturday night on a couple of the doors where the poly ran and needed to be sanded and re-done. I didn't want to mess with the mud dust while doing the poly so I left that part of the project alone. I posted up in another thread about needing a plumber and I think I'm going to rip out a bunch of sheetrock from the bulkhead that separates the dining area and the fireplace area to try and pin point my plumbing leak. I think I pointed the drywall issues out when you were at the house. Anyway, I'll probably rip out that sheetrock today/tomorrow and hopefully I can get ahold of a plumber to take a peak at it all sometime this week or beginning of next. We did get some good quotes for tile and have settled on a company to do that, I just need to get the other work done first. Let me know if you need those drywall tools back and I'll throw them to meet up during the week.

Project List:
1. Rip out fireplace and fill in cubby hole DONE
2. Stain cabinets DONE
3. Fix plumbing leak/repair sheetrock
3. Remove baseboards and old laminate wood flooring
4. Finish mudding and patch wall holes
5. Paint
6. Install tile
7. Install new fireplace mantel
8. Paint and install new baseboards

I should be able to get this all done before August right? :confused:
 

nnnnnate

Well-Known Member
Supporting Member
Location
WVC, UT
I'd love to come over and help out Brent, name the date.

I didn't really do any work the past couple weeks cause I was messing around with the new to me LX470 but I've started to crack down again and get going. I'm only going to be able to do an hour or two of work and will need to then wait for mud or paint to dry so if I can just keep at it won't be too bad. I've got a scout trip coming up July 8th and would like to be ready for tile then, thats my goal at least.
 
Top