TIG Talk

I haven't picked up a TIG torch for about a year now and out of the blue I got the itch again. In all, I have probably less than 10 sticks of filler through a TIG welder, so I'm still very much a rookie. I know we don't all TIG weld, but I think there is enough interest in it to make a thread for tips and tricks. Well, I have no tips or tricks to offer, but I'm willing throw some projects out there for the experienced guys to pick over so we can all learn together.


In this project I needed to make some trailer stakes with some strap pockets welded to them. The material I used was 3x1.5x1/8" rectangular tube as well as 2.5" square 1/8" tube.


Getting my parts lined up.
003.jpg

These are settings I went with. The 151 seems very high to me, but maybe not. I did have my foot to the floor almost the entire time. I did play around a bit. As I backed off the pedal I could really see a difference. My filler would not just drop into place. A lot of times it would end up sticking to the tube and I would have to bring the torch over to it and melt it to free it up then go back to my last bead and kind of start over. Maybe I wasn't sticking the filler into the arc far enough or fast enough? I was using 1/16" filler rod.
007.jpg

This is how I prepped the electrode. I use a dedicated grinder to sharpen them, holding them parallel to the wheel. It's kind of hard to see, but it's ground down to a pretty sharp point.
008.jpg

This is the position I was welding in. I would start at the top and pull the torch towards me. I would bring the filler in from the bottom of the picture and most of the time it was leaning up against the square tube to help keep it from bouncing around.
012.jpg

This is how most of the welds turned out. I made a total of 20 of these passes. It's got to be way too hot. Maybe it's just that I had to go slow because of the large gap between the flat surface of the rec tube and the round corner of the square tube. It was a pretty large gap to fill. The top of the weld is undercutting and the HAZ is pretty large.
004.jpg

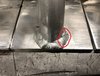
This picture shows how I was close to burning through, although I never did. The stakes ended up warping quite a bit (not a big deal on this project) right at this strap pocket. From here to the end of the stake is 24 inches. The end of the stakes would be about 1/2" in the air.
006.jpg

This picture shows what my electrode looked like after 7 passes, or about 21 inches of welding. I assume this is normal wear? I could really start to see how my arc went from a very narrow line and ended up as a wide arc, like an umbrella. After sharpening it again it went back to a narrow line again and I could be very precise with where I created a bead.
011.jpg

I found welding these lines to be the easiest ones as the filler just kind of dropped into the gap and filled nicely.

One thing to note is how much filler I used. In a total of 60 inches I used 3 1/2 rods. Does that sound about right?
009.jpg

I needed to build 10 stakes and switched over to MIG after the first 5 were done with TIG. You can see how uniform the welds are. Overall I was pleased with the outcome. I just need figure out if the welding could have been done colder with less/no warping.
016.jpg

The bottom 5 are the ones I did with the MIG welder. I really flew through them. Much smaller HAZ and no warping.
020.jpg

Overall I really enjoyed this project. My end game is to get proficient at TIG welding aluminum. I have done it a couple times and accomplished what needed to be done, but I know it could have been done better. I'm going to try to TIG steel more often so that I can develop all the hand/foot/eye coordination more. One thing I really tried to do this time was moving the filler rod through my hand instead of just moving my hand closer to the work as I used it up. It's hard to do!
 

UNSTUCK

But stuck more often.
It seemed like a long time to make the puddle. Had to be at least 10 seconds. The back side looks like nothing happened on the front side. No indication of any welding. Still very clean. Speaking of clean, I wiped both parts very well with acetone. They were very clean to begin with.
So I need more heat and try to move faster with bigger drops/beads? I noticed that a lot of the time I had drops of filler land in front of the puddle then I would move up to that droplet and melt it into place then move onto the next one. It’s like I wasn’t feeding filler into the puddle the way I would with steel or SS.

I’d love a proper lesson. This is a work machine (not mine) so I’ll have to see if I can take it. Would probably need to be Saturday afternoon. Thanks.
 

UNSTUCK

But stuck more often.
Should I be pulsing? If so, what should the settings be to get me started? What should I look for to make adjustments one way or the other.
 

YROC FAB.

BUGGY TIME
Location
Richfield, UT.
It doesnt look like your pieces were properly cleaned before welding and it contaminated the weld. Maybe im not seeing it though.

They look clean enough to me but the weld is cold. It looks like he fired the torch and started moving along before there was a good established puddle and before the cleaning action had stripped off the oxide layer. When you start with aluminum let the heat soak in for a bit and let the cleaning action fully clean around the weld. The cleaning action is the white layer on either side of the weld. Aluminum forms a oxide layer on it that protects it from corroding. That oxide layer is an impurity in a pure aluminum weld puddle. The oxide layer is stripped off the aluminum while the electrode is switched to Electrode positive (Current flows -to+) during the AC cycle. This is the reason you use AC current to weld aluminum. Super thick aluminum weldments that need tons of penetration will tig weld the aluminum root with DCEN and can get over an inch of penetration, however the weld is very sooty and black and if followed up by a AC cover generally. Over time the tungsten gets built up with the oxide layer and needs to be cleaned, reground, or re balled.
 

YROC FAB.

BUGGY TIME
Location
Richfield, UT.
Should I be pulsing? If so, what should the settings be to get me started? What should I look for to make adjustments one way or the other.

No not yet.

Things to consider with trying to dial in the amperage. AC current is usually consider a 50/50 on where the heat is going. 50% is going into the work and 50% into the tungsten. This is because the current is switching between DCEN and DCEP 60hz times a second. Current flows -to+. Not only is aluminum going to dissipate the heat quicker than steel but AC current isn't going to offer the same heat input that DC welding is. Now when you start playing with you with the ac balance, the hz, or running the pulser with you fancy inverter this can have a drastic effect on the amperage it actually takes to get the heat you want. Its really best to get the practice down so that you can know by looking at the puddle if its enough heat or not and aluminum loves heat.

DCEN is about 70% of the amperage heat going into the work and 30% into the tungsten. DCEP is just the opposite.

If you look at you weld and it looks cold but has a big cleaning action this is because of where you balance is set. the less balance the colder the weld will be but the bigger the cleaning action will be. The more balance the more penetration you will get and the less cleaning action. The balance adjustment is dictating how much amperage is happening on either side of the AC wave form. DCEP is when the cleaning action is happening, DCEN is when the real heat is going into the work.

If you want some good base line idea on how to dial it in set the frequency to 60 and the balance at 50 and do not use the pulse.

Sorry for the novels. i know too much about welding and assume every one else does too.
 

YROC FAB.

BUGGY TIME
Location
Richfield, UT.
So I need more heat and try to move faster with bigger drops/beads? I noticed that a lot of the time I had drops of filler land in front of the puddle then I would move up to that droplet and melt it into place then move onto the next one.

Sounds like you have too much leading torch angle. AC welding is extra picky with torch angle because of the AC arc natural want to wonder, and the filler wire will melt easier. 0-10* is where i try to keep my torch on top of pretty much only using 1/8 filler with aluminum unless im welding paper. It maybe hard to see with a more plumb torch angle. I find alot of newbs will weld left to right but that can be difficult to see once the torch is centered with your torso. I find my self welding welding at angle towards my self. Stretch your hands in front of you and weld from your fingers tips on one hand to your elbow on the other. This will give your torch hand more room to move and keep your rod hand tighter and more stable by your body.
 

SnwMnkys

Registered User
Location
Orem, Utah
It seemed like a long time to make the puddle. Had to be at least 10 seconds. The back side looks like nothing happened on the front side. No indication of any welding. Still very clean. Speaking of clean, I wiped both parts very well with acetone. They were very clean to begin with.
So I need more heat and try to move faster with bigger drops/beads? I noticed that a lot of the time I had drops of filler land in front of the puddle then I would move up to that droplet and melt it into place then move onto the next one. It’s like I wasn’t feeding filler into the puddle the way I would with steel or SS.

I’d love a proper lesson. This is a work machine (not mine) so I’ll have to see if I can take it. Would probably need to be Saturday afternoon. Thanks.

You need to clean aluminum with a SS wire brush. Better yet a brush that never gets used for anything else other than aluminum. Theres an oxide layer that forms on aluminum that needs to be removed. Then wipe it down with acetone.
 

zmotorsports

Hardcore Gearhead
Vendor
Location
West Haven, UT
YROC's given you some great advice, especially on the AC balance. By the look of the cleaning zone you may be set a bit low which will effect the current getting into the part for actual penetration.

On aluminum you will be bumping the amperage a bit more than the 1 amp per .001" rule due to the manner in which it dissipates heat. You can see how it looks a bit on the cold side where you started yet you were chasing it near the end. This is where it's good to have a bit more current to establish the puddle and then as the part gets heat soaked you can taper off of the current nearing the end.

Also it looks like you may have had a difficult time either seeing the seam that you were trying to weld or following it. A little trick until you can get proficient at following is to set up a follow guide parallel with the seam where you can rest a part of your hand and follow along so you can focus on the dip & move rather than also keeping the weld bead in a straight line.

Mike
 

UNSTUCK

But stuck more often.
I made a few changes this morning and had another go at it. I set the frequency to 60 and balance at 50. I then turned up the amperage up to what I thought was much higher. I'm a little confused here. The digital display bounces all over the place. Anywhere from 134 up to 220. I would assume the 220 is right as the dial is turned to about 90% of max. But it holds at 134 for a bit before it starts bouncing around again. Maybe its showing the max pedal position and the minimum pedal position?
Anyways, I flipped the piece over from last night for another shot. This time I cut a groove where I wanted to fill. I then wired it with a new SS brush and wiped with acetone.

003.JPG

It started out rough again. I stopped about a third of the way into it and restarted after a few minutes to cool down. This was going much better. I was really focusing on keeping the arc short and the torch more vertical. I'm pretty happy with the end results. I still feel like the cleaning action is way too much. I don't normally see that much white area around the bead.
004.JPG

The electrode balled up this time. It did not do that last night.
005.JPG

Cleaned up. Looks much better, but still ugly.
006.JPG

This is where I really struggled this morning. The tube is .080 wall. I had zero luck, getting it welded. The arc was huge and yellow. I couldn't tell what was going on. You can see where I started to burn through the tube, but the plate was still cold. I have no idea where to go from here.
007.JPG

009.JPG

I appreciate the input so far on this project.
 

zmotorsports

Hardcore Gearhead
Vendor
Location
West Haven, UT
That is a relatively clean piece of aluminum so run over it with a dedicated stainless steel brush (dedicated for aluminum). Your balance is way too low for that piece, hence the more pronounce ball on the tip of the tungsten. You'll get a slightly balled tip normally but if it's much more than normal think balance. Try setting your balance around 68-70 and amperage around 190-200 and give it a go. As you near the end you will taper up on the current to keep the bead profile consistent.

Aluminum tends to protrude upwards a bit more than steel due to the amount that comes off of the filler rod at a time so a good technique is to move the puddle forward and as you are dipping the rod very (I mean very) slightly raise the TIG torch to allow for the puddle growth. Then move the puddle forward and repeat. Again, as you near the end taper off of the pedal so your bead profile remains the same and focus on depositing the same amount of rod each dip to keep the ripples consistent.

Here is the key point..... don't get discouraged. It is more practice than anything so keep going, change only one thing at a time and look for a "better or worse" situation. If you change too many things at once such as technique, travel speed, current or balance then you won't know what worked and what didn't.

Once you get the seam done. Just start stacking dimes around the perimeter of the plate and work on technique. Padding dimes is a great exercise to develop your own style and/or technique.

Mike
 

UNSTUCK

But stuck more often.
I think I knew this, but forgot: On the Everlast machines, the Balance is backwards from, say, Miller. Percent on referrers to DCEP, not DCEN. So to clarify, Mike, you want it set to 68-70 DCEN, right? This is very clean material so it needs less DCEP cleaning action and more DCEN penetration action. So I need to set my dial to about 30%.
 

zmotorsports

Hardcore Gearhead
Vendor
Location
West Haven, UT
I think I knew this, but forgot: On the Everlast machines, the Balance is backwards from, say, Miller. Percent on referrers to DCEP, not DCEN. So to clarify, Mike, you want it set to 68-70 DCEN, right? This is very clean material so it needs less DCEP cleaning action and more DCEN penetration action. So I need to set my dial to about 30%.

That would be correct. I should have mentioned that some machines are backwards. It never used to be that way but some of the import machines are now displaying the balance opposite of traditional. I don't know why other than to be different but I'm not an engineer.

That being said, if your machine is in fact opposite then you would be operating most of the time in the 30-35 % range.

Mike
 

YROC FAB.

BUGGY TIME
Location
Richfield, UT.
A quick balance test would be to set your amps to 120 ish and floor it and just form a quick puddle dot in a piece of plate with no filler. Set the balance on low end and the high end and see which gets you a bigger cleaning action.

What size tungsten are you using and what kind? I prefer mostly 1/8 so it doesn't ball up on me so quickly. I hate using pure green tungsten as it also balls up quickly even in the bigger 1/8" .
 

UNSTUCK

But stuck more often.
I'm a bit happier with this last one. I have the machine cranked up hot! Like 240 amps hot. I actually got into a pretty good rhythm. I was adding a drop of filler each time the machined switched from ac to dc. I followed that rhythm at about half way through and it seemed to work well. The issue is the filler rod melting before I get it all the way into the arc. You can see three main contaminate section where the bead is built up. These are spots where I had a large blob on the end of the filler rod that ended up falling off. I had to stop my travel and melt them down.

018.JPG

019.JPG

After wire brushing to clean it up. It's getting there.

020.JPG

021.JPG

This is the blob that I always seem to end up with. I messed around with different techniques for adding filler. They all seemed to make the filler start melting before hitting the arc. Not sure how to fix this issue.

017.JPG
 

zmotorsports

Hardcore Gearhead
Vendor
Location
West Haven, UT
First off, that looks better. The toes are wet in better and the bead profile doesn't look like a cold weld.

I just wanted to correct you on one aspect, when you mentioned that you are "dipping the rod each time the machine switches from AC to DC". The machine doesn't actually switch from AC to DC. Direct Current (DC) is used for welding ferrous steel and Alternating Current (AC) is used for non-ferrous materials. On AC, the machine is switching from positive AC to negative AC 60 times per second, unless the frequency is altered with an inverter style welder.

Please don't think I am nit-picking, this conversation is about TIG in particular and I just want to make sure that we are using proper terminology and that we know what is taking place at what time so as we go through this discussion we converse in a theoretical as well as practical methodology. When I was learning I found that there were people that were just giving me the tips and pointers rather than teaching me what is actually taking place. Although the tips and pointers were helpful, they really didn't help me to learn what was taking place at what point during the process. Granted I learned on my own and not through an accredited class or school but what I did realize is that when I started reading and learning on my own, that when I learned the proper terminology as well as the procedures it helped me to "think" through the process myself vs. just having someone "tell" me what to do. Again, I apologize as I don't want to nit-pick I just want to make sure we are all on the same page on terminology because it will make a difference when we are trying to diagnose issues.

Now back to your latest welds. If you look at the black soot (and porosity) it tells me that there is still an opportunity to clean the area better. It could also be due to contacting the tungsten to the work and/or the filler rod but I think the area could be cleaned a bit better and given a wipe with acetone just prior to striking the first arc. By looking at your welding rod melting off before it makes it to the puddle it also raises the question about the surface oxidation. Aluminum oxidizes immediately once it's cleaned and continues to oxidize. That oxidation requires more heat to penetrate through than the actual aluminum underneath. That layer of oxidation must be mechanically removed (or chemically, but mechanically is most common) before welding is to take place. By cranking the current up so much that it busts through that oxidation layer then that same heat will not allow you to get the filler rod into the puddle before melting which is merely depositing the rod on top of the material vs. penetrating getting down into the root of the weld.

Keep in mind that the root of the weld is where the fusion is actually taking place so that is where the arc and the filler needs to be concentrated. I have heard it called "feeding the keyhole" before and that makes perfect sense when you think about it. That arc creates a small void as the puddle is moving forward and the filler rod needs to be inserted directly into that molten puddle just at the keyhole.

Once you get the molten puddle established and moving then comes the concept of rhythm. Dip & move, dip & move in a rhythmic manner. One thing that helps me is to listen to music or even a song in my head that I can dip & move to.

Also, I just thought of this but don't want to go back into the previous post to insert but I have found that with aluminum the filler rod has to be moved more pronounced into and out of the puddle. In steel a small movement in and out of the puddle is acceptable but with aluminum due to the fact that the filler will melt prematurely if left in the heat plume, the rod must be moved further distance into the weld puddle and then back out quickly to avoid melting off the end.

I apologize for the long post. With this thread I would like the goal for all of us to learn as much about the TIG process as possible rather than just going through the motions and trying to improve but not really knowing what is taking place.

Mike
 

zmotorsports

Hardcore Gearhead
Vendor
Location
West Haven, UT
If I can find some time tonight I will try to make a couple of test welds and relay the settings as well as results so we can talk through them.

If you think that will be helpful. If not I won't worry about it.

Mike
 

UNSTUCK

But stuck more often.
Mike, I didn't realize it, but my pulse switch has been on the whole time. So what I thought was switching positive to negative, was the pulse switching. Either way I think it helped with the rhythm. I didn't really study the pulse switches, but I wonder if the low heat side is turned way up, which might explain why I needed to turn my main amps up so high to form a puddle.

So the job in now finished and I'm happy with the results. I know I have a long ways to go, but am excited to keep practicing.

Probably my best line here. The start was a bit rough, but I think I got into a pretty good rhythm.
001.JPG

Flat is good right? I assume that too flat or even concave is bad?
003.JPG

The finished products. I know I made progress because at the end when I went back to weld on the tubes it went much better than when I first tried it the other day. Still ugly, but I made the welds and they will hold.
004.JPG005.JPG008.JPG

So one thing I did on a couple of these is go back over them and melt down some of the high spots. Not sure if that is ok or not, but ended up making things look much nicer. I'm sure the beads are WAY bigger than they need to be. It was a bit of a struggle getting plate hot without melting the tube. So there was some fill work to be done. Not to mention the tubes didn't fit perfectly to the plate.
 

zmotorsports

Hardcore Gearhead
Vendor
Location
West Haven, UT
Having the pulse feature turned on will have an affect because when the current goes low the background amperage is what keeps the arc established yet isn't enough to keep the puddle moving forward and therefore not really putting any heat into the weld. Glad you figured that out and can focus your attention on the puddle and rhythm now.

The weld puddle will always eat away at the more susceptible part first which is why the tubing will melt away while your trying to heat up the flat plate. Directing the arc right at the plate to establish the puddle and then "wicking" the puddle over to the tubing is perfectly acceptable to establish a symmetrical puddle and then move forward. Tubing to plate is harder to do than merely 1G welding so you definitely did some advance welding there. Going back over a weld to smooth it out is acceptable as long as there was proper fusion to begin with, otherwise you're just melting the top of the weld bead for aesthetics and not structural.

The only areas I would be concerned about on the tube to plate would be the circled area on the attached picture. This represents a lack of fusion as you can see by the toes not being wet in fully to the parent material. The other areas appear to be sound and just would need some fine tuning on consistency, but again, working around a tube joint is an advanced process and not as easy as a 1G weld on flat plate and just takes practice.

You are definitely making progress.

Mike
 

Attachments

  • weld.jpg
    weld.jpg
    209.3 KB · Views: 15
Top