TIG Talk

I haven't picked up a TIG torch for about a year now and out of the blue I got the itch again. In all, I have probably less than 10 sticks of filler through a TIG welder, so I'm still very much a rookie. I know we don't all TIG weld, but I think there is enough interest in it to make a thread for tips and tricks. Well, I have no tips or tricks to offer, but I'm willing throw some projects out there for the experienced guys to pick over so we can all learn together.


In this project I needed to make some trailer stakes with some strap pockets welded to them. The material I used was 3x1.5x1/8" rectangular tube as well as 2.5" square 1/8" tube.


Getting my parts lined up.
003.jpg

These are settings I went with. The 151 seems very high to me, but maybe not. I did have my foot to the floor almost the entire time. I did play around a bit. As I backed off the pedal I could really see a difference. My filler would not just drop into place. A lot of times it would end up sticking to the tube and I would have to bring the torch over to it and melt it to free it up then go back to my last bead and kind of start over. Maybe I wasn't sticking the filler into the arc far enough or fast enough? I was using 1/16" filler rod.
007.jpg

This is how I prepped the electrode. I use a dedicated grinder to sharpen them, holding them parallel to the wheel. It's kind of hard to see, but it's ground down to a pretty sharp point.
008.jpg

This is the position I was welding in. I would start at the top and pull the torch towards me. I would bring the filler in from the bottom of the picture and most of the time it was leaning up against the square tube to help keep it from bouncing around.
012.jpg

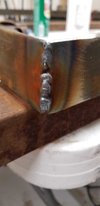
This is how most of the welds turned out. I made a total of 20 of these passes. It's got to be way too hot. Maybe it's just that I had to go slow because of the large gap between the flat surface of the rec tube and the round corner of the square tube. It was a pretty large gap to fill. The top of the weld is undercutting and the HAZ is pretty large.
004.jpg

This picture shows how I was close to burning through, although I never did. The stakes ended up warping quite a bit (not a big deal on this project) right at this strap pocket. From here to the end of the stake is 24 inches. The end of the stakes would be about 1/2" in the air.
006.jpg

This picture shows what my electrode looked like after 7 passes, or about 21 inches of welding. I assume this is normal wear? I could really start to see how my arc went from a very narrow line and ended up as a wide arc, like an umbrella. After sharpening it again it went back to a narrow line again and I could be very precise with where I created a bead.
011.jpg

I found welding these lines to be the easiest ones as the filler just kind of dropped into the gap and filled nicely.

One thing to note is how much filler I used. In a total of 60 inches I used 3 1/2 rods. Does that sound about right?
009.jpg

I needed to build 10 stakes and switched over to MIG after the first 5 were done with TIG. You can see how uniform the welds are. Overall I was pleased with the outcome. I just need figure out if the welding could have been done colder with less/no warping.
016.jpg

The bottom 5 are the ones I did with the MIG welder. I really flew through them. Much smaller HAZ and no warping.
020.jpg

Overall I really enjoyed this project. My end game is to get proficient at TIG welding aluminum. I have done it a couple times and accomplished what needed to be done, but I know it could have been done better. I'm going to try to TIG steel more often so that I can develop all the hand/foot/eye coordination more. One thing I really tried to do this time was moving the filler rod through my hand instead of just moving my hand closer to the work as I used it up. It's hard to do!
 

frieed

Jeepless in Draper
Supporting Member
Location
Draper, UT
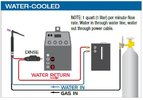
Every TIG machine is capable of a using a water cooled torch. Unlike the shield gas which is usually controlled by an internal solenoid, the coolant runs constantly and the connection to the torch is made external to the machine.

from CK's literature (gas flow is typically through the welder, though):

water_cooled.JPG

The cheapest setup you'll ever get is a water-cooled torch hooked to a water hose your house plumbing with the outlet going to your flower bed.
Next step up is buy a ProCon pump from FleaBay and build one. I've heard of people using the AC evaporator from a car for the radiator or for light welding, just using a large enough water reservoir.

On the subject of torches.. CK water cooled torches and super flex hoses are awesome and never, ever weld with a WC torch without the coolant running... the wire gauge of the electrical cable was sized assuming it is actively cooled.
 
Last edited:

glockman

I hate Jeep trucks
Location
Pleasant Grove
No problem.

From my experience I have found that using smaller filler rod than logic calls for on things like chassis work seems to produce a better result. Personally I have found that the old adage of filler rod size being similar to material thickness hasn't always been true. So for .065" wall thickness following that logic you would use 1/16" filler rod.

When I was building ATV sand drag chassis and sandrail chassis using .058" through .083" 4130 chromoly, logic would dictate that 1/16" filler rod be used. However, I seemed to have better results by stepping down to .045" filler rod and pushing it a bit. By pushing it, I mean forcing it into the puddle based on what the puddle can and will take. I found that having to have the current up high enough to create enough heat to melt off the 1/16" filler rod in the puddle usually resulted in an overheated weld or sometimes even a burn through situation in the parent material. By using the .045" filler rod and running slightly less amperage the rod melts off easier and therefore I can push in the rod and melt off whatever the puddle can take to get the bead profile to raise or bulge slightly. So for 1/16" filler rod to melt efficiently on a .065" tubing node you would need somewhere around 75-80 amps or so which could create an overheated weld and maybe a blow-hole in the tubing. By stepping down to say 60-65 amps and using .045" filler material it would keep a nice consistent bead by pushing some filler into the molten puddle and maintain a nice shiny weld bead without overheating.

The weld joint will also play a role. The example above was when welding a tube node or tube joint/union. Now if I was welding a tube to a plate I may bump the amperage a bit and possible even just back up to that 1/16" filler rod to create a decent fillet weld because it will require a bit more amperage to get the flat plate molten.

Aluminum on the other hand I generally bump up the amperage because it dissipates the heat so quickly. Sometimes 10% more amperage is all that is required but again, it depends on the mass of the part and the joint itself. For the pieces above I was able to pretty consistently stay in that 140-amp range because the drops were relatively small plus the fabrication table helped retain some heat in the material. Had the pieces been larger or an air gap between the table and the part I would have more than likely been in the 160-180 amp range. I could have jumped to 1/8" tungsten in the above examples but I already had 3/32" in my torch so I just ran with it and it did a fair job.

When welding a bung to a tank or fitting and there is some material around the end I would possibly step down to 1/16" filler but much of my aluminum work is using 3/32" filler rod. In the example above I used 3/32" 4043 rod but 5356 could have also been used on 6061 aluminum.

The 5356 rod has a bit more strength and is a better match for say 5052 material but it doesn't handle heat cycling well so for things like a radiator which is more than likely built from 5052 sheet the 4043 would be a better choice. Also if the part is going to be anodized 4043 being softer doesn't react well to the anodizing process so 5356 would provide a better match and result. If the part is going to be bent or formed at all after the welding process then 4043 would be a better choice and less likely to develop stress cracks.

When we get to aluminum castings, many people will argue that 5356 will be a better match because it has more magnesium but I have found that it doesn't weld as well plus if the part is say an engine or engine part it won't like the heat and handle it as well as the 4043 so for an aluminum casting 4043 seems to be more prevalently used. That being said, I have found a fairly new filler rod that seems to be a bit stronger and weld almost nicer on aluminum castings called 4943. I have a little bit of experience with it and so far I really like it but before I completely switch over I want to get some more experience with it before I give it my full endorsement.

I hope that information is helpful and again, these are just my opinions based on my experiences. Others may have different opinions on products they like for various materials than I do. I am by all means not a professional welder.

Mike
So much info there Mike, thank for laying it out. I've been consuming lots of TFS on YouTube and like his approach to learning. Do to his advice I'm going to do the following, let me know if you thinks this is a bad plan.
I'm sticking to standard consumables. My welder came with a CK torch. I'm going to keep practicing with a 3/32 purple tungsten and #5 cup. That way I have consistency and the only variable is me.
TFS also says to stick with smaller filler and one size to help learn. I have a bunch of 1/16 4043 to practice with. You can dab more small rod if needed and again it keeps things constant while you figure out how to weld.

About tungsten sharpening. I did it with a drill and my disk sander. Is it worth investing in a dedicated sharpener?
 

frieed

Jeepless in Draper
Supporting Member
Location
Draper, UT
I have a dedicated grinder and I still use the disc sander fairly often. If you touch the tungsten with the filler you tend to leave a pretty big blob on the tungsten which won't fit through the guide on the tungsten grinder. You can either cut the end off of the tungsten ( my grinder has a slot for this to get to the edge of the grinding disc but the edge is pretty dull now :rolleyes:) or grind the tungsten on the sanding disc. I generally use the sanding disc and then refine on the dedicated grinder if I'm doing finer work.

I am also a fan of using a smaller filler. My welds on 0.063 wall tubing were really fat until I picked up some 0.045 filler. In a pinch I've chucked a screw eye in the drill, looped 25' or so of 0.030 mig wire through it, clamped the free ends in the vise, and spun it down. Works fine, just not the straightest filler you will ever use.
 
Last edited:

glockman

I hate Jeep trucks
Location
Pleasant Grove
I have a dedicated grinder and I still use the disc sander fairly often. If you touch the tungsten with the filler you tend to leave a pretty big blob on the tungsten which won't fit through the guide on the tungsten grinder. You can either cut the end off of the tungsten ( my grinder has a slot for this to get to the edge of the grinding disc but the edge is pretty dull now :rolleyes:) or grind the tungsten on the sanding disc. I generally use the sanding disc and then refine on the dedicated grinder if I'm doing finer work.

I am also a fan of using a smaller filler. My welds on 0.063 wall tubing were really fat until I picked up some 0.045 filler. In a pinch I've chucked a screw eye in the drill, looped 25' or so of 0.030 mig wire through it, clamped the free ends in the vise, and spun it down. Works fine, just not the straightest filler you will ever use.
Already experienced the filler/tungsten marriage. Lol.
 

zmotorsports

Hardcore Gearhead
Vendor
Location
West Haven, UT
So much info there Mike, thank for laying it out. I've been consuming lots of TFS on YouTube and like his approach to learning. Do to his advice I'm going to do the following, let me know if you thinks this is a bad plan.
I'm sticking to standard consumables. My welder came with a CK torch. I'm going to keep practicing with a 3/32 purple tungsten and #5 cup. That way I have consistency and the only variable is me.
TFS also says to stick with smaller filler and one size to help learn. I have a bunch of 1/16 4043 to practice with. You can dab more small rod if needed and again it keeps things constant while you figure out how to weld.

About tungsten sharpening. I did it with a drill and my disk sander. Is it worth investing in a dedicated sharpener?

I am all for changing the minimum amount of variables at a time. I look for a "better or worse" then I know if I'm going in the right direction or not when changing things.

I tend to go a bit undersize with filler and thinner materials anyways as I've found it easier to get consistent results. Too large of a filler requires more heat and when using that much current it can get away from you as you near an end of a work piece so the smaller filler rod can help control that heat input. Thicker parent materials isn't as much of a concern with more heat though.

Mike
 

shortstraw8

Well-Known Member
Building a workbench for the garage 72"Lx48"Wx38"
First time TIG welding, the tig thread here on RME and tig-tutorial helped me feel like I may understand a little about what to do.

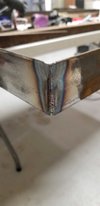
First weld started pretty good but I didn't clean it and was on one knee trying to control the foot pedal.
20210321_165307.jpg

Second was probably the best
20210321_165325.jpg

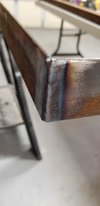
Third I believe was due to imporper cleaning?
20210321_165343.jpg

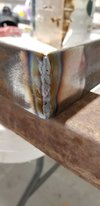
Fourth is a combination of things. First time with filler rod that I think is to big 1/8th", I could not get it to pool before blowing through the joint? While blowing through the joint and trying to figure how to get the filler to melt faster I unknowingly was now making contact with the right angle magnet on the other side.

20210321_165353.jpg
After figuring that out I felt better knowing there where many factors other than being the worst tig welder ever.

Not the best welds but that's the point of this workbench, learn to tig weld and hopefully teach my kids how to weld aswell.
 
Top