General Tech What did you work on Today?

mbryson

.......a few dollars more
Supporting Member
I had a small machining project come through my shop door the other night from a fellow forum member who is building a rock buggy. He is adding an ORD underdrive to his NP205 and needed the NP205's smaller 80mm input bearing bore machined out to accommodate a 90mm input bearing.

Taking some initial measurements of the bearing and determining a target diameter to bore the case to. The bearing measured 3.5425". For interference fits I generally use a .001" per inch of bore formula but where this didn't need to be a complete press fit and just needed to be snug I figured I would shoot for approx. .0005"-.0008" interference fit. This would give me a target bore of approx. 3.5417". I set my bore gauge to 3.5415" which would be .001" under the bearing diameter but I would try to come in on the high side of that by a few tenths.
View attachment 138589


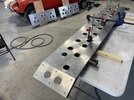
Setting up the case on the mill table. I used a center finder to get it close then swapped in my Blake coaxial tester to dial it in. I was able to get it to about a thou out.
View attachment 138590


View attachment 138591


Swapped over to my 3" Criterion boring head with my new Mesa insert attachment. It has been a while since I bored a precise hole so I took some preliminary measurements to get my feel back on my boring head.
View attachment 138592


Landed at .0002" over my target.
View attachment 138593


The bearing required a slight tap to fully seat so a perfect fit for the application.
View attachment 138594


Final notes as I tracked my numbers. Increasing by .050" at a time to get my feel back for my Criterion boring head. I was landing at approx. .0502" to .051" per pass. I am certain this has to do more with where I lined the marks up on the boring head vs. the boring bars actual accuracy.
View attachment 138595


Thanks for looking.

Mike


Good stuff! @ebryson now works at a machine shop as an entry level machinist. He seems to be digging it and is anxious to have skills similar to this. Hopefully he'll check out this thread
 

Die Blaue Ziege

Working on a Ford somewhere
Location
Logan ut
I started to install the lift spring that mesh sold me (thanks again!). I can't wait to have this project one out of the way so my pocketbook can really start crying.
 

Attachments

  • IMG_20210625_180951_01.jpg
    IMG_20210625_180951_01.jpg
    345.4 KB · Views: 2
  • PXL_20210626_005712597.MP.jpg
    PXL_20210626_005712597.MP.jpg
    659.7 KB · Views: 2

JeeperG

Well-Known Member
Location
Riverdale
Another small victory in getting my rear bumper fully mounted with the shortened brackets and original mounting bolts deleted.
PXL_20210626_215055991.jpg

Then we started cutting some paper board to get an idea on how we are going to add some filler panels, I don't really like most the roll pans, they make the bed look even taller than it already is.
PXL_20210626_231528814.jpg

Also started messing with the front bumper a bit too, we are going to cut and modify the brackets as well and do a split bumper, following the contour of the fender at about an inch and half away and ending slightly in the grille area, here are the brackets on in the stock location.
PXL_20210626_234605414.jpg
 

zmotorsports

Hardcore Gearhead
Vendor
Location
West Haven, UT
I was able to put in some QST in the shop on Saturday as my wife had lunch plans with her siblings.

I started by servicing her Acura and then went to work polishing her headlights. I am embarrassed that I let them get as oxidized as I did before addressing them.

acura1.JPG


Driver's side was starting to oxidize but not as severely as the passenger's side. Here is the driver's side.
acura2.JPG


Passenger's side.
acura3.JPG


My 3M tools and supplies at the ready.
acura4.JPG


Masked around the perimeter to avoid scratching paint.
acura5.JPG


After hitting with 500-grit.
acura6.JPG


After 800-grit, just before going to the 1000 grit Trizac.
acura7.JPG


After 1000-grit, 3000-grit and first coat of polish.
acura8.JPG


After final coat of polish and unmasked. Fenders and hood also wiped down and ready for test drive.
acura11.JPG


Thanks for looking.
 

zmotorsports

Hardcore Gearhead
Vendor
Location
West Haven, UT
After parking the wife's Acura back in the house garage I decided to tackle a job that I have had on my white board for over a year and a half now, a cart for my tube roller. Up until now I have had it under my fabrication bench but it is a PITA to lift up from under the bench when needed so I find myself avoiding using it. I figured if it were more easily accessible I would use it more and actually move on to another project I want to complete.


First order of business was to dig through my metal rack and locate some material. Using some 1-1/2"x .125" angle iron and 1.5" x .187" square tubing. The angle iron will be used for the base as well as the platform directly under the roller which it will bolt to. The square tube will be used for the spanners under the roller assembly and the ends of the base including the axle for the wheels.
tr1.JPG

After cutting some material to length and mocking up on fabrication table.
tr2.JPG

Drilling and chamfering 1/2" holes for mounting of the tube roller.
tr3.JPG

Angle iron and square tube mocked up under the roller to determine placement.
tr4.JPG

Located material to build the axle assembly. So far the only parts that I have had to purchase for this project were the two 6" wheels I purchased from my local Tractor Supply in April of 2020. I'm embarrassed to have put this project off as long as I have.
tr5.jpg

Machining a step in the square stock that will press into the square tube.
tr6.JPG

One cut off with the horizontal bandsaw at .5" in length and the other ready to be cut to size.
tr7.JPG

Both axle end pieces clamped in mill vise to machine to length and drill .5" hole for axle shafts.
tr8.JPG

Axle shaft holes drilled and chamfered.
tr9.JPG

Axle components ready to be welded.
tr10.jpg


Stay tuned for more progress.

Mike
 

zmotorsports

Hardcore Gearhead
Vendor
Location
West Haven, UT
Continuing on with my tube roller cart.

The 1/2"-13 x 2.5" bolts welded to the end caps.
tr11.JPG


Pressed into square tube for final welding.
tr12.JPG


Axle TIG welded together.
tr13.JPG


Axle completed and ready to be mocked back into position for the base.
tr14.JPG


Cart base being welded together.
tr15.JPG


A couple of my welds.
tr16.JPG


tr17.JPG


tr18.JPG


Thanks for looking.

More pics to follow as I progress on the cart this week.
 

4x4_Welder

Well-Known Member
Location
Twin Falls, ID
I actually worked on my Courier for the first time in forever. The cross member and old spring perch were in the way of getting enough uptravel for the diff housing, so I modified it.
IMG_20210704_190400.jpg

IMG_20210704_211602.jpg

IMG_20210704_221140.jpg

Gained about 3" of clearance once I get it all cleaned up. I think I'm just going to run 33s, I need to find some skinny ones though.

It's been too long since I stick welded, I need to get back to good at it. Chinese verticals suck too.
 

Vonski

nothing to see here...
Location
Payson, Utah
The ramp saga continues on… I’m finally adding the aluminum covers I dimpled months ago and currently in drill/tap hell. The ramps themselves were tested a few weekends ago and plenty strong but not too heavy to lift. I must have math’d good I reckon. 🤠
 

Attachments

  • F9906C74-E7C3-4291-A9A9-97780D672178.jpeg
    F9906C74-E7C3-4291-A9A9-97780D672178.jpeg
    393.6 KB · Views: 39
  • 8C90F4DD-64DF-4CA4-9036-50B898B90E4E.jpeg
    8C90F4DD-64DF-4CA4-9036-50B898B90E4E.jpeg
    278.4 KB · Views: 39

Pike2350

Registered User
Location
Salt Lake City
I have been working on the duplex laundry I asked about in another post. I decided to split the room into 2. I recently had a plumber come and break the concrete and run new hookups to the opposing wall. I have since been finishing it out with wiring and paneling.

Small space, shows the existing laundry;
cTyfIX6MxItLG5HXxnoJqIpd3q4cuXMpTyj23GiQ-9kizXCefnFLVSLE4xqZfjeVUbwJZ2cFzLVaRz0n7iD73scljKVh5kbh8wAIAQz_wWiWKr4R_MnieJob4r0frYEvBFIxjmQQ8nodriVbyKbhKhZVxHGSkbZ6D6y1jfzhjN91h5REGwShIBRxobNBRK2JjIKyEyZbf2MjLdkzD7V6ouraoEH8I-2eYwCeP4pLQ8hQrxqDafFa5FEhCMSt2Mgkq2yZSxL4gtmf2FR4M9RmY_mWPxmh2tV_YMtWvCdSzIjGU2-JIMpJKqtUfy0YunpFyhGbFZyN1ANOLC3HoDDKyFWPpkg2PJXCvgMIvpIWm1YGl4VCB3bvY352294xZatGq1JBpVSdtaXGCiX83W-Vdi6zIFZGqsVnB0fBeFwvKlJZY9o76FKAIcaYsop92vYo7Ha5tXHEqyipYsh5tGwiHH2DXcxegiJWbwcrF_jAwj_pmCJHnmEyTekArCLU3hqp-pyTor9Q__rKqzuF6Tt0wg-4te3mC3jsL-t-yq6KwAXpBIhtcukx2cUIlngXdE-RUe4WF215Brir9rcdZi3c2SFPsAeSV-x4qGjvvZydeDhpeqKcP261j0_i485Xl5Trfqzyrsvjn6US-Qtu9tC4K6dBkEzNSv_jE0Zwvq_heG0u_ZHN0YwUhftwftK1XrEBb8pTB96PKSi-B7Onmqrfmcc=w1565-h881-no


0_It4toaFa0QwhsdvyJzeBePhexb5mc-ZNCGmDP4c52ZGyvEQsIXzG5QVvbuXqM8F-iUT5Jmtq4D9B7CuCsB3dGi3njCdgX7ouwvGlItTA3l5X4_SF7cBXilHI4_VojbMJTW17tTmDLHmAFGPHdP8Nz4qAg5SesUwDMIrnSbNtNPgfECPedqbEnQxWB9nP7zTFq8gwIFKwarMI7SfNQP_xYu7LAp9xTDImFLE3lL9_whriktXq7pZmNvwFarRzxuoNuyPi3l_MZnlkZsfmnfVSCRKot4SFnf77DUOq-Z9Xfq0zWD9gOw8tM9Lsj0A6OBeTIJO7CVKgukDaZ0KqsVFfvpuvYOSW46QYogYjE21AZP-XFUcJLTkO9FvLK-GmNywkAv52D1HnmnaQRWj3y8pNrV9BXtI5Di_bY-FTLxEvy4qUcUnmNPTBl_KjS7pEN2MQGQdikTXjMlPiVB5dBzQYYZc0ZIciUyxfysaOL-y_FgxWN8vDy7aDKNAH9OCV3ucfqNMtYk-2Wqyw0x9xcyyefH4UptQPK0ofl5wkXd7Yu-Eag9qePdPqeh-BMNDlxcoylgK3eBry3jgvST1aPSrLfS39PcgMoQi26m-txNtwrK2vl624LxwX88eCUJpmBYdaJNFYBDPP1HL0JPHRs6M1hFx-rg8ZA-CPyYyJQsc6i8iO-l88PYJdQk3SY-REZ9lRNoS82t_PfTXZrIMgwdP38=w1565-h881-no


XxlTiz90Qo68JQ3ipj_vuqNgYCIpaP1nTGlgv_ZhsDeIT0iEeJ1e0Vmfzn-_oyVHhWweJmupchScXT2xtdsiVIAjvW_2iW7jkK7vieig16hspsGBICwNM9yC_-Hbczn4lrL06Hfi_SI6mg9IkSm6UW0h1o_xxgMbiAwVnYYFbJbT_FkXBiybHhMS-iVI7MHQECo2Va3X0RzDLCuRf_o__s6S593IhzeEYOsT4VsN1Lc10QHxT7zKnvuWAKdZdKHGzh8Ys-D2b-Q4er-YMPLYmzHTAt97v5PNunXRwLawSs5G9n3hpGnSPfm9NDN7VRZ0OEQEtlaRYQ-b9oB7mOpKigyBB-nnd-po2ay5NWXkL3EujCj2LH5PQ85d-zU8SWF30oeP_1vWm1czfHZb5HvToRlJMVrc91uznCHQJszreJu0kU9RymigEBHd0Fcd_uuJYSPYxFWs-w_XqVXfB4OoRvHnEcK75DnLWRPsW0REHwV_pfA-TQz8iwFl6yZuMtc-dqyFn9q_NNDLtcqPeWnSpsKogxLK0kv4rsfMZkebXspRcdbbisA-1GUd8AxTBk-glEdUPT5PhxBlEH-_X_tPkSH1Q9xQ-5EVZDeRPErltrnY4yiIrxlO-RUKyxb1tvHAqNr6fF0sYGA3PRtiiziQtOIWV3bHoSCHS8wIRakvYteFk19mhW9UW0PGlb-VxsQtjcrDfrPKzGF7ySrkNllss5A=w495-h880-no


jxGfZRU_LFFMplVd33WednSBSNNAhZSHbl6e-Oy36QY9GvOZErPIrDuOZ3fUumrFJkVfZxubA959_58z9DwPU--zv8MNITQFLfVv87vvV8Wl4qfwAWg_f-3wL4dvPrAmbEhnvq7rQukhGDq9I9J3LLIgV6zBkXT-6VUfHl1sRwSUiPWVbujM4X2kONLLR2tEA_12bDk-TiPvApkrDdJqC4fBmz1QhBZYbPy8bqaKF7VmUeQ3V3L-7ZSawJN5S-GBabSXCsWGSoW-21siqh8K9uEXqpl3oshnFVGs8-g5t0UTzd2mru_5GBpWRnB0NbeutPLfBMqvamUmvyz549_-aOXY49w92AA7qDfTLRJJM7VlRW1IJ3SxfAmjZHgiEh2dLNCNuSBl6j9Gs2bkq-MWUzLKR0xi3EVRzQVofyclM9qzFtEDwLvt5pSByIrgWP8uNtAx1tODsjzF0ub4s6HW9MPScKwgj__L7oqx4bR2gw1biDcGWGxuSCjZEY-8GUsrJ17nkYhxtwm5V9eahMGX4-46cy7tBjZpHlnF56kKqZWu53vgqdYRxyd-MyY3Rdjk2WgBgQ3kYN0DIQSRgyC2etnn6GaKl_WJgrOY-S94s4HYMS5J3kcc71gnk96ESAW58hHZGJJfuY095yp5oHJnp8Eq5Go3vAOn8k0quY80Uot8mIbShenIP1eeiYoLS7V8s4Rqn_ygTzB6XAQThda25MA=w495-h880-no


Still working on trim and cabinets and some more paneling around the walls...but this gets them up and running.
CvQrv9Eom133apLhQAOiBxkVW6YiIkRH7ObfEttBu6RRiqzFom1etVWhHwkIOXYZUzRoGgk3Z_WQJQGUhz0b0-NWzfdJOIB0KmmOxTtCLtkPbf0RYrKMMFlIXJzqjA38baDd9r5ufW1ysghaVtl82JMx34kHK7fWVHyF8mvwdXZ-T0pSjJhpBw8iCishQCEjHU0W3t_4eUUdHpB5ox_S-R7F1cwMfiriMET_lVkrx7XeciLIprbyfqx_R_r0WK8sDiNyabzdvNnzBPa7U4TeC1kgcvHXlFOjtQcd5P8mSwbRisBe_y6bwpQpj1KugUhFt8DMnl1IUQVIdnlbz8wPErsw_UGrdNuDb9brdjWztxOG10AxUAV-DIZuDG23m14vKrwctp_y8PHsghsa10tx4w4obY50EvepRlQOL_Oltr3R-5vb44m7lopO1_tUGkkaBek503iFOvZFL9p3kjcc543myrmkMYgV8WXJtLCD9RBrdzVaXobopVT2qRAFFk1F0CRAli9OCTxiOX_Hdr4qjsk8h8BwotjJx2irJDG18xJsQxXOjlgcW83NJ5JxzBZhvVlvU3QQZxmc1-IEXoq8E6gVOxyOWpvF1yCl8EO6ii0ZSZsR3EDlAs_PG_p6UzSPR0weX3M3k1Tr-CGof8Mth8ywlYNdst56Q9JLIUz093VoUS8RXCqGk0qqXOBxDA2F-bc_uxEOKCANzmHMBQsp88A=w495-h880-no


TTzynWrhnsBqejvK326geRFtkuwamKJ8GXvytwd3Oqwxcj97cx5YnB07qL6zTNMttulKR8kuPasOfvtIGfQoQfwl7tptT9ch-vJreG_fC5PC6T394WU7-Is3aSBR9whDG1wlFM1LvPHPEuC_kqaL81WwA9x2lQCp7Ph7QpTHkqUKUhaKa4TtpgmZc7YqAzOJS5oAaNjmhtXrBoyESLnDOG77yafePqaK6U8mCRLOZAMfxQCKN576-n8JQcMOHkpEFRyYDvseoZjA2YKCtA6F_sDRjoQ4UsN2eXf_KoUNbtUFU9k9ihg7WG7ml9Z2Dj-QjFVOXYtBej7MIgfFTjIYVZTNGOSfxVdwAYW1DmuZQj89iTjIib-adK-pLvdXZCzqAbKbTunXzW3ae9nE8TBLJX_kT-vtila-29fS80cYs85YXZ4H1Ylazz7b0Xdf8dxiUK17Ts3O4kAXEm58yA4Uvt_OptXB3pciDbDdXX95Q0z1-qYmopmAZCpOCg_TTpuJQdLzTbMEWagPov11LMQbO7K-BavkJ0sM2wgSDxRAe_9HW3f0EORE12MtH2L4NaROQtXVs4L7g75W4DtJTo8rIqRvJcz5vtLDZzDyn_G0qwvWG-fpBV493nRPpbfXb0eiQALnJjuFOdvF-dDBvl9u2hmGEh414hlkP-iLeFHA91mBfVYndhOPvZywaIU7ph8RTEQZATBbbaZ-uHr7mDJq_Lw=w495-h880-no
 

zmotorsports

Hardcore Gearhead
Vendor
Location
West Haven, UT
Saturday our neighbor was having an open house as they are moving to Montana. I'm sure going to miss these particular neighbors as they have been great. Quiet and aren't a bother to anyone and their kids are fantastic. They are teaching their kids right as they are polite and respectful. Too bad the ones immediately to our west aren't the ones moving. Oh well, I didn't want to make a bunch of noise until after their open house was done so I detailed the wife's Acura after having a new windshield put in it on Friday and noticing it needed a good interior cleaning.

Once that was completed I moved on to working on the cart for my tube roller that I started a couple of weeks ago.

I started off my measuring and making some feet for the handle end. I sure like the way this Baileigh BS210 saw cuts. It is so easy to get thin precise cuts when needed.
cart1.JPG


cart2.JPG

I dug through my spare parts and found some nice rubber feet so I compensated for them in the height of the feet.
cart3.JPG


After welding some caps on the feet I drilled and tapped the ends to 10-32 threads.
cart4.JPG


Feet completed and ready to weld onto the frame.
cart5.JPG


Getting things leveled up in preparation to weld the vertical support tube in place.
cart6.JPG

Blended a few welds on the underside of the upper support framework in preparation to accept the vertical post.
cart7.JPG


Verifying my fabrication table is level before moving on to the vertical post.
cart8.jpg

Vertical post being welded to the upper framework that the roller will bolt to.
cart9.jpg

Vertical post dead nuts level after welding.
cart10.JPG

More pics to follow.
 
Last edited:
Top