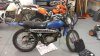
I bought the '77 Suzuki TS 185 from BrianP recently that he had listed, and I thought I'd post up some of my plans for it.
I've wanted a vintage enduro project for awhile, and this seems to really fit the bill!
I did a little research before I bought it, because I've heard that the old 2T oil injection bikes are prone to have problems w/ the oil injection. It turns out that the Suzuki TS series is one of the more reliable oil injection systems, as it injects the oil directly into the engine block where it's needed. As long as it's kept clean and full, it should last a long time.
I want to make it into a "brat" style rat rod bike to cruise to work on. I'm doing holsters full time now, so I pretty much drive about 3 miles to work and back every day, so this will be a little more economical than firing up the powerstroke every morning.
Starting with:
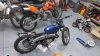
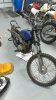
'77 TS 185 enduro (the more off-road friendly version)
Runs great, starts up first or second kick every time so far
signals have been removed but all of the wiring, switches, and the battery tray is still intact.
No headlight
awesome vintage number plate
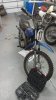
leaks oil at the sprocket seal
threaded cap that holds the speedo cable in place at the front wheel just broke

and my plans:
lower front 2" or as much as the forks will allow
lower rear 2" by lowering the spring mounting point 1 inch and adjusting the spring the other inch
remove the fenders
trim the rear subframe and bend new tubes to a point, weld together
trim the seat lower and shorter, just big enough for me and my wife to fit.
paint tank black
fix speedo cable
fix oil leak
clean out gas tank, oil res
K&N style cone filter
front headlight mounted low-ish on forks
much lower MX handlebars
minimal rear fender
minimal front fender, hard mounted right above tire (it already has the mounting holes on the forks)
signals, street legal stuff. I'm not sure whether to go easy w/ the tusk kit that I have, or wire it all up to a 6v lead battery like it was stock.
not sure on:
fenders -black or chrome? I can probably find some chrome ones pretty easy and I definitely want to keep the chrome exhaust cover because I think it looks rad.
rims, drums, spokes -black or chrome? front forks will stay chrome.
keep new knobby tires or go with trials-ish less-knobby tires.
use existing wiring for all signals, or only for headlight and use tusk kit for the rest, which would require plugging in the battery every now and then.
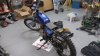
Here is a quick mock-up that I did in paint (don't know how to use photoshop) don't make fun of my crude chop") It won't be a show bike by any means, or a bike that I'll want to take out much further than to work or a close-by date night, but I think it will look be pretty cool and fun for what it is.
It won't be a show bike by any means, or a bike that I'll want to take out much further than to work or a close-by date night, but I think it will look be pretty cool and fun for what it is.

It should be fun! I'm figuring that with all of the random stuff I already have that I can use, I'll be into the project about $300 total (including purchase price) when I'm done. (not including registration, etc.) That makes me happy.
I've never modded a motorcycle before, so any suggestions are appreciated!
I've wanted a vintage enduro project for awhile, and this seems to really fit the bill!
I did a little research before I bought it, because I've heard that the old 2T oil injection bikes are prone to have problems w/ the oil injection. It turns out that the Suzuki TS series is one of the more reliable oil injection systems, as it injects the oil directly into the engine block where it's needed. As long as it's kept clean and full, it should last a long time.
I want to make it into a "brat" style rat rod bike to cruise to work on. I'm doing holsters full time now, so I pretty much drive about 3 miles to work and back every day, so this will be a little more economical than firing up the powerstroke every morning.
Starting with:
'77 TS 185 enduro (the more off-road friendly version)
Runs great, starts up first or second kick every time so far
signals have been removed but all of the wiring, switches, and the battery tray is still intact.
No headlight
awesome vintage number plate
leaks oil at the sprocket seal
threaded cap that holds the speedo cable in place at the front wheel just broke
and my plans:
lower front 2" or as much as the forks will allow
lower rear 2" by lowering the spring mounting point 1 inch and adjusting the spring the other inch
remove the fenders
trim the rear subframe and bend new tubes to a point, weld together
trim the seat lower and shorter, just big enough for me and my wife to fit.
paint tank black
fix speedo cable
fix oil leak
clean out gas tank, oil res
K&N style cone filter
front headlight mounted low-ish on forks
much lower MX handlebars
minimal rear fender
minimal front fender, hard mounted right above tire (it already has the mounting holes on the forks)
signals, street legal stuff. I'm not sure whether to go easy w/ the tusk kit that I have, or wire it all up to a 6v lead battery like it was stock.
not sure on:
fenders -black or chrome? I can probably find some chrome ones pretty easy and I definitely want to keep the chrome exhaust cover because I think it looks rad.
rims, drums, spokes -black or chrome? front forks will stay chrome.
keep new knobby tires or go with trials-ish less-knobby tires.
use existing wiring for all signals, or only for headlight and use tusk kit for the rest, which would require plugging in the battery every now and then.
Here is a quick mock-up that I did in paint (don't know how to use photoshop) don't make fun of my crude chop
It won't be a show bike by any means, or a bike that I'll want to take out much further than to work or a close-by date night, but I think it will look be pretty cool and fun for what it is. It should be fun! I'm figuring that with all of the random stuff I already have that I can use, I'll be into the project about $300 total (including purchase price) when I'm done. (not including registration, etc.) That makes me happy.
I've never modded a motorcycle before, so any suggestions are appreciated!
Last edited: