Project Hundy Build Thread - 2000 UZJ100 Land Cruiser

Tacoma

Et incurventur ante non
Location
far enough away
First of all, there is no such thing as an overkill solution when it comes to stuffing relays into the engine bay: anything necessary and prudent to effect a working solution is by nature, allowed and proper.

Second, that Piranha kit is saaa-----WEET. Ben showed me that and another thing they make when we came back from KOH and I thought it was the bee's knees. Not bad.

The entire thread is approved. Carry on.
 

cruiseroutfit

Cruizah!
Moderator
Vendor
Location
Sandy, Ut
...The entire thread is approved. Carry on.

Pheeeewww. Glad we got that out of the way, was worried it wouldn't meet your quality control :D


Fwiw there are quite a few different harness kits on the market for Cruisers including the IPF and Slee units we stock for the E-1997 models, however this is the first 100 Series specific plug setup I'm familiar with so it is the bee's knees. :D
 

Tacoma

Et incurventur ante non
Location
far enough away
I do what I can to help ensure that the Cruiser Outfitters brand is solid.


I have to add again how much I like the Death Star. Excellent trip vehicle.
 

cruiseroutfit

Cruizah!
Moderator
Vendor
Location
Sandy, Ut
I do what I can to help ensure that the Cruiser Outfitters brand is solid.

You always have.


I have to add again how much I like the Death Star. Excellent trip vehicle.

Thank you, I'm growing quite fond of it. My list of needs is dramatically dwindling... maintenance for the next bit. I did a rush passenger lower ball joint and upper ball joint boot this afternoon (thanks Olly for staying later than planned). I need to do the same R&R on the drivers side when time allows. I've got a set of aftermarket poly steering rack mount bushings and I need to do sway bar bushings on the frame side front and all rears too. From there? Supercharger? Locker? Header/exhaust?
 

Tacoma

Et incurventur ante non
Location
far enough away
I vote supercharger, but that's my car-guy emotional response. It could use "more" power, but it moves along just fine. It's not a race car. So maybe a locker would be more functional if you've got to pick. Header/exhaust never hurts, and paves the way for the supercharger later.

A coin toss would probably be as effective a decision tool as any I guess, along with a cursory look at the bank account haha
 

sawtooth4x4

Totally Awesome
Rear ARB?

What do you think of the ATRACs? I'm curious as to how it works in poor traction situations.

I'd love to compare it to my Range Rover's traction control someday. I do think the advantage would be your center diff lock though compared with my Rangies torsion center diff. The range rover's system likes to see wheel spin, but i'd have to say it has always been very effect for me.
 

cruiseroutfit

Cruizah!
Moderator
Vendor
Location
Sandy, Ut

Definitely an option and a high probability. Option #2 would be sourcing a 1998/1999 axle with the factory rear e-locker. Plus side is I could clean up the housing, do new bearings, etc and then just swap the complete assemblies with minimal downtime. Down side is the cost is more than the ARB and there are some electrical/brake issues to work out. I have the ARB compressor and 100% faith in the ARB so I'll likely end up that way.

What do you think of the ATRACs? I'm curious as to how it works in poor traction situations.

It works well, it is not to be confused with a locker but it absolutely gets one further down the trail with minimal driver input.

I'd love to compare it to my Range Rover's traction control someday. I do think the advantage would be your center diff lock though compared with my Rangies torsion center diff. The range rover's system likes to see wheel spin, but i'd have to say it has always been very effect for me.

I'm not sure how they would compare? The Land Cruiser does come standard with the center diff-lock button on the dash. The weight of the 100 generally means all 4 tires are on the ground giving any traction control system a helping hand. Obviously lockers would be better but for some users it's apples and oranges.
 

cruiseroutfit

Cruizah!
Moderator
Vendor
Location
Sandy, Ut
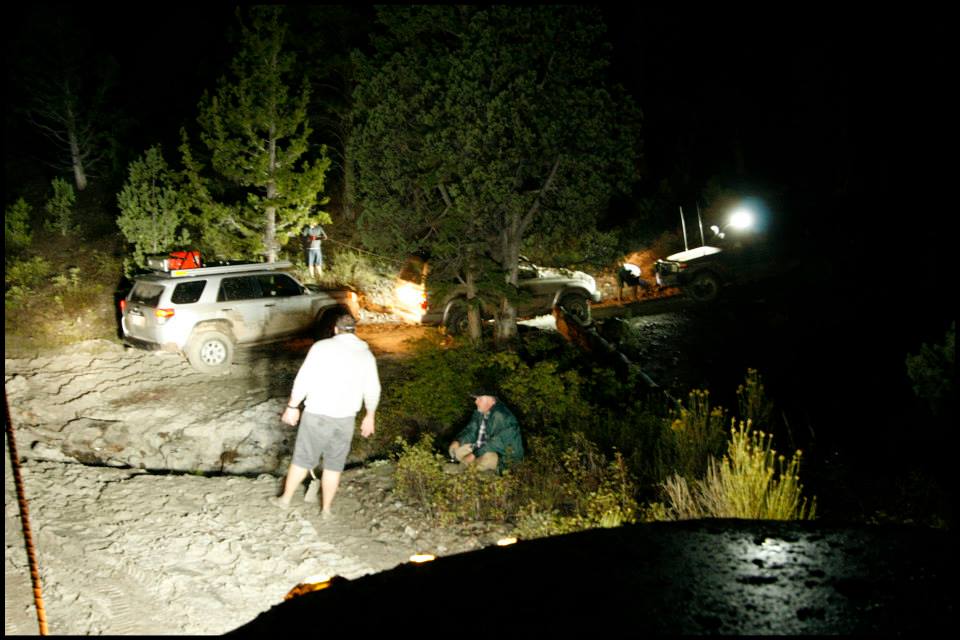
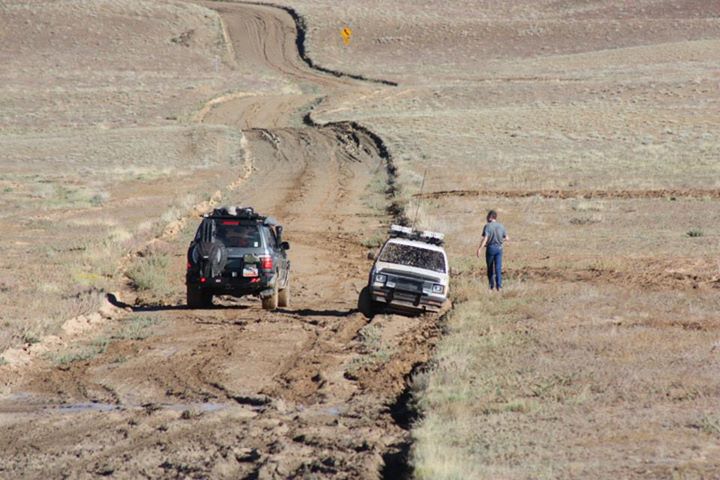
The new LED light bar proved to be a great addition though it wasn't quite apparent initially. I fired the light a couple of times on the lonely highway as my buddy Ryan and I bombed south towards St. George where we were launching for an off-road adventure. The light was extremely visible but lacked any real 'reach', which makes sense as I opted for the flood pattern rather than the spots. All was well, the upgraded headlights kept things illuminated and the aux IPF lights on the bumper were there just in case. Fast forward a few days and a particularly soggy and washed out section of trail above Panguitch in southern Utah. Our group of 6 vehicles found ourselves winching, road building, using the Maxtrax and digging, progress slowed drastically as we literally had to coerce each truck through washouts and muddy ravines. Enter the LED light bar, it proved invaluable as a work light for winching and recovery operations as well as a fantastic 'trail light' as we led the group off the mountain. Couldn't be happier with its performance.

winchfest_tolman.jpg

One of many recovery situations, Adam's Tacoma and the 100 lighting up the night
(Photo by Adam Tolman)

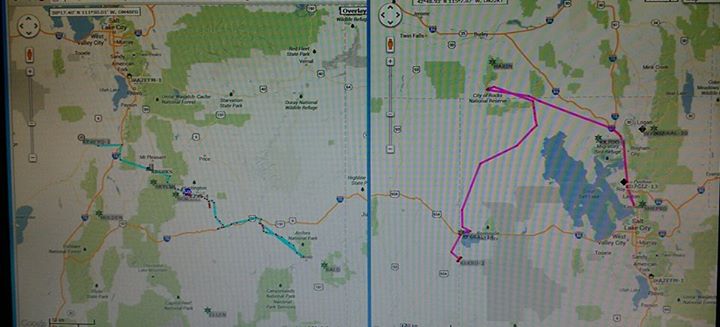
While on the trip, Ryan and I had some on-going discussions about the many merits of HAM, one of which was the APRS tracking. I've used the APRS for several years now but my setup has been a standalone system that literally just plugs into a 12V outlet and does it's thing. Family and friends back home can watch our progress (on sites like aprs.fi) and I can check it late to recount our route and pace. Turns out there was a far easier solution and of course Ryan would know about it. Green Light Labs makes a module (Part# GPS-710) for my Kenwood 710 Series 2M. It allows my unit to act as the APRS radio while still allowing me full access to communications. Even one better, the Kenwood 710 allows me to real-time track other APRS users, send text messages or get real-time weather readouts from weather stations operating in the area. I was sold... while we bounced down the trail I ordered up the GPS-710 module and crossed my fingers it would show up before I rolled out for the Moab to CruiserFest trip in just a few days. I placed the order on Thursday and it must have arrived Saturday as I was greeted by the box when I returned home Sunday. The install took literally 5 minutes and after adjusting a few radio settings, it was working. Tuesday night I rolled out for the CruiserFest trip with the APRS sending out beacons as planned. Ryan's group was meeting at City of Rocks, Idaho the following day, as planned I was able to see Ryan's real-time location and track him as we converged on our planned Simpson Springs meeting location. Totally nerdy? You bet. Practical application for remote travel? Absolutely!

aprs_cruiserfest.jpg

Moab to CruiserFest convoy on Left, City of Rocks to CruiserFest convoy on right - Converging.
(Photo by Jason Goates)
 
Last edited:

cruiseroutfit

Cruizah!
Moderator
Vendor
Location
Sandy, Ut
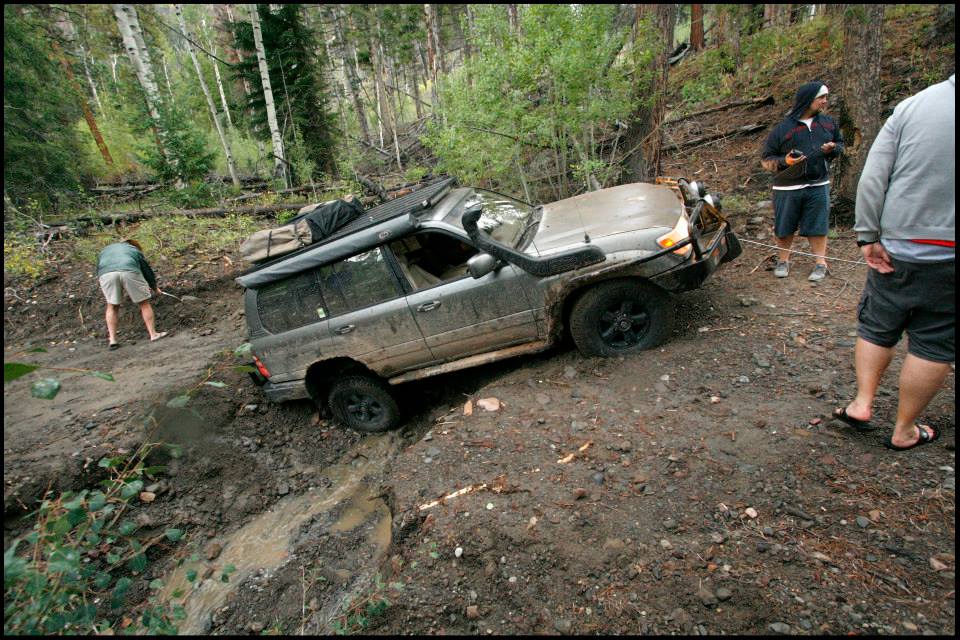
I suppose an update on the winch is in order too. As I mentioned in the original build planning, I opted to try the Warn VR10000 unit, reviews were great and quality looked to be on-par with Warn's reputation. The past few weeks have offered me a handful of opportunities (not sure if that is the right word :D) to use the winch. I was part of a group called the UCEIII, our goal was simply to drive from Utah's lowest elevation to Utah's highest elevation, nearly entirely on dirt. It just so happened Utah, particularly the southern half of the state was getting pounded with rain storms, washing away trails and roads throughout the region. We were in for some fun. Sure enough we found fun at around every corner, particularly that stretch above Panguitch in which we were attempting to get to Powell Point outside of Bryce National Park for the evenings camp. Not too far in we encountered our first washed out ravine, a ~6' deep section of road was washed ~3' deep. We did what we could in the rocky ground with shovels I opted to give it a go. Things went well for about 5 feet, time for the winch. We stretched out the line and attached it to a large tree up the road via a tree strap. A few quick tugs and my rear end was no longer hung up and out and we were on our merry way. The behemoth that is a 100 Series pushed and drug enough dirt to allow those behind me a near 'paved' experience :D The adventure didn't end there, we encountered numerous mud holes or washed out sections, if we were not winching we were digging and using the MaxTrax.

adam_t_1.jpg

Road paver and the winch
(Photo by Adam Tolman)

Fast forward to last weekend and I was en route from Moab to CruiserFest primarily on dirt with a group of 12 from across North America. We were not on the trail for more than an hour before we stumbled across a German tourist super stuck in a particularly wet section of the Blue Hills Road north of Moab. He was axle/fender depth mired and the road offered little in the way of traction for a snatch strap. Out came the winch. We were able to get ~100' away from him on a better section of road, we winched him every bit of that 100' and a bit more in order to get
him free of the mud's intense suction. Two thumbs up for the VR10000.

mitch_m_1.jpg

Robert, the stuck German Tourist as we get set up for winching
(Photo by Mitch Massey)
 
Last edited:

cruiseroutfit

Cruizah!
Moderator
Vendor
Location
Sandy, Ut
Let there be more light!

I've been absolutely thrilled with my IronMoose LED light bar but it is strictly a flood. While it offers fantastic light on slower trail conditions and as a flood at camp or during recovery... it didn't help my need for something out on the horizon. I have IPF lights on the front bumper and they had served me well, they are actually a combo set consisting of one flood and one spot. While the housings look near identical the lens and reflectors are different thus producing different light. With a single set of aux. lights in play, they were a great solution but as after adding the light bar on the rack, they lower flood became near obsolete and was literally drowned out by LED bar. The decision wasn't easy as the new ARB LED offerings are not tilted to the low end of the price scale however the technology is solid (built by Rigid) and I by far prefer the round light and easy fitment on my ARB winchbar. The ARB LED's are available in both a flood and spot configuration, as my flood needs are covered I opted for the spots. As I already had a high capacity light harness installed (OE IPF setup) I opted not to use the ARB LED specific harness rather I swapped connectors as my IPF's harness used a connector similar to a weatherpack and the LED's use a Deutsch connector. Beyond that it was a matter of swapping the lights themselves and plugging them in. Let me just say the initial testing is impressive. I still need to figure out a way to take some good night shots with the limited camera equipment/skills I have. I think they look right at home:

ARB_LED (Small).jpg
 

cruiseroutfit

Cruizah!
Moderator
Vendor
Location
Sandy, Ut
How many lumens? They look like they'll be seriously bright.

SPECIFICATIONS:

• High pressure cast A360 aluminium body.
• Unbreakable polycarbonate lens.
• UV stable moulded polycarbonate lens cover.
• Multiple position stainless steel mount.
• Durable UV Stable polyester powdercoat
• Goretex breather.
• IP68 Certified.
• Deutsch DT-06 waterproof connectors.
• MIL810-STDG vibration certified
• RoHS compliant.
• 10-36 V DC input.
• 90 Watts.
• Amp draw 6.25A @ 14.4V.
• 32 LEDs.
8200 raw Lumens
• Color temperature: 6500 Kelvin
• Lux @ 10m (33Ft) – 2250 (spot) 770 (flood).
• 20° full width flood.
• 10° full width spot.
• Over/under voltage protection.
• 50,000+ Hour LED life span.
• Zero UV emissions .
• Operating temp: -40°C to +63°C
-40°F to +145°F
• Protected against RFI/EMC interference.
• Integrated thermal management.
• Weight 3.1Kg / 6.8Lb complete
 

cruiseroutfit

Cruizah!
Moderator
Vendor
Location
Sandy, Ut
Update time!

The 100 has been serving me most splendidly, I've had it out on a dozen or so trips since my last update and each time I grow fonder of its cross-section of abilities and comforts. To further emphasize my absolute pleasure, I finally committed to selling my beloved Tacoma and it now resides with a new owner, more on that here. With nearly 180k on the clock and little service history beyond the minimal service records I could find in the glovebox, it was time for the 90k service including timing belt, water pump, thermostat, etc. I'm fortunate to have Toyota mastertech and 100 guru Will C. in my neck of the woods and was able to recruit him to rock-out the upkeep. He's done a grip of these services and makes quick work of the project. Thanks again Will :cool: During that same time, I did some minor maintenance on the front end, lower ball-joints, upper ball-joint boots and sway-bar bushings & front links as mine were hammered.

100_aux_tank_1.JPG

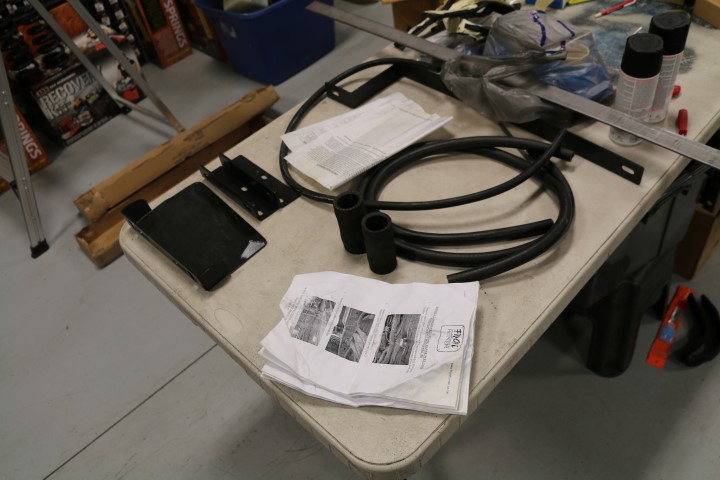
Laying out the parts pre-install

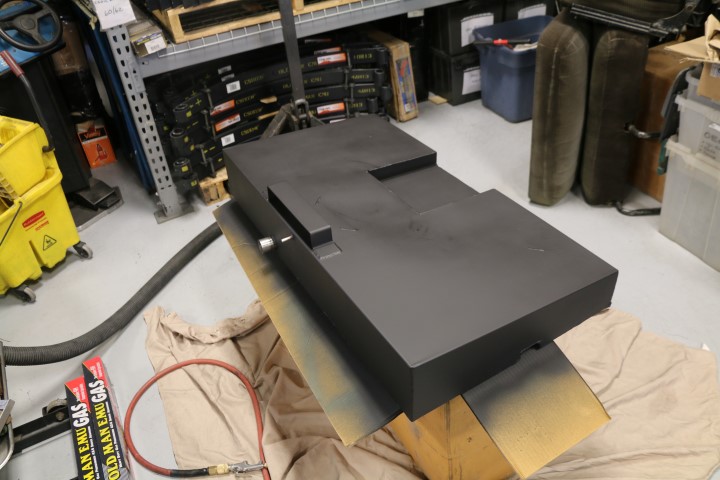
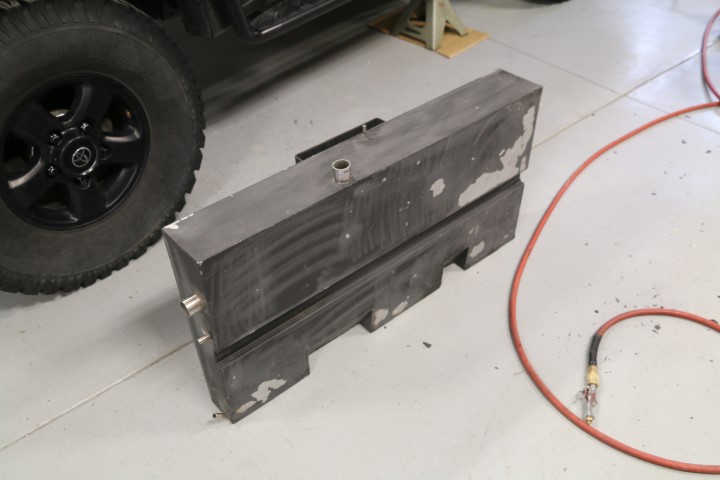
With that behind me I had a few other modifications in queue including the installing the Front Runner fuel tank I had picked up from one of the employees at Proffits Cruisers. Jeremiah had mentioned to me that Bob won a 100 aux. tank at the Cruise Moab raffle and after a few calls I figured out that it was the 62L Front Runner gravity feed tank that was originally donated to the raffle several years earlier by Paul May of Equipt Expedition Outfitters. Paul was confident in the tank as a practical and reliable solution so Bob and I were able to work out a deal and get it out to Utah. There it sat on the shelf in the shop for nearly 9 months as other more pressing projects took priority, all until this weekend. I had a Saturday morning to spare and I was able to convince Olly (my shop tech) and Jake (one of my past employees) to come spend some quality time in the shop, they took the bait. Olly and I had previously reviewed the instructions and anticipated the project taking just a few hours. We were very wrong. Between a couple of missing parts and some shall we say 'lacking' instructions, it took the better part of the day on Saturday and a few hours this morning to finish it up. In the end the extra day worked out as I was able to get some good paint coverage on the parts. The stainless steel tank's original paint was flaking bad and the more I roughed it up with scotch-brite, the worse it became to the point 1/4 or more of the paint was gone. Between the scotch-brite, fine-grit sand paper and compressed air, I as able to get the failed paint off and start priming the bare areas with a self-etching primer. I applied a couple coats of primer and then 2-3 good coats of flat black paint. I'm less than optimistic that the paint won't blow back off with the pressure washer but at least I started with a fully painted tank and access is reasonable if I need to touch it up on occasion.
100_aux_tank_2.JPG

Prepping the tank for re-paint

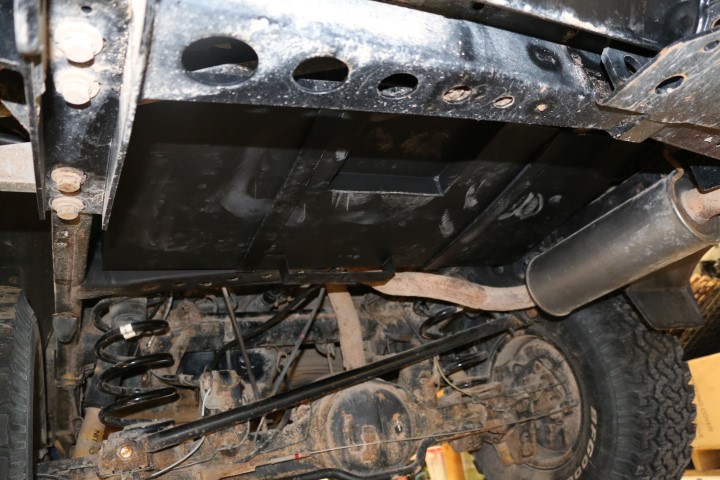
The tank mounts in place of the factory spare tire carrier and includes provisions for lowering the stock tire carrier in the event you choose to run it. I've got my spare tire on the bumper and had taken off the factory tire winch and cross-member during the original build. So while I could have utilized a much larger tank, I weighed all the options in my mind and really 62L (16 gallons) is going to work out well for my needs. Additionally, I won't be too much weight to the already heavy rear end or losing any ground clearance. A full aux tank and the additionally weight of the tank itself is roughly 150 lbs, well within the load capacity of my current springs given I'm now going to carry two less 20L Scepter fuel cans. If I find myself wanting for more fuel in the future, Long Range has a 160L auxiliary tank.

100_aux_tank_6.JPG

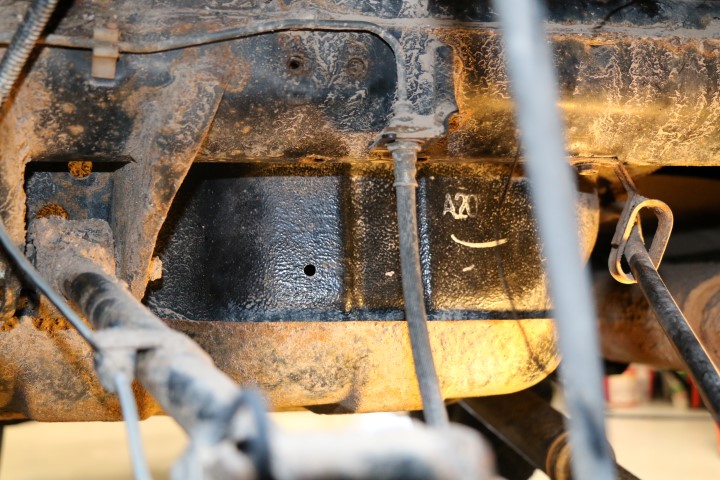
8.5mm hole in the factory main tank

100_aux_tank_7.JPG

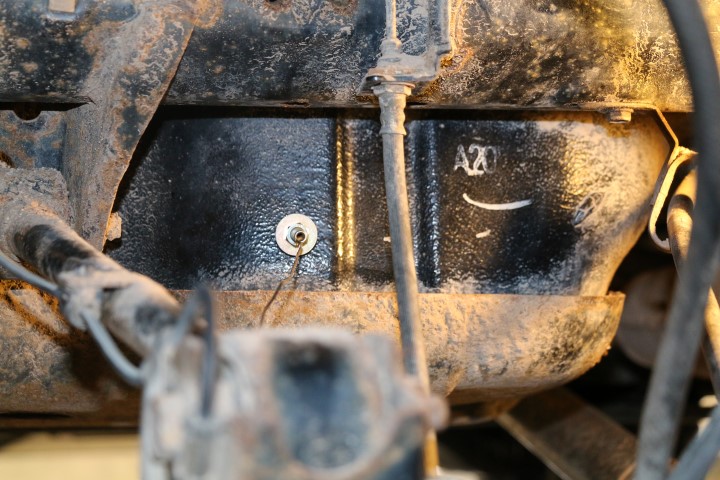
Balance fitting in place

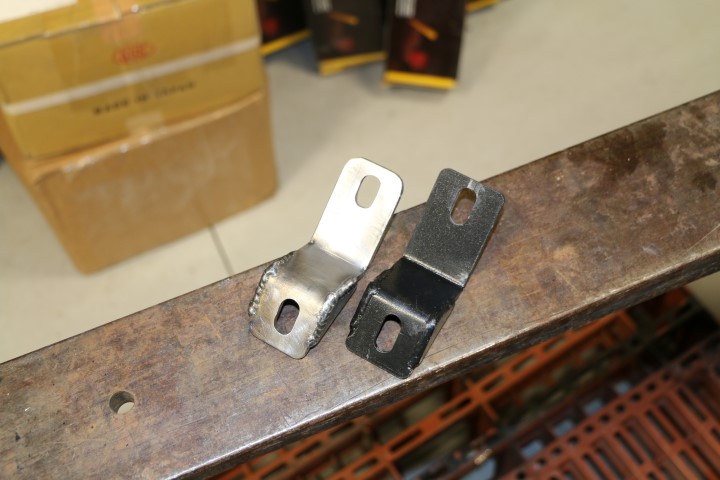
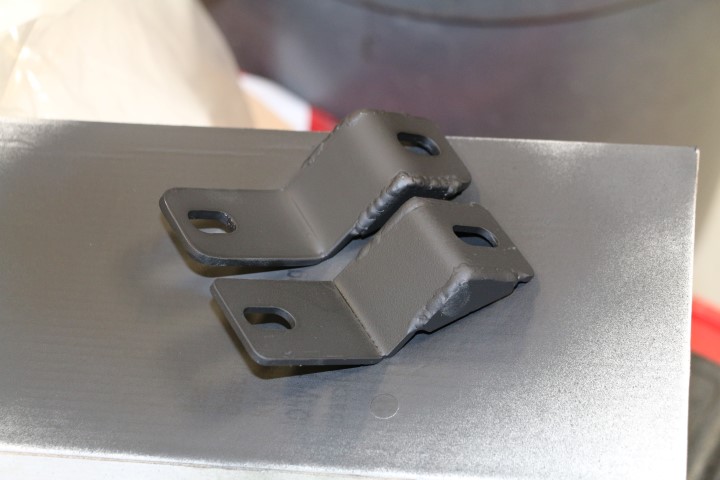
Mounting the tank was straightforward but required we clean out and re-tap 4 holes in the bottom of the body, one of which is directly above a frame cross-member leaving very little room to access the hole. The part of the project that took the most time was plumbing, more specifically adding a balance line into the lower portion of the stock tank. Front Runner includes a specialized fitting made for this application and the instructions state that it must be inserted from the inside of the tank and secured on the outside with a nut. However the inlet of the factory tank as a spring loaded 'flapper' 6-8" down the tube so even trying to fish it through with a wire proved impossible. Perhaps the non-US diesel tanks don't have the flapper and thus the lack of detail in the instructions? We ended up pulling the entire inlet/vent assembly from the tank by removing 6-7 8mm bolts and carefully separating the gasket. With that removed we had better access and could fish some bailing wire and glide the fitting it place. In hindsight, I'd likely drop the entire tank which would provide easier and safer access. We cut the factory fuel neck as directed by the instructions even adding a 1" or more of 'cushion' room as a second cut is always easier then too short. However when we went to test fit the filler system, the provided hoses were not going to work as they were shorter than the instructions part list specified which was already 1/2" shorter than we wanted ideally. It simply wasn't going to work. Fortunately NAPA had a 12" section of fuel fill hose in stock and we were back on track, thanks for making a quick parts run Jake! Somewhere along the transport, one of the mounting brackets for the tank came up missing. Its design wasn't anything difficult to duplicate but it took some time to recreate the bracket using our sheet metal brake and weld gussets into place for a near identical mount. With that behind us we went back to watching paint dry, literally. :D

100_aux_tank_3.JPG

Reproducing the the tank bracket

100_aux_tank_4.JPG

Painted to match

This morning we were ready to rock and roll and in just a couple of hours we had the tank mounted, finalized the plumbing and were cleaning up tools. Thanks again for spending a couple of your days off helping Olly :cool:

100_aux_tank_5.JPG

Tank paint completed

I drove the Cruiser out of the shop and off to the first big fill, adding ~32 gallons before the machine clicked off at $100. :D I considered adding a few more to fully top off the tank but figured if there was a leak or and issue with the system, I'd rather have as little as possible to remove. I ran a few errands with it this afternoon and at each stop inspected the connections for any signs of leaking, so far it is bone dry. I'll go ahead and top off the tank tomorrow and again continue checking for any system leaks.

I am a bit worried about the proximity of the tank to the exhaust pipe, if nothing else the paint will fail and the cushion material between the tank strap and the tank might get baked? I'll likely fab up a little heat shield to help protect the tank. I'm headed out on a long road trip with a fair amount of bombing down dirt roads, it will be a great time to see just how hot the tank gets near the exhaust.

100_aux_tank_8.JPG


The biggest con, the total cost at the fuel pump :D
 

cruiseroutfit

Cruizah!
Moderator
Vendor
Location
Sandy, Ut
The tank proved very useful this past weekend en route to KOH and to and from the pits. Whereas my comfortable mixed on/off-road range (without cans) was approx. 200-250 miles, I'm now at 350-400, perhaps as much as 500+ on the highway figuring 12-13 mpg. The real world improvement is less stops, whereas the 1500 mile round-trip would have needed 6-7 fuel stops, he had just 4. Time saved is time earned. :D
 

cruiseroutfit

Cruizah!
Moderator
Vendor
Location
Sandy, Ut
As crazy as this sounds, the aux. fuel tank is proving to be one of my favorite mods thus far. Obviously it doesn't make driving X miles any cheaper, I mean one can argue they fill-up a little cheaper and less often, what it does do is save time and time does equal money. I ran down the the Swell a few weekends ago, filled up in Green River, ran home camping through the Swell and still had a full tank when I got to the bottom of Spanish Fork Canyon :D

Now, back to mods for the hundy. During our quick Swell trip, I pulled a total rookie move landed on a control arm. I was making a 3-pt turn and rolled a rear tire up on top of a rock, wasn't centered up on it perfectly and I slid down, landing on my control arm with a heavily laden 100. All 4 tires were firmly on the ground but it was just enough anchor to require a quick tug. Low and behold I bent the control arm so it was time for an upgrade. It just so happens Old Man Emu released control arms for the back of the 80/100 Series recently and I had a set sitting on the shelf :D

Swap was super easy, 4 bolts. It literally took more time to pull it in the shop than it did to swap them.

The 'incident':

1798449_10151921069822097_1194880664_n.jpg

The aftermath:

IMG_5386 (Small).JPG

Stock on top, bent in the middle and the new HD model on the bottom. While the HD unit is actually a slightly smaller diameter, it's solid HD metal and uses poly bushings and a sleeve versus the stock rubber bonded style.

The finished product:

IMG_5387 (Small).JPG
 

cruiseroutfit

Cruizah!
Moderator
Vendor
Location
Sandy, Ut
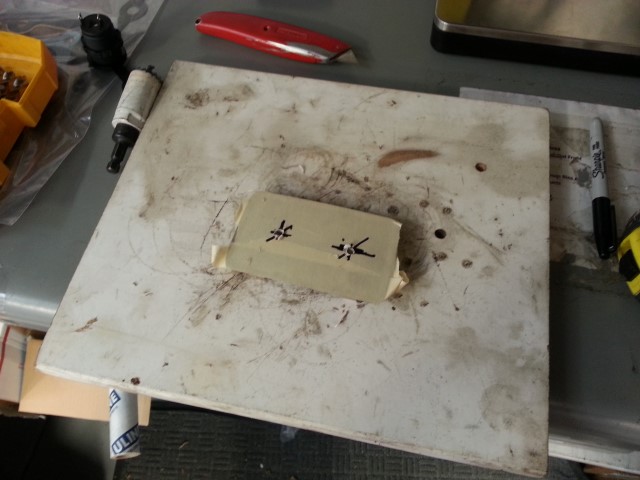
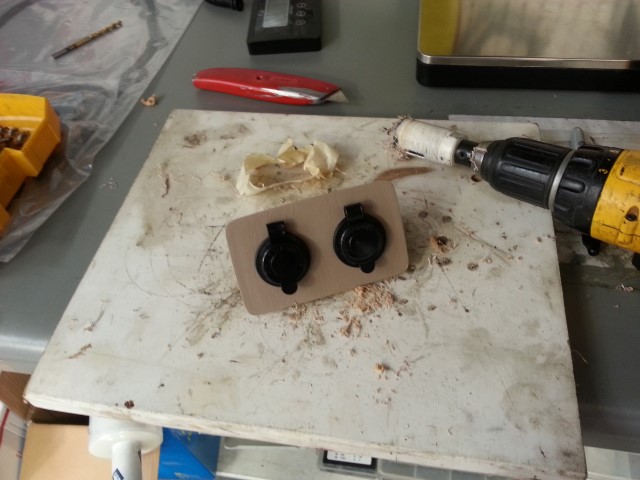
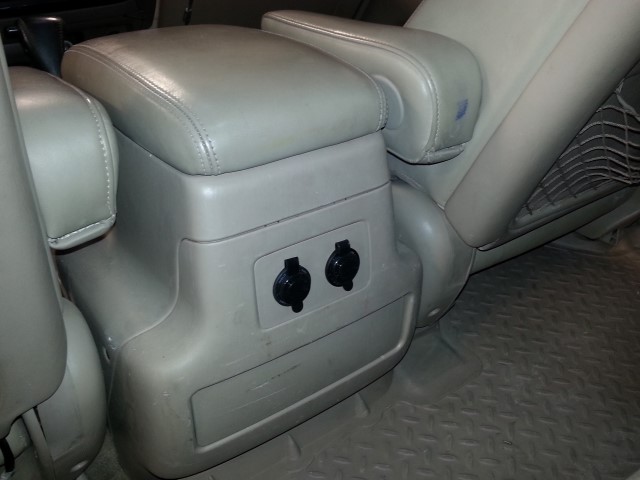
It has been a bit since I've done much with the 100 beyond use and enjoy it. It was my go-to daily driver until the Project LXXIV was in the picture. Since then my wife has somewhat absconded it for mountain bike transportation duty. I had some free time this afternoon to do some maintenance thinking it was due for an oil change. I peaked at the maintenance log and low and behold I had done an oil change more recently than I had thought, yeah. But, I did find a Blue Sea dual USB outlet in the glove box. The outlet has been bouncing around the glove box since the initial build in 2012, it was one item that just didn't get finished for whatever reason. The plan was to mount it in the rear of the center console, allowing additional USB outlets for the front occupants and super convenient outlets for passengers in the rear. Far from a major project but it felt good to do something on the old steed :D

aux_1%20%28Small%29.jpg

Marking the holes in the plastic panel found in the rear of the center console.

aux_2%20%28Small%29.jpg

Dual USB and 12V outlets mounted in panel

aux_3%20%28Small%29.jpg

Finished and ready to use

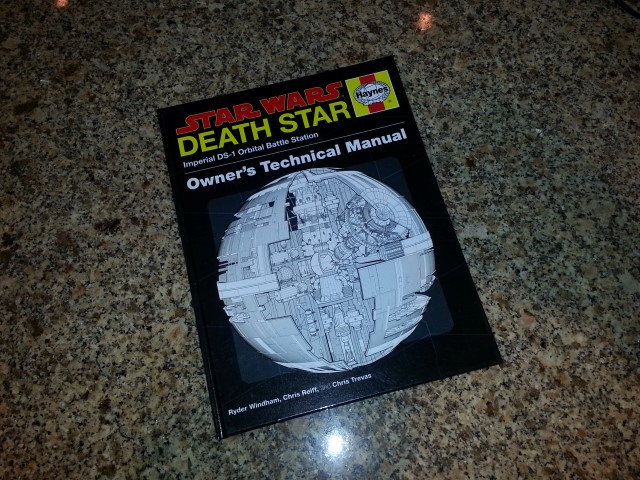
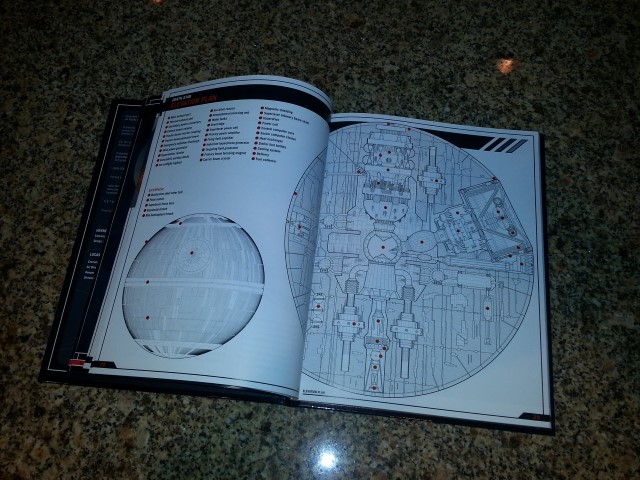
Oh, I did score a manual for the truck recently. My pal RyRy picked it up for me figuring I could use all the help I could find for the complicated systems of the 100 Series. I'm not sure where my weapons controls are just yet but I'm studying the manual diligently. :D

aux_4%20%28Small%29.jpg


aux_5%20%28Small%29.jpg
 
Top