You are using an out of date browser. It may not display this or other websites correctly.
You should upgrade or use an alternative browser.
You should upgrade or use an alternative browser.
Krazy Ks new build.
- Thread starter kmboren
- Start date
- Location
- Grantsville, Utah
With locker are you running in the sterling?
kmboren
Recovering XJ owner anonymous
- Location
- Southern Utah
Yukon Zip locker. Had an arb in it a few years ago bit it didn't like the sterling 10.5. Yukon zip has been problem free.With locker are you running in the sterling?
kmboren
Recovering XJ owner anonymous
- Location
- Southern Utah
Also I forgot to mention that one of our old CNC 7/8 cutter failed. Being that the company has been out of business for several years and rebuild kits are not easy to find we installed some 3/4 push/pull cutter from empi. We also upgraded out stock factory duty brake pads ro some EBC Yellow pads with freshly turned brake rotors.
With all the changes I dare say that the buggy works better now than it did new.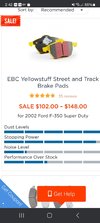
With all the changes I dare say that the buggy works better now than it did new.

- Location
- The Land Northward (Bountiful), Utah
Let's just talk about overdriving the front 5%.
So does it keep the front from lifting off walls when climbing or ?
So does it keep the front from lifting off walls when climbing or ?
kmboren
Recovering XJ owner anonymous
- Location
- Southern Utah
Here is a basic explanation.
Overdriving the front helps the vehicle maintain direction on difficult climbs where traction is low. It does this in two ways:
Overdrive is another way to address the understeer issue. By keeping the suspension slightly loaded and keeping more of the traction authority up-front with that higher wheel speed, your crawler will more consistently and reliably reach the line you’re trying to drive.
Overdriving the front helps the vehicle maintain direction on difficult climbs where traction is low. It does this in two ways:
- It lets the front pull the rear onto and through problems.
- It also maintains a low loading effect on the suspension by way of that front/rear wheel speed difference. This is thought to aid traction on rock problems, though it would be undesirable on flat, high traction surfaces.
Overdrive is another way to address the understeer issue. By keeping the suspension slightly loaded and keeping more of the traction authority up-front with that higher wheel speed, your crawler will more consistently and reliably reach the line you’re trying to drive.
The biggest gain I’ve seen from it since Ryan did it in his first moon buggy was when you’re climbing a big ledge with the front tires the car doesn’t “push” as much since the front is spinning just a little faster. The front just pops right up. It’s especially noticeable when you’re turned and right next to a cone. It’s pretty awesome. I’m pretty sure his was more like 10% though and mine will be right around there too.
kmboren
Recovering XJ owner anonymous
- Location
- Southern Utah
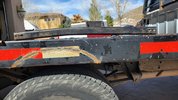
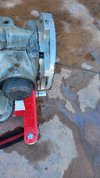
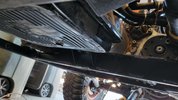
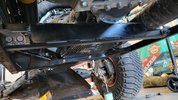
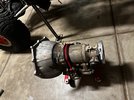
After our first comp we ended up breaking the end of our transmission housing. Thankfully Matt, Katelynns boss had a spare case he wasn't going to use. I then took that to Logan a fellow competitor that owns a local shop and he cut the bell housing off so we could add the ultrabell housing and swap our guts over to the new housing.
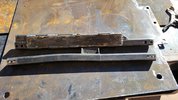
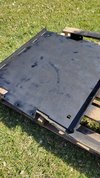
I really don't want this to happen again so I got to redesigning my cross member and plans to beef up the skid plate. I am replacing our 3/16 100 KSI skid plate with 1/4 AR 400. For the cross member the old one was 1/4 by 1.5x1.5. I couldn't find 1/4 so I opted for 3/16th 1.5 but stacked it on top and then welded strips of the AR400 to the side of it. Unfortunately I couldn't do the full length because the exhaust is in the way but definitely feel this combined with the AR skid will prevent it from happening again.
Tom Tom from Katelynns job was also a big help in getting the AR400 plate cut out on his plamsa table and then I stitched it all together and Katelynn took it to work to have to fully welded.


kmboren
Recovering XJ owner anonymous
- Location
- Southern Utah
So this transmission broken case has been a pain in my butt. We transferred all the guts of our case into a new case. We installed it and it was leaking trans fluid and slipping. Katelynn was suppose to use it for the off road games but that didn't happen. I then had my gallbladder out unexpectedly so the car sat for 3 weeks until I was cleared to work on it again (2 weeks off then 6 days back to work)
In this time frame I decided we will start all over. Found a local builder and bought a rebuild kit and planned on buying a new torque converter. Finally got it pulled and over to him. He rebuilds it and I installed it. Put everything back together and I only have first and reverse. To say I was frustrated would be an understatement. The only thing not new is a manual valve body. We replaced the gaskets reccomended by valve body company but thought this might be the problem. A new valve body showed up today and he got it installed and states we now have 1-2-3 and Reverse. This new valve body also has 1st and 2nd gear engine breaking so we will see how we like that. Our old valve body was just 1st gear breaking. I'll go to pick it up tomorrow. Hopefully the rig will be good for a while again.
During this time frame I also worked on some new upgrades to hopefully help is be more competitive in W.E. Rock comps. I'll post those soon.
kmboren
Recovering XJ owner anonymous
- Location
- Southern Utah
Well I think the car is ready. I found a new vacume leak but the car was tuned with it. When I plugged it the car didn't like it. I'll get that fixed next week but didn't have time before our comp.
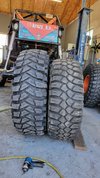
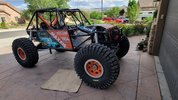
We made more changes to make the car more competitive. First of all huge thanks to our sponsors that made it easy. SUMMIT MACHINE was able to get us taken care of on new shorter links. ADAMS DRIVESHAFT built us a shorter rear driveline. We went from 111.5 wheelbase ro 108.25. Katelynn also signed an official contract with Maxxis tires and they sent us new treads. 42x14.50 R R17 Trepador sticky tires. The car is so much taller than before. I might lowered our ORI pressure after this weekends comp but I also might not. I ran the car on Arrowhead and Nasty Whole and it works phenomenal. Can wait to get more mile put on it. Only problem I found with the new wheels base is we have more drop out than driveline angle so I added a center limit strap and marked our rear winch line so I know where to not extend it beyond that.
New old 40 vs new 42.


- Location
- Grand Junction, CO
Looks amazing on 42's!
kmboren
Recovering XJ owner anonymous
- Location
- Southern Utah
Yes it does. I get giddy looking at it.Looks amazing on 42's!
kmboren
Recovering XJ owner anonymous
- Location
- Southern Utah
I have had a new radiator and higher CFM fan laying around for a few months. During our last comp we got another pin hole in the radiator so it was time to finally upngrade. I did have the old radiator repaired so I'll keep it has a back up spare just in case.
The new radiator was slightly to wide so the frame had to he notched. I had some left over 1/8 aluminum laying around that Todd Little drew up and cut a new fan shroud and bottom mounting plate. Our old radiator mounted with some tapped screws on some aluminum spacer on the side. We wanted to clamp this one in so Todd came up with a handy way of doing that. The bottom has 2 dowel pins in rubber mounts and the top has 2 pieces with some rubber matting in it that bolt down. Much better in my opinion. The new radiator is about 2 inches taller. New fan is 16 instead of 14. Hopefully it stays a little cooler on the trails now during the summer.


The new radiator was slightly to wide so the frame had to he notched. I had some left over 1/8 aluminum laying around that Todd Little drew up and cut a new fan shroud and bottom mounting plate. Our old radiator mounted with some tapped screws on some aluminum spacer on the side. We wanted to clamp this one in so Todd came up with a handy way of doing that. The bottom has 2 dowel pins in rubber mounts and the top has 2 pieces with some rubber matting in it that bolt down. Much better in my opinion. The new radiator is about 2 inches taller. New fan is 16 instead of 14. Hopefully it stays a little cooler on the trails now during the summer.


RustEoldtrux
RustEoldtrux
- Location
- Evanston, WY
Todd and Jen gave us some awesome lessons at Three Peaks many years ago. Great people.
kmboren
Recovering XJ owner anonymous
- Location
- Southern Utah
Jen is actually my manager at work in the ER as a RN. Todd is still my go to guy for more complicated fabrication skills. Very good fabricator. I have known him for probably 15 plus years.Todd and Jen gave us some awesome lessons at Three Peaks many years ago. Great people.
kmboren
Recovering XJ owner anonymous
- Location
- Southern Utah
It has been a few since I updated anything here. Our steering heims have wore out and we also needed to change or eliminate our ball joints.
A few people have recommended American Iron and they happened to be at trail hero. Katelynn said hi and introduced herself but that was about it. With some follow-up work on my part I was able to get them to sponsor us a BallJoint elimination kit. I started on it today and got to a stopping point. Passenger side is done I just need to put everything back together. The kit is pretty impressive. Top and bottom are basically bolted so these things should never come apart. It looks weird when Installed but that is just how they are. It also comes with a offset cone for caster and camber angles. I measured the old shim with calipers and matched that on the new one. Hopefully my Camber stays the same and I added a 1-2 degress to the caster. I also need to tack my U-JOINT caps because they keep working themselves out some.
All this work takes about 5 times longer to do while in crutches. It sucks but I am hammering away at it.


GER4x4
Member
If you need some help to get this wrapped up I could help on Tuesday.It has been a few since I updated anything here. Our steering heims have wore out and we also needed to change or eliminate our ball joints.
A few people have recommended American Iron and they happened to be at trail hero. Katelynn said hi and introduced herself but that was about it. With some follow-up work on my part I was able to get them to sponsor us a BallJoint elimination kit. I started on it today and got to a stopping point. Passenger side is done I just need to put everything back together. The kit is pretty impressive. Top and bottom are basically bolted so these things should never come apart. It looks weird when Installed but that is just how they are. It also comes with a offset cone for caster and camber angles. I measured the old shim with calipers and matched that on the new one. Hopefully my Camber stays the same and I added a 1-2 degress to the caster. I also need to tack my U-JOINT caps because they keep working themselves out some.
All this work takes about 5 times longer to do while in crutches. It sucks but I am hammering away at it. View attachment 177504View attachment 177506View attachment 177507View attachment 177508View attachment 177509View attachment 177511View attachment 177505
View attachment 177510
