You are using an out of date browser. It may not display this or other websites correctly.
You should upgrade or use an alternative browser.
You should upgrade or use an alternative browser.
My Next Project: 1959 VW Beetle
- Thread starter UNSTUCK
- Start date
rholbrook
Well-Known Member
- Location
- Kaysville, Ut
Have you wheelied it yet
UNSTUCK
But stuck more often.
The electrical board is complete! With that wrapped up I was able to turn all the power on. Both high voltage and low voltage systems. The best part was that it didn’t burst into electrical flames. With power on I was able to plug in my laptop and start programming the traction controller for our set up. After that I plugged into the battery management system and programmed it. Once that was complete I shifted the transmission into low gear, turned the wiper switch to forward and tapped the throttle. The wheels started to roll forward. I turned the wiper switch to “high” speed aka reverse and tapped the pedal again. The wheels rolled backwards. Success!
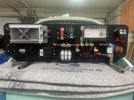
I now have the daunting task of laying the electrical board down into place. There’s a mess of wires behind it and im afraid I didn’t build the stands tall enough to clear the mess. Either way im hopeful it will see the street this week.

I now have the daunting task of laying the electrical board down into place. There’s a mess of wires behind it and im afraid I didn’t build the stands tall enough to clear the mess. Either way im hopeful it will see the street this week.
UNSTUCK
But stuck more often.
I’m struggling with details and testing now. The turn signal switch that I installed two years ago has a bad connection to the left rear light. If I wiggle the lever just right it will work. At least I know my very goofy wiring modifications to even make the switch work in the first place, work. The 1958 uses a single 1157 bulb for turn/tail/stop. But you can’t get a 1958 turn signal switch. You have to use a 1959+ switch that uses an 1157 and an 1156 to handle the three lights. The retailer I bought it from of course won’t warranty it because of time, but he also didn’t give me any confidence in buying another one. 🙄
I also learned that the DC/DC converter is not working. It’s like an alternator. It takes high voltage and regulates it down to 13.8v to run the normal car stuff and recharges the car battery. It’s turning into a fight between the retailer and the manufacturer over how I wired it. I’ve now seen documentation that says to wire the turn on wire to high voltage and to low voltage. Unfortunately I was told high voltage first which I did but now I think I burned it up. 🙄
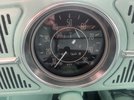
BUT I did manage to get the fuel gauge working properly. A “fuel sender” takes battery current and converts it to a signal the fuel gauge can use. So I now have a full tank of electricity. 😂

UNSTUCK
But stuck more often.
Quick update on the dc converter. We finally figured it out. The EV company that sold it to me with the whole “kit” sold me the wrong one. The one I have is for input voltages from 48-100. My system puts out 125 max so I need their next higher voltage converter. The EV company that sold it is now avoiding me. 🙄
On to funner projects. I’m hoping this one will be a highlight of the bug. Even though it’s electric it still needs exhaust right?
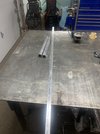
This projects starts with two 1 3/8” round tubes and 1x1/8” flat bar in aluminum.
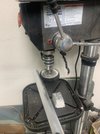
First step was to polish the tube where it will be seen. About half will be seen so I polished a bit past that.
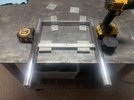
I then cut two pieces of flat bar. The closer one will be bolted to the body and further one is just a support. Dang! It polished up pretty nice.
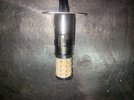
On the inside end of the tubes I welded on caps then drilled through them to mount my light sockets. I found these lights on a random Amazon search. They are 1157 bulbs but one wire powers white leds and the other wire powers amber leds. Originally I was just going to use white for reverse lights. I have a wire for reverse lights that’s powered off the reserve switch and a relay. I will now use that wire to switch an another relay. I will run ignition hot to the normally closed pin on the relay to send power to the amber lights and then the relay will switch ignition power to the white lights when backing up. The goal here is to give the appearance of flames out the exhaust during normal driving.
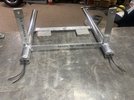
Two more flat bars installed to complete the mounts. Lights installed with pig tails ready to be wired.
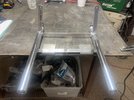
Touched up the polish job.
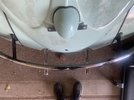
Installed. Just need to wire it up in the morning. Oh, and don't look too close. The bumper needs a bit of adjustment so it looks a bit off right now.
On to funner projects. I’m hoping this one will be a highlight of the bug. Even though it’s electric it still needs exhaust right?

This projects starts with two 1 3/8” round tubes and 1x1/8” flat bar in aluminum.

First step was to polish the tube where it will be seen. About half will be seen so I polished a bit past that.

I then cut two pieces of flat bar. The closer one will be bolted to the body and further one is just a support. Dang! It polished up pretty nice.

On the inside end of the tubes I welded on caps then drilled through them to mount my light sockets. I found these lights on a random Amazon search. They are 1157 bulbs but one wire powers white leds and the other wire powers amber leds. Originally I was just going to use white for reverse lights. I have a wire for reverse lights that’s powered off the reserve switch and a relay. I will now use that wire to switch an another relay. I will run ignition hot to the normally closed pin on the relay to send power to the amber lights and then the relay will switch ignition power to the white lights when backing up. The goal here is to give the appearance of flames out the exhaust during normal driving.

Two more flat bars installed to complete the mounts. Lights installed with pig tails ready to be wired.

Touched up the polish job.

Installed. Just need to wire it up in the morning. Oh, and don't look too close. The bumper needs a bit of adjustment so it looks a bit off right now.
UNSTUCK
But stuck more often.

This is the battery monitoring system hooked up to my laptop. Right now it is showing the voltage of each cell in the 5 battery modules. It took some doing, but I finally got the bug plugged in and charging. I originally followed the “old” wiring schematic which was not comparable with the parts I was sent in the kit. No one told me that. So with their tech support on the phone I made a simple wire change and it started working.
This BMS is actually pretty cool. It tracks each cell and will either allow charging to a cell or it will discharge cells as needed while the other cells continue to charge. So in the picture it shows 3 cells being discharged while the others are charging. Every minute it re-evaluates the cells and will discharge other cells as needed. The goal is to get all the cells to hit 4.15 volts at the same time, which is max charge. If one is lower that will cause the pack to loose capacity because as soon as one cell hits max low voltage of 3.30 volts the car would shut down to prevent battery damage. The cells will draw power equally so they may all be high but if one is low they may as well all be low. It’s crazy to me that all this charging comes down to less than a volt of change. But that is what makes these batteries last forever.
UNSTUCK
But stuck more often.
I got the electrical board in place. One of the biggest pains I have encountered. Originally I built it with 1 1/2” standoffs but that proved to not be enough. The traction cable under it is just too much. I had to add another 1 1/2” spacer to the standoffs to give the needed clearance. It’s fine, just doesn’t sit tight to the body like it did before. I guess most people won’t really notice though.
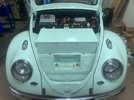
With the board in place it was time to put wheels on and put it on the ground. Then it drove right out of the shop, up and down the street a couple times, onto the trailer and off to the upholstery shop!
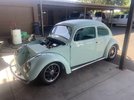
Then it was time for a years worth of cleaning. 😎

Oh, and the transaxle sound like it’s going to come apart at the slightest throttle input. 😢

With the board in place it was time to put wheels on and put it on the ground. Then it drove right out of the shop, up and down the street a couple times, onto the trailer and off to the upholstery shop!

Then it was time for a years worth of cleaning. 😎

Oh, and the transaxle sound like it’s going to come apart at the slightest throttle input. 😢

