Tallz CJ5 Buildup

Tallz

Active Member
Location
Murray, UT
Update: Last week I got the Centerforce clutch in and the housing all done, ready for the tranny/tc.

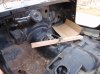
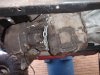
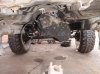
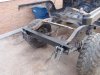
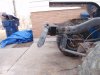
Today the weather in Utah finally broke and it was a beautiful day for some wrenching on the Cheveep. I first got the NP435 and the Dana 300 up and mounted to the clutch housing. It is a long sone of a ***** and heavy! When it was mounted I soon realized that I would need to fab a cross member soon and do some plating around that transfer case as it hangs down really low (see pictures). Maybe it would be worth it just to buy a clocking kit for it and not have to worry about beating the crap out of it on a trail.
 

Attachments

  • tranny top.jpg
    tranny top.jpg
    176.8 KB · Views: 8
  • Tranny-TC Side.jpg
    Tranny-TC Side.jpg
    185.7 KB · Views: 9
  • TC rear.jpg
    TC rear.jpg
    183.7 KB · Views: 11

Tallz

Active Member
Location
Murray, UT
I also fabbed up the rear bumper today. I used a piece of 2"x4" steel and cut the ends at a 45 degree angle. Then capped the ends off with some more plate steel. It turned out nice. Probably one of my better fab jobs to date. I also mounted the shackle hanger to the rear of the bumper. This is my first step in relocating the rear axle 10 inches rearward. Tomorrow I hope to get the front spring hangers done. This should give me a wheelbase of about 100 inches. Stoked!
 

Attachments

  • bumper1.jpg
    bumper1.jpg
    183.3 KB · Views: 7
  • bumper2.jpg
    bumper2.jpg
    182.4 KB · Views: 9
  • bumper3.jpg
    bumper3.jpg
    182 KB · Views: 10

cheepin

Active Member
Location
Parachute Co.
Looking good.You should like the 100"WB.I had a CJ-5 at 100".Did pretty good.I ran my last CJ-7 at 98" for a few years.The New one is pushed to 107-8":greg:.DO a search on Pirates for Goto guys for a clocking ring.I ran one my last CJ-7.Can be gotten for less the $100.
 

Tallz

Active Member
Location
Murray, UT
Looking good.You should like the 100"WB.I had a CJ-5 at 100".Did pretty good.I ran my last CJ-7 at 98" for a few years.The New one is pushed to 107-8":greg:.DO a search on Pirates for Goto guys for a clocking ring.I ran one my last CJ-7.Can be gotten for less the $100.

Do you have any pictures of your old cj5? I would be interested in seeing what you did to it and how it looked. I am always looking for inspiration from other CJ owners.
 

Tallz

Active Member
Location
Murray, UT
Well, there is an update. The jeep is finally done. Its been a few years, but I have photos to show what I have done and the final product. Now please understand that hindsight is always 20/20 and there are things i did that I would definitely do differently if I build another one, like start with a custom frame, but this was (supposed to be) a budget build. Im sure you guys who have any time building your rigs know that budgets are very hard to adhere to. Its also hard managing family, work, home and still finding time to work on the rig. I guess thats what took me so long? Well that and I like to make sure things aren't half-assed before I go trying to crawl something and fail miserably. Anyways, here it is and Im curious to hear your feedback as well as any invites to go play this spring/summer. I need some fellas to show me the ropes. Thanks. View attachment 89062View attachment 89061
 

Tallz

Active Member
Location
Murray, UT
The Front axle is a Dana 44 with high steer kit from Ruffstuff. This became a problem soon as it interfered with the leaf springs. I wanted to keep the high steer since I had purchased everything first, so I bought a Astro Van steering box to make it all work. I then sent the gear box to West Texas Offroad to have it tapped, rebuilt for the hydro assist kit. They also rebuilt my pump and I bought a new resevoir and pulley from Poly Perf. The ram is mounted to the heavy diff cover also from Ruffstuff. All new brake lines were run along the axle to a center point above the diff and then back into a Willwood proportioning valve. Front disc brakes are stock.
View attachment 89064CAM00246.jpgCAM00263.jpg
 

Tallz

Active Member
Location
Murray, UT
The winch I found from a guy parting out an old willys. Its the Warn 8274. It works great as the guy I bought it from made a nice cavas cover for it while it was stored outside. It has a little rust on it and is definetely looking its age, but it works great and even cam with the original wired remote. I figure I can clean it up and rebuild it later if I really need another project. The mounting plate and front bumper/stinger are from another jeep part out. It looked professionally bent and welded so I made it work to fit mine. Another cheap score from being a classified ad junkie.150' synthetic winch line from Smittybuilt.
CAM00247.jpg
 

Tallz

Active Member
Location
Murray, UT
I removed the original fenders and sold them, and then built a support that comes from the boat sides and the firewall. I think I did a good job fitting it snugly under the hood and mounting it to the radiator support. The hood is now secured via hood pins that are mounted to the top of the radiator support. The shocks are Bilstein 7100 and I used the original Chevy lower shock mount and fabbed a new upper mount with support. it turned out OK. I probably should have fabbed up new lower mounts on top of the axle, because now I am worried the stock lower mounts will get bent up from rocks, etc. See....20/20!
CAM00248.jpg
 

Tallz

Active Member
Location
Murray, UT
Also all new brake line plumbing runs inside the frame rail to the firewall to the Willwood proportioning valve. I also added a new dual diaphragm power assist brake for a wrangler. Also in the above photo you can see the new clutch linkage from M.O.R.E. which is a great replacement for worn, sticky 30 year old clutch linkage. Stock CJ lighting but the marker lights are not connected, just filling the holes for now. Someday I will go to HID or LED. Leaf springs are stock YJ for as much flex as I can get.
 

Tallz

Active Member
Location
Murray, UT
Engine: I left it mostly stock, but switched to HEI and added the GotPropane kit for the 5.0L 304. I added a yellow top battery and with the fenders gone I had to run the wiring along the radiator support, even though I don't need rad supports with the ones I built. Aluminum radiator with a new shroud. All new rad hoses and a new water pump. If you see me on the trail ask me about the overheating issue I had and why i wasted some money here, too long to go into now.
CAM00265.jpgCAM00262.jpgCAM00249.jpgCAM00251.jpg
 

Tallz

Active Member
Location
Murray, UT
Boat sides were done with 2 inch HREW welded to the frame and if you see these welds, don't flame, I was having issues with my welder at the time and the welds look like shit. The skins for the boat sides are 3/8" steel diamond plate that I salvaged from a job site dumpster. The A-pillare for the cage is also mounted to it.
CAM00252.jpg
 

Tallz

Active Member
Location
Murray, UT
Interior. I had planned to make the ignition all push button but after looking into what is involved I figure the stock switch was good enough. The lights and high/low beam switches are also stock, I just mounted them to the new stainless dash. Also on the dash is a Pyle Marine IPod stereo system, with the speakers mounted to the tranny hump via a speaker pod from Centra-Pod. What a great idea that is! Seats are all Race-Trim including the kids seat out back. Seat Belts by Crow, 4-point, all mounted to double shear tabs. Stock steering wheel and column. The roof is 16 gage sheet metal painted black on top and underneath I did some custom swirling with the flap-disc. Poly Perf grab handles and custom self made wood shift knob (not pictured). Out back I have the propane bottle and my sons seat. Cramming his seat in there was not easy. He and the bottle just fit, but some creative fab work was involved and it did not turn out as clean as I might have liked but it all works well. The rear shocks are also mounted to the cage there and are same as the fronts, Bilstein 7100. Rear brake light is LED, but currently only hooked up to the lights not the brakes. Rear bumper will soon have 3/4" thick tow points added.
CAM00253.jpgCAM00254.jpgCAM00255.jpgCAM00256.jpgCAM00259.jpgCAM00258.jpg
 

Tallz

Active Member
Location
Murray, UT
Underneath the Tanny is the Dana 435 from a 67 Bronco and the transfer case is a Dana 300. I built a skid plate for the transfer case but not one for the tranny. Some day I will figure out how to fab one that will not interfere with the driveline and the exhaust, but its good for now. The transfer case is the only thing that is below the frame rails including the exhaust. The exhaust is all custom built by me and what a pain in the ass that is to weld! A great learning experience though. The 2 1/4" pipes flow out of stock exhaust manifolds along either side of the tranny and then behind the transfer case where they flow into a 2 into 1 muffler from Cherrybomb. Sound is really tough with the pipes being so short and really not much of a muffler. The seats are protected from the heat with heat shield under all panels.
CAM00266.jpg
 

Tallz

Active Member
Location
Murray, UT
Rear axle is a 14 bolt that is welded up and stock gearing at 411. The rear brake lines were all redone with remaining parts from the front brake line rebuild. Its not pretty but will work better that what was there before...nothing. Rear disc brake conversion from Ruffstuff. The calipers are off of a Dana 44 front with stock discs and pads. This thing stops really well after dialing in the new Willwood proportioning valve. The rear springs are also YJ but I took two 4 packs and made one 6 pack for each side. Stiffer and still flexy. Anti-wrap kit and super beafy rear diff cover from Ruffstuff. Shocks here were mounted the right way, to the top of the axle. An extra square tubing cross member was also added to hold the upper brake line connections and the propane bottle mounts.
CAM00267.jpgCAM00268.jpgCAM00269.jpgCAM00270.jpg
 
Top