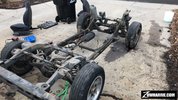
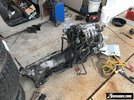
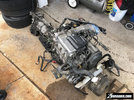
Suzuki TDI Swapped Samurai Truck Conversion

When doing my math for needed spring weight rating, I’m assuming I don’t add the unsprung weight of the axles, etc, correct?
 
Correct. F = k*d, where F is your sprung weight at that corner of the vehicle, k is your spring constant (eg. 250lb/in), and d is your displacement or spring compression distance.

For example, if your corner weight is 600lb, given a 14" spring that you want to compress to 9" to achieve target ride height:
k=600lb/(14in-9in) = 120lb/in spring rate.

This only works for a single rate setup, if you're doing dual rate it's different.

Make sure to also account for coil binding when planning your travel.
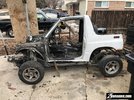
Good info!! I need to try to figure out my corner weight. I don’t have the engine or trans in yet, so that could be difficult. It seems that with most radius arm setups in Samurais, 175-180ish is about perfect. So perhaps I’ll just go with what everybody else is using. Since I’m not doing a diesel or big winch bumper this time around, I’m significantly less nose heavy.
 
Had a date with some 3/16” plate and a hole saw this afternoon. I have to do some trimming, slot the rear hole, and figure a way to tie them together however possible for added strength.
 

Attachments

  • C3F0B445-9FAF-41F5-B262-72B6E72B9011.jpeg
    C3F0B445-9FAF-41F5-B262-72B6E72B9011.jpeg
    349 KB · Views: 2
So I’m roughing some numbers.

I’m expecting my Sami to weigh about 2,500 lbs once finished. Splitting that between axles is 1,250, but I suspect the front will be about 1,450, rear 1,050, just given that the front has the cab, engine, winch, etc.

Subtract 200 pounds for front axle, wheels, suspension, nets me back at 1,250

/2, is 625lbs at front corners.
This Honda spring is 14”. I want my spring to have as much up travel as possible, so I want to run a longer spring. If I want it to compress 2.5” to ride height, that would put me at 250 PPI. Or is the compressed amount to ride height, the compressed distance under flex?

Did I calculate this wrong?
IF, my corner is indeed 625lbs, and my spring rate is 250 PPI, that would compress it 2.5”?
If this is correct, this seems like my cheap Honda springs will actually work.

I’ve never done this before, so I’m still trying to figure it all out.
 
Last edited:
Correct, if your corner weight is 625lb and the spring rate is 250lb/in the spring would compress 2.5in at ride height.
  • What is your target inches of uptravel and downtravel from ride height?
  • Out of curiosity whats the reason for maximizing uptravel?
 
I am not 100% certain what my uptravel I'm shooting for is. For sake of argument, I'm going to say about 8", which is probably what I'll have for clearance at ride height, before I start to have oil pan clearance issues. I want to make sure I have enough travel in my spring for that, even if I do have to get a softer spring. Wouldn't a longer spring be more beneficial?
 
Built some frame mount brackets yesterday. Still isn’t mounted up to the axle in the picture, with the leafs still on, it’s kinda in the way, but the axle side will go up a couple inches. Plus, these tires only measure about 27”, and I’m hoping to run a 30-31”. With a little more lift I can drop the axle down as well to get more clearance.
 

Attachments

  • ACBE4017-1D48-4A40-8E7E-CD9F17177E75.jpeg
    ACBE4017-1D48-4A40-8E7E-CD9F17177E75.jpeg
    363.1 KB · Views: 17
Did some rough fit up today, cleaned the frame up a bit, and tacked some stuff into place to check fitment.

Will 3/4” heims be sufficient for my panhard, or should I go 7/8 or 1”?
 

Attachments

  • 554B8F71-D6FD-46AA-BB71-1B9F4A0C14DF.jpeg
    554B8F71-D6FD-46AA-BB71-1B9F4A0C14DF.jpeg
    376.7 KB · Views: 13
  • FF138617-FA9B-45F9-AB3B-37CB1D5FE366.jpeg
    FF138617-FA9B-45F9-AB3B-37CB1D5FE366.jpeg
    395.4 KB · Views: 13
Copy that.

I also have these forged poly ends, but would there be enough flex in them to be used on a panhard?
 

Attachments

  • 1E9EA9A9-3794-4E74-A09E-371181FAA36F.jpeg
    1E9EA9A9-3794-4E74-A09E-371181FAA36F.jpeg
    189.8 KB · Views: 0
Tacked up all the brackets today. Once I get this frame stripped, I will measure everything up to make sure it’s square before I start welding everything up. I set the caster at about +5° close to ride height, so hopefully, I won’t need to do any work elongating the rear holes! One problem I’m having so far, is that at full lock, my tie rod on the inside tire contacts the top of the arm. Thinking about just taking a flap wheel to it to clear off the excess casting web, it’s so close to clearing. Otherwise, I could do a couple bends on a custom tie rod to clear, or, run a complete high steer setup, which is honestly not my first choice.
 

Attachments

  • F3E50ED3-7D54-4F75-8A2C-39BAE13758DA.jpeg
    F3E50ED3-7D54-4F75-8A2C-39BAE13758DA.jpeg
    472.6 KB · Views: 21
  • 139AFB41-E114-4296-801B-51FD0AB8FA5D.jpeg
    139AFB41-E114-4296-801B-51FD0AB8FA5D.jpeg
    416.3 KB · Views: 19
  • 64DA009D-94F2-409E-A2C2-B984A7D36706.png
    64DA009D-94F2-409E-A2C2-B984A7D36706.png
    24.1 KB · Views: 20
  • 46B2A4E5-E7D9-4D08-A50F-752C605B433B.jpeg
    46B2A4E5-E7D9-4D08-A50F-752C605B433B.jpeg
    184.9 KB · Views: 22
Running into an issue with the 80 series arms. Due to the arch in them, I don’t have much uptravel before they hit the bottom of the frame and can’t go up any further. Soo...I’m going to scrap this idea, and use Grand Vitara rear control arms bolted off of YJ spring brackets bolted to the existing front leaf hangers. The arms will be shorter, but I’m hoping will work well, I only want or need around 4” of lift.
 
Got the tracker paid for today finally, and instead of a title, just jumped to the dismantler permit.

also got the new lowers I’m going to try for the radius arms, from a Suzuki Grand Vitara. They feel pretty beefy. Will see what kind of setup I can figure out with these!
 

Attachments

  • 7DB827CD-9C91-4E24-97BC-76225CB8EDE7.jpeg
    7DB827CD-9C91-4E24-97BC-76225CB8EDE7.jpeg
    319.7 KB · Views: 8
  • C05803AF-660B-4DFC-BFB3-8293C35D233A.jpeg
    C05803AF-660B-4DFC-BFB3-8293C35D233A.jpeg
    297.6 KB · Views: 8
Went to town as soon as I got this thing home. Dash harness to the engine plugs is out, ready to be weeded down. This is a '96, so OBD2. The plan was to run this auto trans, but after checking the fluids, it smells burnt. That, along with the fact there was paperwork printed off from a forum regarding transmission issues, I get the feeling this thing may have been parked due to tranny issues. I have a 2 wheel drive 5 speed in my garage I'll likely throw on instead.
 

Attachments

  • IMG-4447.jpg
    IMG-4447.jpg
    736.3 KB · Views: 6
  • IMG-4448.jpg
    IMG-4448.jpg
    456.5 KB · Views: 6
  • IMG-4449.jpg
    IMG-4449.jpg
    174.5 KB · Views: 6
Also I don't have a cherry picker anymore, but I do have a chain hoist, so I picked up some c channel on KSL, and built this thing yesterday. Needs some more structural support on the feet to the uprights I think yet. Welds are not the greatest, but I'm using a Harbor Freight Titanium 125 flux core, so I don't think they're too awful for what it is.
 

Attachments

  • IMG-4458.jpg
    IMG-4458.jpg
    510 KB · Views: 12
  • IMG-4459.jpg
    IMG-4459.jpg
    512.4 KB · Views: 12
  • IMG-4460.jpg
    IMG-4460.jpg
    428.3 KB · Views: 13
  • IMG-4461.jpg
    IMG-4461.jpg
    357.8 KB · Views: 11
Gantry frame worked well! Pulled apart the donor cluster, removed the VSS, swapped it into the Sami speedo, left a couple pig tails to splice into the donor harness.
 

Attachments

  • 03B15716-0D3E-4E9A-A42D-07A21FA72E9A.jpeg
    03B15716-0D3E-4E9A-A42D-07A21FA72E9A.jpeg
    384.5 KB · Views: 4
  • DF1EC426-B03A-4CDB-9976-15727A620DB1.jpeg
    DF1EC426-B03A-4CDB-9976-15727A620DB1.jpeg
    378.8 KB · Views: 4
  • 7ADD0252-7BA3-4794-8862-FB9D632DB30B.jpeg
    7ADD0252-7BA3-4794-8862-FB9D632DB30B.jpeg
    229.4 KB · Views: 4
  • A0FAAF97-6A4D-4709-A11F-68BA63D04286.jpeg
    A0FAAF97-6A4D-4709-A11F-68BA63D04286.jpeg
    317.4 KB · Views: 4
I hate electrical. This harness better work, I’ve probably spent at least 8 hours now on it, tracing wires and trying to understand it. I had the entire thing strapped to a piece of 4x8 OSB though and weeded everything down that was not necessary.
 

Attachments

  • 925D71F3-F714-4731-8F3D-012C3C6167CC.jpeg
    925D71F3-F714-4731-8F3D-012C3C6167CC.jpeg
    691.8 KB · Views: 8
  • 3E056A1C-81DD-4F50-A437-4D91E29080E0.jpeg
    3E056A1C-81DD-4F50-A437-4D91E29080E0.jpeg
    846.1 KB · Views: 8
Chopped the body up, kept what I wanted, and the rest went to scrap! Got my engine here now, just need to finish my frame repairs, and start to reassemble everything.
 

Attachments

  • 7E415436-2282-43A4-BE67-EAEA25F3BCB9.jpeg
    7E415436-2282-43A4-BE67-EAEA25F3BCB9.jpeg
    336.1 KB · Views: 9
  • 50903CFE-E16C-4A96-BD6F-217F320E8359.jpeg
    50903CFE-E16C-4A96-BD6F-217F320E8359.jpeg
    194.7 KB · Views: 9
  • F214A8A3-44D9-4880-A952-56A4B80EEFBE.jpeg
    F214A8A3-44D9-4880-A952-56A4B80EEFBE.jpeg
    225 KB · Views: 8
  • 8395B7FC-B367-4E3F-9AFC-0228150ED5A5.jpeg
    8395B7FC-B367-4E3F-9AFC-0228150ED5A5.jpeg
    334.5 KB · Views: 7
  • C2D2F15A-85D2-4F45-92EB-9A5DAC07F748.jpeg
    C2D2F15A-85D2-4F45-92EB-9A5DAC07F748.jpeg
    378.2 KB · Views: 9
Need to figure out what wheels I want to run though. I kinda dig the 5 spoke wheels from the donor actually. Just a photochop here.
 

Attachments

  • Samurai 5 spoke.jpg
    Samurai 5 spoke.jpg
    657.7 KB · Views: 9
Back
Top