The H'ell Camino

ID Bronco

Registered User
Location
Idaho Falls, ID
It shouldn't be this hard to find a decent machine shop in Grand Junction.... :mad: Nobody wants to answer the phone, have a voice mail box that works or even open the effing doors during normal business hours!

I had a similar experience here with a project I had done, I just had to stay on top of them. What a pain.
 

Greg

I run a tight ship... wreck
Admin
Well, the machine work is done and I'm ready to start assembling the engine! Here's what I had done.


  • Hot tank & clean block and crank
  • Balance rotating assembly
  • Polish crankshaft
  • Align Hone & debur the block
  • Pistons hung on rods

I had the shop double check the crank, since it came out of a 200k mile 5.3 LM7. It didn't need to be turned and was actually on the big side, which is impressive, considering the miles. I also had the machine shop source the crank & rod bearings. I love seeing freshly machined parts from the machine shop!
 

Greg

I run a tight ship... wreck
Admin
Finally able to get back to the engine build, after finishing my trailer project. I'm taking my time, double & triple checking everything along the way. This isn't going to be a fast build and these days my time at home is limited, so I do what I can, as I can.

20190113_135523-L.jpg


First off, I worked on the heads and swapped out the stock LS1 valve springs for the heavier Comp Cams Beehive springs.

20190112_160138-L.jpg


I also upgraded the factory rockers with the Retrofit Trunnion Kit which replaces the needle bearings in the rocker arms with brass bushings. Both of those jobs were tedious, 16 valve springs, 16 rocker upgrades. The rockers require pressing out the old bearings and then pressing in the new brass bushings and trunions. I cleaned them thoroughly, then put them back together with plenty of assembly lube.

20190112_140748-L.jpg


20190112_145556-L.jpg


20190112_152418-L.jpg


20190112_152539-L.jpg


20190113_135535-L.jpg


Next up, I started working on the block and crank. I installed the oil galley plugs, the barbell plug & a coolant plug. After that, I carefully installed the crank bearings and dropped some Plastigauge in place, torquing everything to spec. Pulled it back apart and verified the crank main clearances.

20190113_144530-L.jpg


20190113_152637-L.jpg


20190113_154420-L.jpg


Tossed some assembly lube on the bearings.
20190113_155822-L.jpg


I stopped here for the night, need to get the old crank hub pressed off and the new one on, with the lower double roller sprocket in place. Hey, it's a start!
 

Greg

I run a tight ship... wreck
Admin
Little more progress.... Crank had been dropped in and torqued to spec.

20190113_144623-L.jpg


20190113_152637-L.jpg


I had to pull off the old single row crank sprocket and press on the new one. I used a 3 jaw puller to pull it off, then heated up the new double row timing sprocket and pressed it on, using the old parts and installation tool.

20190119_125322-L.jpg


20190119_125327-L.jpg


20190119_131612-L.jpg


20190119_131659-L.jpg


Next up, I set the all the piston rings in place, then loaded the pistons and rods.

20190119_142506-L.jpg


20190203_154720-L.jpg


Hey, it's progress! :D
 

Greg

I run a tight ship... wreck
Admin
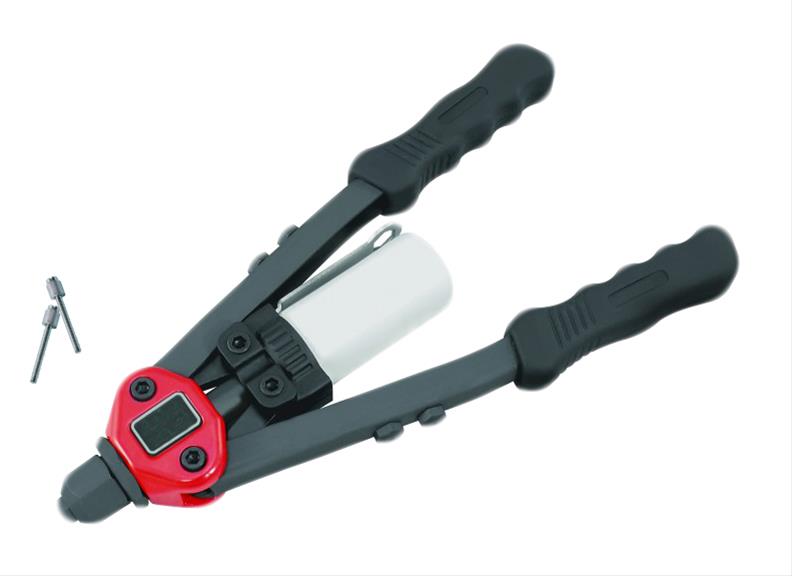
More engine assembly progress, had to buy some more parts & tools. I needed to block off the DOD/AFM ports under the intake and decided the best way with with the Lingenfelter AFM/DOD Delete Block Plug Tool, basically a rivet tool. I bought some of the rivets alone, thinking my current rivet gun would do the job, but nope! I had to get the Lingenfelter tool, too. (If anyone needs to borrow this tool in the future, let me know!) -
The install was simple, just pop-rivet the 8 holes. These are oil ports that allow the deactivation of cylinders for more fuel economy. The factory system is known to have issues and I don't want/need it, so away it goes.

20190222_100127-L.jpg


Installed -

20190222_101335-XL.jpg


Ordered some Brian Tooley Racing push rods, these are beefier and won't distort under pressure with the larger cam & heavier springs.-

20190222_100107-L.jpg


I mentioned the camshaft before, but I enjoy talking about cams. This one should have a good lope to it and make power from 1,500 to 6,600 RPM. Here's the spec card. -

20190222_103952-L.jpg


I wiped it off, lubed up the cam bearings and installed it.

20190222_104233-L.jpg


20190222_104028-L.jpg


Next up was the double roller timing chain & sprockets, then the oil pump.

20190222_122947-L.jpg


20190222_170341-L.jpg


Tossed the crank sensor in the block.-

20190222_143428-L.jpg


Put the rear engine/crank cover in place, triple checked the gap and torqed it down when it was less than 0.020. -

20190222_143439-L.jpg


20190222_163824-L.jpg


I've got a F-Body windage tray coming tomorrow that I need to pick up at the GM dealer and then I can work on the oil pan! I'm getting excited about this build, it's been a LONG time since I've built an engine and I'm really enjoying this. Feel like I want to build more in the future and I really like how the LS engines are engineered!

So speaking of the cam, I like hearing a built engine with a rowdy, aftermarket cam... I found a video of this same cam in a truck LM7 5.3. I thinking that with the higher compression, this engine will sound similar, if not just a tad more mean.


Greg

I run a tight ship... wreck
Admin
It's got a great lopey idle which will be great in a car like yours. His exhaust doesn't sound great though. Too crackley.

I agree, on all counts.... so his exhaust is actually open, it's louder than it would normally be with full exhaust. It sounds good, but it's raw.... nothing dampening the exhaust note. The cam sounds great, it's very noticable at idle which is what I want, but it should still make good low-end torque, while still pulling hard up to 6,500 RPM+.

I have those headers mentioned previously and plan to run 2 1/2" exhaust with a X-over, then a pair of 40 series Flowmasters and dump them on the ground before the rear axle, just like my old '71 SS Camaro. It should be pretty loud, but sound great.
 

Greg

I run a tight ship... wreck
Admin
More progress on the engine build, it's taking time because I keep finding more parts I need, have to wait on a getting paid then put in an order from Summit Racing to get the parts! :rofl: And whoever said LS engines are cheap didn't know what they were talking about!

Anyway, I was able to install the front timing chain cover, but since I upgraded to a double roller chain, I had to space out the oil pump. The oil pump then hit the cover, which meant I had to do some grinding on the inside. I ended up bolting it on, tapping it with a rubber mallet, seeing where it hit, grinding, cleaning out all the material and fitting it again. It took 5-6 times, making sure I wasn't taking off to much material at once. Eventually I was able to get it bolted up without hitting anything.

20190302_153814-L.jpg


Then I worked on the Holley oil pan, the oil pickup and the windage tray. I had to purchase a Camaro windage tray, then notched out the corner to clear the oil pickup, as instructed. Then I installed the oil pan, torqued it to spec and used the harmonic balancer install tool to press on the new Camaro balancer.

20190302_103028-L.jpg


20190302_152823-L.jpg


Next up, turned the engine over and went to work installing the roller lifters into their trays, then into the block.

20190302_154231-L.jpg


20190302_154920-L.jpg


I tapped the cyl head locating pins in the block, set the MLS head gaskets down and set the heads in place. I have some OEM torque to yield bolts, which are one time use bolts, but didn't install them. I wanted to upgrade from the TTY bolts, so ordered a set of ARP head bolts.

20190302_160158-L.jpg


Even though the heads weren't bolted down, I wanted to see what it looked like with the valley pan and intake on! Speaking of the intake, the one I picked up from @Anchor_Mtn ended up being an LS2 intake, which is known to be a pretty poor performing intake, plus it didn't come with injectors. I decided to sell it and purchased a used LS6 intake with 28.5# hr injectors. The LS6 intake performs excellent for a stock intake, supposedly you can gain 25 HP over a LS1 intake and it flows way better than the LS2. I pulled the injectors out and sent them for a cleaning and flow test. Since I had the intake, I had to fit it up to the engine.... it's looking GOOD!!

20190302_184945-L.jpg


20190302_160515-L.jpg
 
Last edited:

Greg

I run a tight ship... wreck
Admin
And, just an idea of something different.... my neighbors kid does hydro dipping. My neighbor suggesting dipping some parts, so we decided to cleanup the stock valve covers and dip them with a carbon fiber graphic. They'll mostly be covered by the coils, but I think the carbon fiber is going to look neat underneath! The carbon fiber piece shown is just a example, the valve covers should be getting dipped this weekend.

20190302_144417-L.jpg
 

glockman

I hate Jeep trucks
Location
Pleasant Grove
Thanks, Chad.... it's getting there! I've never built an LS, but have played with several old-school SBC's and it's funny how similar these are. I almost feel like I know what I'm doing. :rofl:
You look like you do :D
I'm following closely. The LJ is getting an LS/4L60 when the 42RLE finally dies. I'm not rebuilding a minivan trans.
 
Top