You are using an out of date browser. It may not display this or other websites correctly.
You should upgrade or use an alternative browser.
You should upgrade or use an alternative browser.
#iwannagofast ZJ build
- Thread starter Johnny Quest
- Start date
ID Bronco
Registered User
- Location
- Idaho Falls, ID
Awesome
Johnny Quest
Web Wheeler
- Location
- West Jordan
Time to brush the dust off this thread. Baby (James) is doing well, as is mom. If you follow me on social media, I’m sure you’ve seen all the pics.
Anyway, I cut some holes in the floors earlier this week, so the rear upper arms have somewhere to go when I hit bumps. I’ll have to box those in at some point, but that won’t be hard. Nothing pic worthy yet.
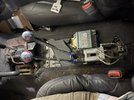
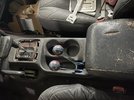
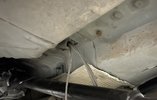
I have also been working on the brake system, specifically, the cutting brake handles. I was able to reuse a bracket from the emergency brake handle mount, and will use that as a base for the cutting brake handles, which as you can see from the pics below, will be coming up through the console in the stock ebrake handle location. They currently stick straight up, which will 100% get in the way of normal driving, since that’s where my elbow wants to be, so I’ll have to modify those down to a lower resting position. Nothing too tricky. I decided to go with braided lines for this system, since the routing was going to be interesting, and I didnt to go back and forth between hard line and flexible sections like 5 times per side between the handle and the rear caliper; I’m lazy, and would probably screw something up. Plus, that’s a lot of fittings to potentially fail. I’m running the braided lines down through the stock ebrake cable tunnel under the rear floor, through a rubber grommet, which pokes out conveniently near the frame side rear UCA mounts, which I plan to run the lines down on their respective sides.
I’m sure there are better ways to do this, but it’s what I’ve got. And if I’m lucky, it might even work.


Last edited:
Johnny Quest
Web Wheeler
- Location
- West Jordan
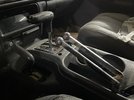
Been driving myself crazy chasing brake fitting adaptors on this thing; trying to get the new Ram van MC in and connected to the stock lines that go to the ABS module, that then had to connect to the braided lines, that then had to connect to the calipers. Such a tedious time consuming waste of time. But I *think* everything is finally connected. In the meantime, I got to work on the cutting brake handles. I had to figure out how to mount them, and then had to modify the handles so they weren’t sticking up so high. (Don’t worry; I finish welded those joints and cleaned them up). Two more bolts to track down and those will be mounted for good.
So, as of tonight the to-do list (to drive it) is getting shorter:
-Finish weld trackbar and drag link
-Trim and Finish weld trackbar mount
-Mount cutting brake handle
-Fluids (tcase, axles, brakes, etc)
-Nut and bolt check
-Ball joint cotter pins
-Battery
-Shocks
-Check bumpstops
-Trim fenders, etc
-mount Skid plate
Johnny Quest
Web Wheeler
- Location
- West Jordan
there finally seems to be a light at the end of the tunnel. Tracking down all the brake line fittings has been a PITA. But now that thats all hooked up, it should just be a matter of bleeding the brakes ::fingers crossed:: and another solid day or two of wrapping up loose ends.You are getting close
Bear T
Tacoma free since '93
- Location
- Boulder, mt
Is this thing done yet?
Johnny Quest
Web Wheeler
- Location
- West Jordan
yes. But mostly no.Is this thing done yet?
was actually out in the shop last night chipping away at it. for every item I cross off the to-do list, I seem to add two more. But they're just small stuff. Gotta get shocks on it, and fluids in it next. then just nut and bolt check.
Last edited:
Bear T
Tacoma free since '93
- Location
- Boulder, mt
And then a test run in the Montana snow...???yes. most mostly no.
was actually out in the shop last night chipping away at it. for every item I cross off the to-do list, I seem to add two more. But they're just small stuff. Gotta get shocks on it, and fluids in it next. then just nut and bolt check.
Johnny Quest
Web Wheeler
- Location
- West Jordan
I’m probably gonna start off a little closer to home; might try to make it around the block first
Last edited:
Johnny Quest
Web Wheeler
- Location
- West Jordan
I managed to get out in the shop for a few hours over the weekend. I've been doing everything I can to keep my head above water lately when it comes to raising three kids and trying to keep them healthy, so this Jeep has certainly been pushed to the back burner since well before Thanksgiving.
Anyway, started chopping the body. I want to have as much of the fender as possible, but not give up any uptravel by bumpstopping the hell out of it. I started with a minor trim, knowing that I would have to go deeper, and then pulled the springs to see where it would end up. The 2nd pic is on full bump both corners up front. Seems perfect, but I know once it flexes, the tire will come up another inch or two. So I'll have to go up above that next body line, which isn't a big deal. I was also able to measure for shock lengths at this time, and at least get a ballpark on what i can fit in there. I believe that I'll reach coil bind before the bump stops as they are currently set up, so I'm going to have to order up some hockey pucks. Out back, the diff hits the gas tank skid before the bumps, so I need to throw a few pucks back there as well.
ride height
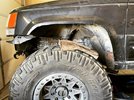
springs removed/full bump
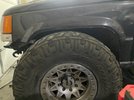
full lock, front edge clearanced a bit more
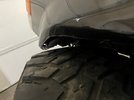
full lock, back edge of passenger fender
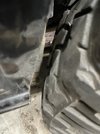
I definitely need to get this on a ramp to make sure everything clears before much longer.
Anyway, started chopping the body. I want to have as much of the fender as possible, but not give up any uptravel by bumpstopping the hell out of it. I started with a minor trim, knowing that I would have to go deeper, and then pulled the springs to see where it would end up. The 2nd pic is on full bump both corners up front. Seems perfect, but I know once it flexes, the tire will come up another inch or two. So I'll have to go up above that next body line, which isn't a big deal. I was also able to measure for shock lengths at this time, and at least get a ballpark on what i can fit in there. I believe that I'll reach coil bind before the bump stops as they are currently set up, so I'm going to have to order up some hockey pucks. Out back, the diff hits the gas tank skid before the bumps, so I need to throw a few pucks back there as well.
ride height

springs removed/full bump

full lock, front edge clearanced a bit more

full lock, back edge of passenger fender

I definitely need to get this on a ramp to make sure everything clears before much longer.
RockChucker
Well-Known Member
- Location
- Highland
If you have access to a fork lift, I'd recommend that over a ramp. Lifting straight up allows for easier trimming and a lot less noise and cringing
kmboren
Recovering XJ owner anonymous
- Location
- Southern Utah
Winter 4x4 Jamboree usually has a flex ramp trailer with flexing opposite directions.I definitely need to get this on a ramp to make sure everything clears before much longer.
Johnny Quest
Web Wheeler
- Location
- West Jordan
we've got one at workIf you have access to a fork lift, I'd recommend that over a ramp. Lifting straight up allows for easier trimming and a lot less noise and cringing
that Metalcloak trailer is pretty sweet, and Cory, (the dude that drags it around) is a cool dude.Winter 4x4 Jamboree usually has a flex ramp trailer with flexing opposite directions.
Johnny Quest
Web Wheeler
- Location
- West Jordan
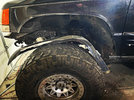
I cut more fender off; should have plenty of room now. rocker is going to be cut out and replaced with 2x6; should gain like 3" of clearance. Most likely going to have to cut out the battery box and air box pockets so i don't shred the tires while at full lock and full bump. you can see those in the wheel well behind the headlight. rear fenders are getting the cut and fold method.

Johnny Quest
Web Wheeler
- Location
- West Jordan
not yet lol
that thing was fun, but infested with tetanus. it got me good a couple times.
that thing was fun, but infested with tetanus. it got me good a couple times.
Johnny Quest
Web Wheeler
- Location
- West Jordan
Working on rear bump stops today. Got some JK bump stop stuff from Teraflex that should work really well, once it’s all dialed. With the axle drooped out, things look good…
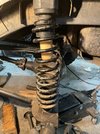
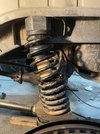
…however at ride height, things look not so good.
I was really hoping that I could avoid moving the coil locations; I might be able to move the lower coil post forward a bit on the axle, but that could create some weird twisting forces, plus I just don’t want to. But it’s looking like that’s what going to have to happen so I don’t get some weird coil action. There is currently a 2.5” and a 1.25” bump stop spacer stacked on the bottom; probably going to pull the 2.5” and see how it sits.
Two steps forward, one step back.

Johnny Quest
Web Wheeler
- Location
- West Jordan
