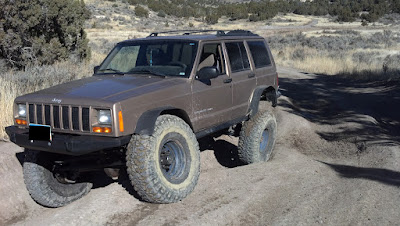
Jeep Nathan and Tanja's 99 XJ Build up

Love the build man, I like your rig a lot. Looks like it has all come together very well.

I used a Wagoneer drop Pitman arm to gain full lock-lock steering after putting in a d44 wagoneer axle up front. should give you lock-lock. (I had to ream it for 1ton chevy TRE)

That is an awesome steering box brace. Now that you have had it off road does the Durango box make that much of a difference? debating putting one in and trying it or just going hydraulic assist with the swap...
 
I like your anti-rock. It makes it feel more stable, but doesn't inhibit full articulation? How much of a difference did it make on the road?
 
gorillaxj-

the durango box makes a HUGE difference! it is incredible! i'm sure a lot of the difference i noticed was because i went from a shot box to that, but the Jeep never turned as good as it does now. Plus, you can use your Jeep box for the core, so you don't get totally eaten alive on the cost of it. If it is in the budget I would recommend it.
 
I like your anti-rock. It makes it feel more stable, but doesn't inhibit full articulation? How much of a difference did it make on the road?

At this point I will give up travel for stability. I didn't get a chance to get it twisted up and look at it and don't have access to a ramp. If someone has a ramp I would love to check it out.

It only slightly helps on road. The jeep still leans but it is more predictable and smoother from left sway to right.

Also remember this jeep was hella stable when I had the spare tire in the cab, the balance of the rig got bad when we put the tire up and out. I am considering lowering the spare, even though it will be in the departure, to try to get the weight down a bit. (fill the spare tire with helium... )

I think putting the front bumper on helped balance it out and the weight of a winch will do so even more.

I used a Wagoneer drop Pitman arm to gain full lock-lock steering after putting in a d44 wagoneer axle up front. should give you lock-lock. (I had to ream it for 1ton chevy TRE)

That is an awesome steering box brace. Now that you have had it off road does the Durango box make that much of a difference? debating putting one in and trying it or just going hydraulic assist with the swap...

I will probably have to do a Waggy pitman arm, I am not sure I will find one with as much drop as this one, it is something that I am looking into but will not be changed for a while.

Yes the Durango box makes a hell of a lot of difference, but again I am coming from a box with 180,000 miles on it. Also the trail was snow covered so it is not like I was in Moab trying to turn. It makes the steering almost too light, it kind of feels like the tires are not on the ground or something...

nathan
 
Last edited:
I will probably have to do a Waggy pitman arm, I am not sure I will find one with as much drop as this one, it is something that I am looking into but will not be changed for a while.

Yes the Durango box makes a hell of a lot of difference, but again I am coming from a box with 180,000 miles on it. Also the trail was snow covered so it is not like I was in Moab trying to turn. It makes the steering almost too light, it kind of feels like the tires are not on the ground or something...

nathan

Awsome, thanks. been on the fence for a while. I'll do it and then think about hydralic assist if needed. I got my drop pitman arm from here http://fatbobsgarage.com I can measure the actual drop if you would like to know.
 
Awsome, thanks. been on the fence for a while. I'll do it and then think about hydralic assist if needed. I got my drop pitman arm from here http://fatbobsgarage.com I can measure the actual drop if you would like to know.

That is not even close to what I would need for drop. Right now my drag link and track bar are perfectly parallel. This is the one I have;
http://claytonoffroad.com/product_info.php/cPath/18_77/products_id/166

It is also plenty beefy, a lot of the drop down pitman arms seem pretty skinny.

I guess full size ford ones will work too, so I will track down a huge drop pitman arm for a lifted f350.

Again not something very high on the priority list, what I have works fine.

Thanks!

Nathan
 
I snagged a couple of pics out at RS this weekend.

It was nice and dry so I can report that everyone with a xj should install a Durango steering box. With the lockrite up front and 37's I could turn the tires pretty easy. (the jeep still wants to go straight due to the locker but the wheels turned...)

Also the anti-rock is worth every penny and I really want to get a sway loc for the front now. There is an optional line on RS and coming off of it the driver front drops as the passenger rear climbs, it didn't feel tippy, it felt as stable as the old, wider, lower, leaf sprung bronco. It was sweet.

I also got to test the driver side rock slider...

First pic the driver tire is on the bump stop, the pic from the rear it is almost on the bump stop. I have had to limit travel quite a bit due huge axles, and trying to keep the the body somewhat intact.

2011-11-26_11-43-15_340.jpg


2011-11-26_11-43-44_776.jpg


nathan
 

Attachments

  • 2011-11-26_11-43-15_340.jpg
    2011-11-26_11-43-15_340.jpg
    23.5 KB · Views: 16
Did you do Wayne's World, and Constrictor? I want to go next time, I want to check out a little closer how you did some things.
 
Did you do Wayne's World, and Constrictor? I want to go next time, I want to check out a little closer how you did some things.

No didn't try Waynes' World or Constrictor. I am still kind of a wuss with this thing. Only had rock sliders on a few weeks. I won't do constrictor unless it is really dead out there since I will have to drive back down due to no winch yet. I do love Constrictor, we should have hit it up but it was really busy out there.

Waynes' World always had my number in the bronco, I haven't even attempted to go up that in about 5 years. I will have to give it a shot next time we are out there.

I want to see how you did some things too...

Nathan
 
I haven't posted for a while so here is a small update;

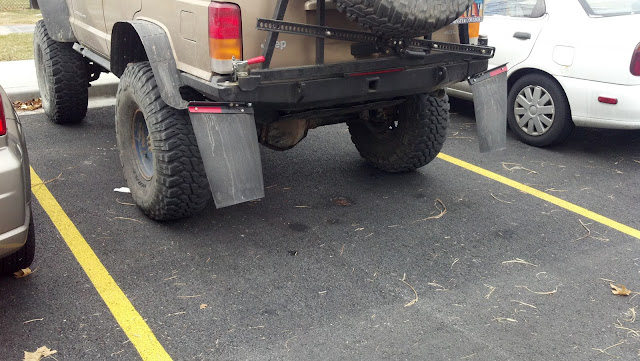
Mud flaps; I welded some nuts on the inside of the bumper so they un-bolt. It doesn't take long to put them on or take them off. Flap material is from a gym grade treadmill... I added some red reflective tape since they stick out. Technically you cannot pass safety inspection with anything sticking out but you also need a mud flap so...

2011-12-19_14-07-26_937.jpg


2011-12-19_14-07-35_734.jpg


Frosty Rattlesnake pics;
(I also fixed my radiator leak so my coolant reservoir may not be big enough hence the puddle of coolant on the ground;

IMG_4976.JPG


IMG_4980.JPG


IMG_4983.JPG


IMG_4988.JPG


full albums still here;
https://picasaweb.google.com/thenag

nathan
99 xj
build thread... your looking at it...
 
Last edited:
Went to RS/Con today. I did the hard line on RS

I also crawled up Waynes' World, Which I didn't really know was possible, everyone I have seen has to bump up the bottom pretty hard to keep the rear driver tire out of the hole. (maybe it was stacked good?)

xjtony was with us, his new long travel DS is does not have enough travel. We have the same year xj's it was pretty cool.


a few pics;

IMG_5031.JPG


IMG_5033.JPG


IMG_5038.JPG


I love my face on this one "you want me to do what?!"
IMG_5041.JPG


IMG_5045.JPG


IMG_5058.JPG


go-go-go-go-go-go-go
IMG_5061.JPG


IMG_5066.JPG


Here is full album;
https://plus.google.com/photos/116333554950363953131/albums/5692068173314441761

nathan
--99 xj
build thread here...
 
Last edited:
Wow 2 months without an update.

We have been wheeling, and getting ready for a spring moab run.

I mounted my CB and antenna, I don't think I took any pics of it. Put a basic CB on the ceiling, above the rear view mirror and between the visors.

I got this pile of poly;
DSCN5903.JPG


The pictured transmission mount is the wrong one, of course the correct one doesn't quite fit either. It is too tall and pushes the np231 into the floor. (maybe the old one was compressed that much but anyway it won't work as is so I will notch the cross member)

I had a "doh" moment removing the motor mounts, the big bolt hit my york bracket
DSCN5917.JPG


I was pretty sure I wasn't running enough oil in the 231, so I took some angles of it in the jeep so I could set in on the bench and do some figuring...
DSCN5906.JPG


dropped the t-case out
DSCN5911.JPG


There were some metal shavings in the case, I am not sure why I didn't take any pictures of it. I put it back together, you can see the new brass fill plug between the two ribs in this picture. There was what looked like an oil line in the case from when it was stock, so I used that to reference the new fill plug. (well it is up side down so I did the opposite sort of)
DSCN5915.JPG


I wanted the fill on the driver side so I could get to it without burning myself on the exhaust, the bonus is I can sort of get to it without dropping the belly skid plate.

To drop the t-case I had to pull the front interior to get the top bolt on the t-case, so I welded the rock sliders to the frame stiffeners. Since the carpet was loose I could weld without worrying about setting the carpet on fire. The ridgidco sliders are just bolted in place, but I wanted to add a little weld.
DSCN5913.JPG


The next thing is to take it to get a safety inspection, it should pass.

I am also going to build up some quality custom battery cables using fusion connectors
http://www.youtube.com/watch?v=YIe-2vUwXqw

nathan
99 xj
build thread here
 
Last edited:
Well it passed inspection, woo-hoo.

I notched my cross-member so I could use the poly transmission mount.

Here you can see the difference from the stock one to the daystar one
DSCN5919.JPG


So here is the cross member and the mount has to go into it.
DSCN5921.JPG


After some time and some tests fits this is what I came up with
DSCN5922.JPG


painted and ready to go back in
DSCN5923.JPG


I also had a few battery cables that looked like this;
DSCN5925.JPG


So as I mentioned I got some Fusion battery ends and made up some cables with some welding cable
DSCN5926.JPG


DSCN5927.JPG


The only other thing I did was I removed the weather strip between the hood and the cowl. Hopefully this will allow some heat to escape the hood without needing to put in actual hood vents. Some people shim the hood up with some spacers as well but some other people claim that will cause the hood to go through the windshield in a wreck. I call "Shenanigans" since 85% of the cowl is cheap plastic and wouldn't cause the hood to crumple anyway. The chance that shimming the hood up could cause it to not crumple in a wreck means that until I do more research I am not going to shim it up.

I will see what happens with this current mod and decide if more needs to be done.
DSCN5928.JPG


DSCN5929.JPG


DSCN5930.JPG


There is now almost 1/4 inch gap the entire width of the hood, I don't think rain will be a problem but some "hose testing" will occur soon.

nathan
99 xj
build thread here...


My engine does NOT run hot, I believe my batteries were over heating and leaking due to that, also when opening the hood in Moab to get the safety latch was like reaching into a boiling pot of water.
 

Attachments

  • DSCN5922.JPG
    DSCN5922.JPG
    35.7 KB · Views: 4
  • DSCN5923.JPG
    DSCN5923.JPG
    38 KB · Views: 4
Last edited:
Looks good. I feel your pain on the trans-mounts.. I got both, and neither fit so I had to go factory for mine. I like your solution.
 
Looks good. I feel your pain on the trans-mounts.. I got both, and neither fit so I had to go factory for mine. I like your solution.

Does anybody know if it is just Daystar mounts or are other manurfactures that fit better?

I wanted the same manurfacture for the motor mounts and both transmission mounts, Daystar was the easiest to find. (although the little mount is a CJ mount so it should be easy to find...)

nathan
(woo-hoo 10 pages!)
 
I added some real cargo tie downs after ripping one of the OEM ones out of the floor.

These are from a Dodge truck pick-up bed. I made a plate to go through on the outside. The plate is pretty much where the rear leaf spring mount is. For tie downs in the front of the cargo area I hook the ratchet strap to the rear seat back bolt. The setup worked well on the last Moab trip. (pics of Moab to come soon)

DSCN5943.JPG

DSCN5944.JPG

DSCN5945.JPG

Nathan
 

Attachments

  • DSCN5943.JPG
    DSCN5943.JPG
    13.9 KB · Views: 8
  • DSCN5944.JPG
    DSCN5944.JPG
    12.9 KB · Views: 8
  • DSCN5945.JPG
    DSCN5945.JPG
    16.6 KB · Views: 6
Last edited:
May 2012 Moab pics and video here:
https://picasaweb.google.com/116333554950363953131/MoabMay2012?authuser=0&feat=directlink

We ran Flat Iron Mesa on Saturday, we got almost no pics due to the 50mph wind. It was mostly un-eventful.

Sunday we did Poison Spider Mesa. I managed to spot my father in laws tj into the bottom of the wedgie, he escaped without a scratch. We managed to go off the trail and put our xj really close to tipping over. I think the anti-rock in the rear might make it feel too stable, I swear we should have rolled. My father in law saw it and and yelped an expletive. It happened so quick no one got a photo.

Monday we ran Gold Bar Rim. Other than coming up the "water fall" there wasn't many issues. I am told that a center limiting strap up front will take care of those issues.

I also had issues with the rear coil springs rubbing in their buckets. The passenger side one I could jack up and center and it wouldn't rub for the rest of the day. The driver side I welded the coil bucket at a slight angle so something will need to be done about that. Other than that the vehicle ran flawlessly.

Next up is to finish off the re-enforcement of the uni-body, basically just plate from the front bumper plate to the where the OEM lower control arm was. I am going to add a support to the drop down track bar mount going over to the passenger side, this will give me a nice place to mount my center limit strap.

Re-gear and an eaton e-locker up front are near the top of the list too, we don't need lower gears off road, our xj will go up anything except a hill at 60mph.

nathan
 
Last edited:
Wow 3 months no update.

I did this a while ago but didn't update. I added a skyjacker 3/4 inch urethane spacer to the rear coil. One reason is the spring rubbing that happened in Moab, the other is that the rear sagged a little compared to the front, and when loaded with moab gear it needed a little more in the rear.

This took care of the rubbing issue (at 5 mile at least)
DSCN5982.JPG

Also out at Snakes I managed to permanently damage a sidewall. It actually held air all the way home, I went out the next day and the tire was completely flat. I have talked to the guys at Discount before and have thought about what to do. Discount said that since the old 37x12.5x15 mtr was out of production and there are very few 37 inch tires for a 15 inch wheel that they would replace it with a new 37 inch kevlar mtr. Of course I would need wheels. I have the tire certificates at discount and they have always been great about taking care of me. So Discount bought one new 37x12.50x17 mtr, I bought one and I bought 4, black 17 inch soft 8's. They came in the other day.

The 37 inch kevlar mtr's are actually 37 inches, the old ones were not quite 37 inches. my old ones don't look that worn there is about an inch of difference between them.
DSCN5993.JPG

DSCN5995.JPG

DSCN5997.JPG

DSCN5998.JPG

opinions on if I should have them in the front or the rear?

I took it to a parking lot and put it in 4wd with the new, bigger tires in rear and drove straight for about 100 yards. Nothing popped or made any noise. I know it was bound up since I couldn't easily get the front to go into neutral on the d300.

pros for rear, the rear sits higher (which looks better than the front sitting higher) Tire pros always says put the new ones in the rear

pros for the front, the bigger tires will move further with the same rpm so the front will pull the rear, also you need more traction up front when climbing and assuming the new mtrs have better traction this would help off road.

I will try to compensate with tire pressure. Also I have twin sticks so I am in RWD 98% of the time. Pretty much I put the front in to go up or down something sketchy then go back to RWD.

Stay tuned for hydro assist update.

Nathan
 
Last edited:
So I should have done hydro-assist steering from the beginning of this project. It was a failure on my part to realize how easy it is and how much safer it will be off road and how much longer steering components will last. Also I won't have to worry about ripping the steering box from the frame. Also after every time wheeling I could tighten the pitman arm nut a little bit, I know it wasn't loosening since I put paint on the nut and shaft. My guess is the since the pitman arm is so long the splines are stretching out... yeah scary.

The first thing I had to do was to get the steering to go lock to lock. The jeep pitman arm and distance from ball joint to knuckle is shorter than the same distance on a ford. So with ford knuckles and a jeep pitman arm the knuckles were not getting close to full lock.

Did a little research and found this thread on pirate.
http://www.pirate4x4.com/forum/showt...=857210&page=3

post #63 gives a good guess as to what it should be. So I went about re-locating my drag link on my hi-steer arm. I didn't want to get a ford pitman arm, I couldn't find one with the same drop mine has which matches the drop on my drop down track bar (no bump steer).

DSCN5987.JPG
(I love how hours of work can be summed up in one picture)

and installed
DSCN5991.JPG

and the sway bar link re-located (and probably still in the way...)(btw I did ad a gusset after I took this picture)
DSCN5992.JPG

so now that I have nearly lock to lock steering I can add hydro.


I wanted to put a clamp on the tie-rod I am a little nervous about the thin-ness of the clamp, but if it breaks, I can drive home with regular steering or battery weld the thing back together and onto the tie rod on the trail... The clamp more makes it easy for setup, gives me some wiggle room for mounting etc.

All tack welded (the darker tubing is left over from my tie rod so I know it is the same)
DSCN6001.JPG

made some tabs for the ram (plasma cutter=good)
DSCN6002.JPG

tabs welded to clamp, (tack welded I should say)
DSCN6003.JPG

Hopefully today I can get the axle side mount done.

Nathan
99 xj
build thread here...
 
Last edited:
Back
Top