- Location
- West Bountiful, UT
You are using an out of date browser. It may not display this or other websites correctly.
You should upgrade or use an alternative browser.
You should upgrade or use an alternative browser.
Topic of Discussion Tile. Yes, this is THAT thread
- Thread starter Hickey
- Start date
- Location
- Grantsville, Utah
Same.
- Location
- Never Far From Nowhere
Next question for all you experts out there. After cleaning the floor and properly checking the level, the height difference reaches a max of 5/8" in one corner. So my plan is to go with self leveling compound. I sealed everything up last night and was planning on priming the floor tonight when I read on the TDS for the leveling compound that you should not pour it on particle board, which is what I have. Should have read that earlier, but here we are. I'm assuming that this is because particle board is more porous and will wick out the moisture while the leveler cures thus leaving it more brittle and less stable as an underlayment.
Now, I'm lazy and I really don't want to have to tear out all the particle board if I don't have to. Does anyone have experience with this? Its a small space (36 sqft), the floor will be primed, should I just roll the dice? You're supposed to wet the floor with a sponge before you pour the leveler anyway, so that should help with the wicking issue.
Now, I'm lazy and I really don't want to have to tear out all the particle board if I don't have to. Does anyone have experience with this? Its a small space (36 sqft), the floor will be primed, should I just roll the dice? You're supposed to wet the floor with a sponge before you pour the leveler anyway, so that should help with the wicking issue.
- Location
- Grantsville, Utah
I wonder if it’s a grip/adhesion issue because the particle board is much more smooth than say OSB?Next question for all you experts out there. After cleaning the floor and properly checking the level, the height difference reaches a max of 5/8" in one corner. So my plan is to go with self leveling compound. I sealed everything up last night and was planning on priming the floor tonight when I read on the TDS for the leveling compound that you should not pour it on particle board, which is what I have. Should have read that earlier, but here we are. I'm assuming that this is because particle board is more porous and will wick out the moisture while the leveler cures thus leaving it more brittle and less stable as an underlayment.
Now, I'm lazy and I really don't want to have to tear out all the particle board if I don't have to. Does anyone have experience with this? Its a small space (36 sqft), the floor will be primed, should I just roll the dice? You're supposed to wet the floor with a sponge before you pour the leveler anyway, so that should help with the wicking issue.
- Location
- Never Far From Nowhere
Maybe. The primer is and adhesive as well. So I'd think that'd help there.I wonder if it’s a grip/adhesion issue because the particle board is much more smooth than say OSB?
Pike2350
Registered User
- Location
- Salt Lake City
I think I would last down 1/4" concrete board and lay the level or on top of that.
Tonkaman
Well-Known Member
- Location
- West Jordan
I think the main concern is mostly about drawing the moisture into the wood and out of the compound. If the wood is primed, it’s less of an issue.Next question for all you experts out there. After cleaning the floor and properly checking the level, the height difference reaches a max of 5/8" in one corner. So my plan is to go with self leveling compound. I sealed everything up last night and was planning on priming the floor tonight when I read on the TDS for the leveling compound that you should not pour it on particle board, which is what I have. Should have read that earlier, but here we are. I'm assuming that this is because particle board is more porous and will wick out the moisture while the leveler cures thus leaving it more brittle and less stable as an underlayment.
Now, I'm lazy and I really don't want to have to tear out all the particle board if I don't have to. Does anyone have experience with this? Its a small space (36 sqft), the floor will be primed, should I just roll the dice? You're supposed to wet the floor with a sponge before you pour the leveler anyway, so that should help with the wicking issue.
The second concern would be if the floor flexes when you walk on it. Self leveling compound is so thin it will easily crack if the floor is too flexible.
- Location
- Never Far From Nowhere
I talked to the manufacturer of the leveling compound I'm using, and they said that if I prime the floor, which I was planning on doing, then I'm fine. As for the stability, the subfloor is solid. The particle board is just an underlayment.I think the main concern is mostly about drawing the moisture into the wood and out of the compound. If the wood is primed, it’s less of an issue.
The second concern would be if the floor flexes when you walk on it. Self leveling compound is so thin it will easily crack if the floor is too flexible.
I primed it tonight, self leveler goes down tomorrow.
- Location
- Never Far From Nowhere
- Location
- Never Far From Nowhere
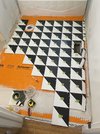
It doesn't really for the full tiles, but since we're dry laying this will help us keep track when we're finally setting the tiles. Also, my wife wanted to make sure that the best looking tiles were in the most visible areas while the less desirable ones were more hidden and then the ones with chips etc. were used for cutting.
- Location
- Never Far From Nowhere
Corban_White
Well-Known Member
- Location
- Payson, AZ
Man that looks like a lot of work!! I've always just started with full tiles at the tub and figured the rest out as I go! It's worked out for me so far.
- Location
- Never Far From Nowhere
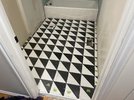
When we first started dry laying the tiles, I thought that we'd do the upper right corner by the tub. But after a few rows it became clear that the walls are so far from plumb that it was going to be a pain to keep all the grout lines straight. That's when we switched to starting in the middle and radiating out. I think if we'd used larger tiles and larger spacing, it wouldn't have been as big of a deal.Man that looks like a lot of work!! I've always just started with full tiles at the tub and figured the rest out as I go! It's worked out for me so far.
The first three rows were tough. Lots of checking and rechecking with a level and a ruler. But once those had stabilized a bit, the rest went down real quick. I think it looks good, except the threshold. I wanted to use a fairly large beveled transition, but we couldn't find one that my wife liked. So we went with a thin rounded nose one that I just don't think looks right. Oh well.Smokes. That is a straight line nightmare!
Good job making it work!
Tonight I get to clean out all the grout lines and hopefully seal the stone. Fun times. Looking forward to being out of town this weekend sipping mai-tai's poolside.
Corban_White
Well-Known Member
- Location
- Payson, AZ
When we first started dry laying the tiles, I thought that we'd do the upper right corner by the tub. But after a few rows it became clear that the walls are so far from plumb that it was going to be a pain to keep all the grout lines straight. That's when we switched to starting in the middle and radiating out. I think if we'd used larger tiles and larger spacing, it wouldn't have been as big of a deal.
The first three rows were tough. Lots of checking and rechecking with a level and a ruler. But once those had stabilized a bit, the rest went down real quick. I think it looks good, except the threshold. I wanted to use a fairly large beveled transition, but we couldn't find one that my wife liked. So we went with a thin rounded nose one that I just don't think looks right. Oh well.
Tonight I get to clean out all the grout lines and hopefully seal the stone. Fun times. Looking forward to being out of town this weekend sipping mai-tai's poolside.
Starting in the middle with a lot of layout is definitely the way the pros recommend. I'm just too lazy to do it that way! And I'm also way too lazy to use tiles that small.
Tonkaman
Well-Known Member
- Location
- West Jordan
This turned out great!View attachment 154600
My back hurts.
- Location
- Never Far From Nowhere
Last night after I cleaned out all the grout lines and vacuumed everything up we found that there were a number of tiles with slight amounts of lippage, like 1/32nd or 1/64th. Grout will make them less apparent, and most people will never notice. But my wife said, "We probably wouldn't have had that if we'd used larger tiles, huh? Next time we can do that."Starting in the middle with a lot of layout is definitely the way the pros recommend. I'm just too lazy to do it that way! And I'm also way too lazy to use tiles that small.
Next time there's a tile project in a bathroom it will be in a new build and I'll just pop in to make sure the contractor is doing it right. Ugh.
Tonkaman
Well-Known Member
- Location
- West Jordan
Yeah…. I hate to break it to you, but contractors SUCK! Trust me, you made the right choiceLast night after I cleaned out all the grout lines and vacuumed everything up we found that there were a number of tiles with slight amounts of lippage, like 1/32nd or 1/64th. Grout will make them less apparent, and most people will never notice. But my wife said, "We probably wouldn't have had that if we'd used larger tiles, huh? Next time we can do that."
Next time there's a tile project in a bathroom it will be in a new build and I'll just pop in to make sure the contractor is doing it right. Ugh.


