General Tech What did you work on Today?

mbryson

.......a few dollars more
Supporting Member
I used to feel the exact same way about mixing brands Marc. Nowadays, less nervous about it as I've been doing it for small spot jobs over the past 10+ years. My first experience was with House of Kolor bases and candy's then using PPG clear with great success.

Then I experimented on a few small jobs with Sherwin Williams, Martin Senour and Diamont bases and used PPG clears with excellent results. The Sherwin Williams base was on my son's LJ as the cost was much less than the same in PPG. The Diamont bases with PPG Clear was the biggest risk as it was on our 2003 Monaco Dynasty coach which had some clear peeling and I wanted to repaint the failing areas. Diamont was what Monaco used from the factory and was the only thing I could get mixed in the correct colors so I went with it. I initially tested it on the refrigerator cover then ended up using the Diamont base with PPG clear on the complete bedroom slide, eyebrow (area over the windshield) and the large section between the front and bedroom slides on the street (driver's) side. The result was amazing so I have little fear now of mixing brands as long as I stay with a urethane base.

One thing I have found is the most urethanes are now more comparable to PPG's DBC base rather than the older BDU bases. The DBU used an active reducer whereas the DBC and most other urethane bases I have used recently only require a reducer. After speaking with Barry @ SPI last year he recommended that if I wanted to really lock down the base well then mix about an ounce of activator from their clear into a quart of reduced base urethane (ready to spray) and it would basically turn it into a reactive reducer and help to avoid bleeds and mottling of the metallic bases. Hope all of that makes sense.

Over the years I have witnessed PPG using less and less solids in their clears resulting in my having to apply more coats in order to get the depth I was looking for and still have enough to cut & buff afterwards. In order to not run the first coat of the DC2021 clear I would apply a "fog coat" of clear initially over the base after a tack. Once the fog coat flashed for about 10 minutes I would follow by 2 full medium wet coats with 25-30 minutes flash time between coats using the 85-degree reducer. Then I would over-reduce the last coat of clear about another 10% with their 105-degree (very slow) reducer and this would allow the last coat to lay down like glass with nearly zero orange peel and a great depth.

For the past couple of years using SPI's Universal Clear I can say that it is definitely a high solids clear and does not need the previous mentioned steps. In fact with SPI's clear you do NOT want to put a fog coat down as the first coat. You want to put the first coat down as a medium wet coat and have it look like you want the final job to look. Then wait 30-minutes and do another. Two coats is all that is really needed and still provide plenty of mil thickness for a nice cut & buff job. A third coat can be applied if needed but I have not needed to use one yet and the results are amazing.

After curing I sand with 1500-grit then 2000-grit before going to compounding. On rare occasions or spots with a bit more trash or debris in them I may start with 1200-grit before going to 1500 and 2000 grits. On the open blend areas of the clear on my son's Duramax I just lightly hit them with some 2000-grit wet sandpaper before moving on to the three steps of polish and it resulted in a mirror finish without removing too much material or cutting back into the blend.

My procedure of cutting and buffing followed by a 3-step compounding/polishing process that I use has resulted in several best of paint awards, people's choice awards and best in class awards in many shows with cars that I've built.

I will post a few completed pictures of my son's Duramax in the next posts showing the results of not only the areas in which I painted, cleared and blended but also of the overall 20-year old OEM finish that we performed a full paint correction on over the weekend.

I hope that information is helpful.

Mike


1.4 tip size on the SPI? Sounds like interesting stuff. 1 coat is kind of an interesting concept but worth a shot for sure. For 1 coat, you just hit the edges (edges and tough to spray spots?) like you would with a basecoat and then "gloss" the big spots?
 

Attachments

  • SPI-4100.pdf
    142.1 KB · Views: 2

zmotorsports

Hardcore Gearhead
Vendor
Location
West Haven, UT
Good repair on the "flow indicator"

By "flow indicator" I'm assuming you are referring to my run?:rofl:

Yeah, I have a tendency to hose the clear on and occasionally put too much on the surface.:thinking:


1.4 tip size on the SPI? Sounds like interesting stuff. 1 coat is kind of an interesting concept but worth a shot for sure. For 1 coat, you just hit the edges (edges and tough to spray spots?) like you would with a basecoat and then "gloss" the big spots?

Yes, I use a 1.4 tip for the color, clear and sealer. Not sure if I mispoke, but you actually put two full coats down, not just one. The first coat shouldn't be a tack or fog coat, it should be full gloss just like you want the final finish to look like, then wait 30-minutes and apply a second coat. Two coats are all that is needed but IF you decide for a third, just be certain to wait the 30-minutes to avoid run and give plenty of time for the solvents to flash.
 

mbryson

.......a few dollars more
Supporting Member
By "flow indicator" I'm assuming you are referring to my run?:rofl:

Yeah, I have a tendency to hose the clear on and occasionally put too much on the surface.:thinking:


Yes, I use a 1.4 tip for the color, clear and sealer. Not sure if I mispoke, but you actually put two full coats down, not just one. The first coat shouldn't be a tack or fog coat, it should be full gloss just like you want the final finish to look like, then wait 30-minutes and apply a second coat. Two coats are all that is needed but IF you decide for a third, just be certain to wait the 30-minutes to avoid run and give plenty of time for the solvents to flash.


Flow indicators show you that you're JUST over the threshold of good "gloss"


I'm still a knuckle dragger that thinks you need a 1.7-1.8 tip for clear. (1.8-2.0 for primer) I used my Sata 1.4 gun (my 2.0 gun is unfortunately destroyed :( by leaving clear in it. I have no idea the last time I sprayed clear and I'm RELIGIOUS/OBSESSIVE about cleaning my paint guns. I vaguely remember lending it out but why the hell would I do that?) on some primer and REALLY didn't care for it. I might have to mix up a 1/2 pint of clear and see how the 1.4 guns sprays?

I bought a couple of DeVilbiss guns to do this car from Summit. I think they were $300 for the pair. They're really not bad hobby guns at all. Not sure I'd like to clean them like you would a professional gun (lots of nooks/crannies for material to hide in) but they spray pretty decently.
 
Last edited:

glockman

I hate Jeep trucks
Location
Pleasant Grove
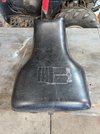
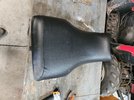
did you buy a cover or sew it all by hand? Where can I buy covers? Gravy?
I bought it from Rocky mountain ATV. It's a quad works brand. Looks to be good quality material. It was $35. This is much harder than a dirt bike seat cover though. The curves took me a couple iterations of stretch, staple, re-stretch.
 

jeeper

I live my life 1 dumpster at a time
Location
So Jo, Ut
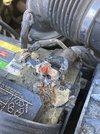
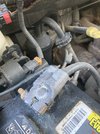
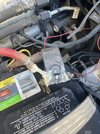
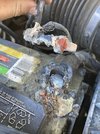
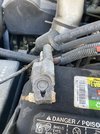
What do you Dodge Bro’s make if this? Positive terminal on one battery melted. I did notice leaking acid a few days ago, but didn’t think much of it. Gauge cluster started showing zero volts, and this is how I found it. I am not sure why it did this… I’ve got the mirrors flipped up like I should 🤷🏼‍♂️

The other 3 terminals seem fine.


D51837DA-790E-4230-896D-8BFE628B49A0.jpeg

025D16CC-7E33-4BF1-9151-7F8C3C884F86.jpeg

0DC73C19-77EB-4BEF-A58D-75ABB327C656.jpeg

61AECB1C-31C7-4949-95BC-9602A2ED54A1.jpeg

70B610F9-7C7E-48D9-A035-31C928E17A09.jpeg
 
Last edited:

jeeper

I live my life 1 dumpster at a time
Location
So Jo, Ut
Just kidding. I used 30 seconds and searched google.

Crossover cable failed. Alternator charges passenger side battery, computer reads from driver side battery. When the Crossover cable fails the alternato ramps up charge power and fries the passenger side battery
 

nnnnnate

Well-Known Member
Supporting Member
Location
WVC, UT
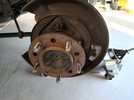
A rear caliper seized on my LX470 probably a month ago. Trying to be cheap I ordered parts to rebuild it and replace the rotors. After a quick trip to Palisades (with a borrowed truck, thanks Dad!) and after waiting for the parts I got it apart and saw the caliper was cracked so I did the order and wait thing again. It went back together pretty quick but something was dragging on the side that seized. I wondered if it was my parking brake (that had also been seized for some time) so I fiddled with that and then ended up just taking the shoes and whatnot out since my adjustments hadn't helped at all. You know, process of elimination. Still no dice. I searched on ih8mud for answers and someone says that the new oem rotors sometimes need to be clearanced on a lathe. I think, couldn't I just look at the dust shield and see where its making contact and sand/grind that down a little since I don't have a metal lathe and/or any skills?

20220707_194658.jpg

HOW IN THE WORLD DID I MISS THAT! I seriously took off and put the rotor back on like 5 times to adjust the parking brake and fiddle with stuff on Tuesday. Its ridiculous. I hit it with a hammer a couple times and its not dragging any more.

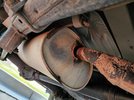
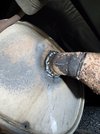
Bonus: I also "fixed" my exhaust. I put on a borla replacement muffler in 2017 and this spring it broke.

20220531_202532 (1).jpg

I used a ratchet strap to pull the two pieces back together and then chewed up some gum and stuck it on there. I didn't get any on the top so its not totally sealed but its not loud anymore which is what I was going for.

20220707_203939.jpg

My reg expired in June so I just need it to pass inspection. Funny thing is I took it to Master Muffler downtown on Wednesday to have them put a new muffler on and I asked them to check the brake situation as well. I dropped it right at 8 when they opened and when I called back at 3 to see where it was at they said they hadn't gotten to it. So much for first come first serve. Saved myself a penny and got to kind of weld something for the first time in years.

A couple new tires and it'll be as good as new*.

(*this is a totally false statement)
 

Hickey

Burn-barrel enthusiast
Supporting Member
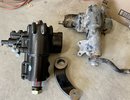
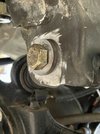
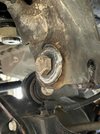
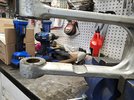
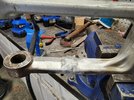
I swapped in a PSC Big Bore steering box yesterday on my JK. I've actually had the parts for nearly two years and just finally got around to it.

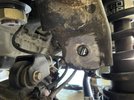
The old box had some deflection in the sector shaft. I thought that may have contributed to a hint of death wobble I've been feeling, but I think this wallowed out track bar hole might have been adding to that issue as well.

44B3E01B-BA10-41C0-9C0B-861594AD3303.jpeg

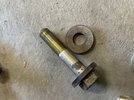
I had two weld washers floating around for things just like this.

99FB1CE0-FA82-4CA4-A4BB-C4F97BBA491D.jpegF215A829-1F8A-4194-BDCC-B51671D1D5A8.jpeg96EA4AD1-B497-483E-9260-EF6018C43C3F.jpeg

I AM FABRICATE!!
 

bryson

RME Resident Ninja
Supporting Member
Location
West Jordan
What do you Dodge Bro’s make if this? Positive terminal on one battery melted. I did notice leaking acid a few days ago, but didn’t think much of it. Gauge cluster started showing zero volts, and this is how I found it. I am not sure why it did this… I’ve got the mirrors flipped up like I should 🤷🏼‍♂️

The other 3 terminals seem fine.


View attachment 150512

View attachment 150513

View attachment 150514

View attachment 150515

View attachment 150516

Just kidding. I used 30 seconds and searched google.

Crossover cable failed. Alternator charges passenger side battery, computer reads from driver side battery. When the Crossover cable fails the alternato ramps up charge power and fries the passenger side battery
I get the scenario where the alternator could overcharge and ruin the passenger side battery like you say, but your melted terminal looks more like it was simply loose and not making good connection (and thus making lots of heat from arcing I assume?)

I'm thinking the crossover cable failure was a symptom - not the cause - and that the loose terminal was the initial problem. Maybe. Could be?
 

jeeper

I live my life 1 dumpster at a time
Location
So Jo, Ut
I get the scenario where the alternator could overcharge and ruin the passenger side battery like you say, but your melted terminal looks more like it was simply loose and not making good connection (and thus making lots of heat from arcing I assume?)

I'm thinking the crossover cable failure was a symptom - not the cause - and that the loose terminal was the initial problem. Maybe. Could be?

That was my original thinking as well, but the cummins forums say this is a pretty common issue to deal with 🤷‍♂️ Either way, it means new batteries and cables for me.
 

jeeper

I live my life 1 dumpster at a time
Location
So Jo, Ut
Does this mean you bought the clean one owner dually?

Yeah. I think he originally was planning to keep it and fix it himself. He was replacing parts.. But then one day called and said he wanted it gone asap, and I was there a few minutes later.
I’ve got a new windshield in it, new tires all around, replacement fender on but waiting for paint, new window switch plates, and fresh oil and air filter.
 
Top