General Tech What did you work on Today?

N-Smooth

Smooth Gang Founding Member
Location
UT
My old place was by that new Nielsen's. It’s good we moved before it opened!
I’m glad to have all the food options but yeah, gonna be poor and fat lol. They announced that smoked taco place will be on the other side of me and I’m already so excited.
 

N-Smooth

Smooth Gang Founding Member
Location
UT
Smok3d tacos? How do they keep them lit?
🤣

But seriously tell me more
There’s one in AF and another one was just recently opened in Saratoga Springs. I’ve talked to a few people that have had it and love it. I just love tacos, especially when I can swing to the Home Depot they’re building right by it and then get tacos on the way home- all on an electric toy of some sort. That’s living!
 

N-Smooth

Smooth Gang Founding Member
Location
UT
Anyone ever used vinegar for rust removal? We have gallons of the stuff in our food storage so I decided to give it a shot on this crazy cart chain. The chain was super rusty and crusty. Last night I sprayed it down with chain lube and wiped it but it’s still nasty so here we are. I crammed it in a water bottle and put in enough vinegar to cover it. I’ve been agitating it periodically to try and help the process. It’s only been a couple hours but it’s gross. #forscience
IMG_9579.jpeg
 

N-Smooth

Smooth Gang Founding Member
Location
UT
Evaporust works better, but once a chain rusts It's buest to chuck it. Especially on those little ones. Too much slop in the pins and they come off. Ask me how I know 😂
Oh yeah I already have a replacement on the way but figured I’d have some fun first. A chain coming off is an exciting adventure.

New chain gets here Monday 😎
 

Hickey

Burn-barrel enthusiast
Supporting Member
Anyone ever used vinegar for rust removal? We have gallons of the stuff in our food storage so I decided to give it a shot on this crazy cart chain. The chain was super rusty and crusty. Last night I sprayed it down with chain lube and wiped it but it’s still nasty so here we are. I crammed it in a water bottle and put in enough vinegar to cover it. I’ve been agitating it periodically to try and help the process. It’s only been a couple hours but it’s gross. #forscience
View attachment 159288
The Heinz Cleaning Vinegar in the 1 gallon jug is a pretty good rust remover. It will also remove mill scale with enough time and agitation. You can find it on the same aisle as the home cleaning products.
 

1969honda

Well-Known Member
Supporting Member
Location
Cache
Wife said the Yukon was making a rattling noise, I thought it had cracked the flex plate. Nope, two sheered factory bolts, vibrations walked the others out and buggered the first couple threads of every hole. 🤬😡

Now tomorrow I get to start on extracting the broken bolts. Then it's clean up the crank threads, replace the rear main oil seal, flexplate, crank to flexplate bolts and possibly the converter.
 

Attachments

  • IMG_20230429_194934_01.jpg
    IMG_20230429_194934_01.jpg
    466.6 KB · Views: 20
  • IMG_20230429_194838.jpg
    IMG_20230429_194838.jpg
    561.7 KB · Views: 20

NYCEGUY01

Well-Known Member
Location
Willard, UT
Had a semi productive morning.
Got the 4 speed and transfer case pulled out in preperation for the new trans/transfer. Just gonna roll with the TH400/205 and see how I like it for now.
Then moved on to suspension, got the rear springs bolted up and the rear 14 bolt hung in there., the front springs are also in and the Dana 60 is sitting near the truck for now. lol

I ran out of steam and called it early.
Next weekend Ill get the Front axle in and trans/transfer mounted.
Then it can finally get up on its new tires to check ride height and make adjustments etc...
Once ride height looks good I can run the driveshafts up to Axis for re-tubing.

rs.jpgfs.jpg
 

Zombie

Random Dead Guy
Location
Sandy Utah
Not big or exciting, but it'll add a lot of comfort on my drive home today - As it got warmer I noticed that my AC was only blowing out of the dash vents in my Ram. It wasn't hard to find the two culprits, this one was the worst:
20230430_130927.jpg

A few dollars at Autozone replace this and the two couplers at the check valve at the dash. Full selection, quick changes between modes, and I'm betting it'll go into 4wd a lot quicker now.
 

cruiseroutfit

Cruizah!
Moderator
Vendor
Location
Sandy, Ut
Added some ink. Koyari-san was the Cheif Engineer of the 200 Series platform (and many other Land Cruisers) and is an absolute lover of Rankul models around the globe. I've been fortunate to spend some time with him over the years including a visit to the Land Cruiser Heritage Museum and a camping trip this last week. The team stopped by Cruiser Outfitters today to check out our operation and some of the Land Cruiser projects and parts we are working on. I had him leave his mark on a few things around the building including my 08 200's visor.

15CA3069-9E19-4C1E-8201-FA2711D81B44.jpeg
A756DA3C-BEAC-402C-B220-AC9FD25719D1.jpeg
 

N-Smooth

Smooth Gang Founding Member
Location
UT
Tonight we rode the razor bikes to get dinner and afterwards the boys decided they wanted to paint them on a whim. So we grabbed some fusion paint and went to town. I’ve heard great things but never used it. Mine is the blue color satin rolling surf and the other two are basic glossy yellow and green. The satin is legit but I’ll never use their gloss again, it sucks. The whole point of it is not having to prime but man it covers terribly and runs super easily. A primer really would’ve been ideal.
IMG_9649.jpegIMG_9646.jpeg
The yellow was over red plastics so it needs a couple more coats but the can is almost spent. The green is better but still needs another coat or two.
After that I decided the red seat on my bike has to go. I thought I’d swap it with one of the black seats on our other bikes but it’s a unique one. Lame. I messaged Stratton about having him upholster it and he said to get vinyl and fabric paint and give it a go. So I did and it looks great right now. We’ll see how it holds up.
IMG_9644.jpegIMG_9650.jpeg
 

zmotorsports

Hardcore Gearhead
Vendor
Location
West Haven, UT
I've had a Buick LaCrosse with the High Feature V6 in the shop the last week. The owner brought it to me with an oil leak a month or so ago to see if I could identity where it was coming from. Unfortunately, it was coming from the right bank at the union of the head and front timing cover.

I explained that these GM High Features V6's are a good engine but they have one area that needs to be addressed around the 120k-140k range if they are well cared for and that is the timing chains, guides and tensioners. If neglected these can have a catastrophic failure much sooner, as I had one fail for a gentleman around 80k because he insisted on extended oil service intervals. The worse things on any of these modern engines that utilize VVT configurations is extended oil change intervals. Fresh, clean and healthy oil is a must for any of these modern engines to survive as the oil serves not only for lubricity and cooling but also as hydraulics for the many phasers and tensioners in the VVT systems.

This car was the perfect candidate as the owners are adamant about oil changes and take very good care of the car. I gave a quote and laid out the options as far as some preventive maintenance on the timing chains system and fixing the leak vs. looking for something else and gave them time to discuss. They had discussed it and called me back a week or so later to approve the repairs so I ordered the parts and put the car in line on the "list" of to-do items.

This really isn't a difficult job but one that needs to have attention paid to it as there are a lot of moving parts and the timing system has three timing chains, two idlers, three hydraulic tensioners and 6 guides all of which must go together in the proper order and timing. This engine has two timing stages, Stage 1 is the left bank secondary chain and primary chain and then the engine must be put into Stage 2 for the right bank secondary chain and related components. Also the front timing cover is cast aluminum and care must be taken to ensure a leak free repair as it's going back together. Ideally this job is much easier with the engine/trans and cradle assembly lowered from the car but it can be done with everything in the car, it's just a bit more problematic due to space constraints and access.

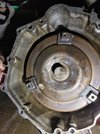
Car racked and ready to begin the repair. This really is a nice clean car for 130k miles and 13 years old now.
buick1.jpg

Teardown commenced.
buick3.jpg

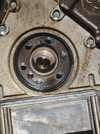
Upper intake plenum removed, rocker covers removed, wiring loom laid out of the way, upper motor mount assembly along with accessory drive and belt removed and finally the timing cover removed gaining access to the timing chain and related components. The majority of the work and time is just getting to the timing chains, replacing them is relatively easy and quick. Luckily we caught this engine in time as the chains were showing signs of severe stretch but not quite to the point of jumping timing yet or even getting some of the common diagnostic codes that go along with this system displaying camshaft correlation codes. Down near the bottom left of the picture you can see the power steering pump which was actually the worst part of this job as the fasteners need to be removed so it can be pushed out of the way only about 1/2"-3/4" just to allow access to two timing cover bolts.
buick15.jpg

All timing chains, guides, tensioners, idlers and sprockets removed so cleaning of the block and heads sealing surfaces can be cleaned. I highly recommend a plastic razor blade followed by carbon gasket scrapers and lastly a chase with Scotchbrite to clean the surface as anything more aggressive can gouge the aluminum and create a potential leak point. The block, head and oil pan have smooth machined surfaces for sealing.
buick32.jpg

All new parts at the ready in preparation for installation. I also soak the chains in oil the night before so they don't get damaged from dry starting until oil can begin flowing/slinging.
buick37.jpg

Timing cover is thoroughly cleaned inside and out along with new VVT solenoid valve seals, crankshaft seal and water pump seal. IF you look closely near the grooves machined in the sealing surface you can see a coarser crosshatch pattern. The sealant is to be applied into the grooved so ensure the grooves are properly cleaned of old sealant but the coarse crosshatch machining pattern in the sealing surface it so actually hold and retain a certain amount of sealant to allow proper sealing of the engine.
buick45.jpg

I probably spend a bit more time cleaning parts than many shops but I can't seem to put filthy parts back together on a job. The lower timing cover was oil soaked and required some heavy scrubbing with a toothbrush and solvent brush in the solvent tank. Here you can see all the new seals installed and the cover awaiting installation.
buick46.jpg

The engine is in Stage 1 timing. This can be a bit confusing as Stage 1 timing is actually starting with assembly of Bank 2 (left bank). Bank 1 on this engine is the right bank which is up against the firewall. With the engine in Stage 1, the camshaft flats must be horizontal and the timing marks on the phasers properly lined up as well as the crankshaft at Stage 1 with the crank timing mark at about the 5 o'clock position on the oil pump. There are exactly ten links between the timing marks on the phasers so that is another way to ensure the cams haven't slipped out of time with one another. Also worth noting is as soon as the rocker covers and timing covers are off you should do a quick check of the phasers to ensure they are not damaged. They should lock in the static position so if there is any movement of the camshaft separately from the phasers in the static condition now would be the time to replace the affected phaser(s). Guides in place, tensioners in place, idler in place and all torqued to proper spec before even thinking about rolling the engine over into Stage 2 timing.
buick54.jpg

With everything double checked the engine can be rolled over to Stage 2 timing with the crankshaft sprocket aligning with the timing mark around the 8 o'clock position on the oil pump. Now the seconday timing chain and related components can be installed on Bank 1 (rear against firewall on this engine).
buick55.jpg

With the timing system completed a final wipe of the sealing surface on the block, heads and oil pan with a lint free rag and brake wash in preparation to receive the timing cover and sealant. The sealant is applied to the timing cover. The FSM states a 3mm (~1/8") around the perimeter of the timing cover with the exception of the areas where components such as heads and block meet and it specified in those area a 5mm (~13/64") bead be applied. My sealant of choice for the past couple of decades now has been the GM ES (Engine Sealant) as I feel it is the perfect balance of adhesive and sealing materials. I also applied a very thin application of Sil-Glyde to the rubber seals to aid in assembly without damaging the rubber sealing surfaces. Guess this is habit more than anything. I must stress the importance of not using any mechanized means of removing the old sealant from these surfaces as they are precisely machined to not only have the crosshatch pattern but also the distance between the block and standoffs cast into the timing cover must be exact or improper sealing could occur.
buick56.jpg


More pics to follow.....
 

zmotorsports

Hardcore Gearhead
Vendor
Location
West Haven, UT
Continuing on with the LaCrosse timing job.

The timing cover is in place and all fasteners are torqued to spec.
buick57.jpg

The harmonic balance can now be installed. This fastener is a torque to yield bolt so it should be replaced at this time. Torque spec on this bolt is 74 ft/lbs. plus 150-degrees so be prepared to lock the crank very securely in order to achieve this torque as even with the spark plugs in this will easily roll the engine over without ever even coming close to spec. I locked a screwdriver through the balancer under the block to prevent movement of the crankshaft rather than dealing with pulling the starter to gain access to the flywheel but either method will work fine.
buick58.jpg

Another thing I like to do with any job where the cooling system has been opened is as soon as possible get the cooling system closed up so I can pull a vacuum on it and ensure there are no leaks and then fill the cooling system. Many years ago I had a couple bite me where I was completely done with the repair only to find I had a hose or fitting that was leaking and access was denied because the entire thing was put back together. Now I test as soon as possible so in the event I need to get access back to a component I can do so without complete disassembly again. I must also mention that I did a coolant flush and replaced both upper and lower radiator hoses as well as thermostat while the system was open. Here you can see the upper radiator hose sucked flat due to the vacuum on the cooling system.
buick62.jpg

Cooling system holding steady. I like to leave them in this state for a good 20+ minutes while I do something else. Here I could see rather soon that the system was tight so I went about reinstalling the accessory drive, serpentine belt and upper motor mount assembly while the system held vacuum. Then once the motor mount was installed the blocking could be removed from under the engine I went ahead and filled the cooling system with a fresh charge of coolant.
buick60.jpg

Rocker cover seals and gaskets were quite brittle and in need of replacement prior to reassembly.
buick65.jpg

The seals for the spark plug standoffs pressed into the covers. These don't require a lot of force so be careful not to crack or break the rocker cover. I used my EZ Driver more to ensure I got the seal in squarely and not canted in the bore. A couple of light taps ensured they were fully seated. The Fel-Pro gaskets are also of a new redesign for this engine.
buick66.jpg

Rocker covers, wire loom and coil packs all installed and torqued to spec.
buick70.jpg

Upper intake plenum installed and the last of the wiring laid into its proper location. My goal on a repair is to make it look like no one has been under the hood. Things like properly reinstalling the wiring looms and hoses back where they go are paramount and even small details like seeing the proper amount of sealant coming out from between components. Most GM's (and others for that matter) you should see about a 1/16" to 1/8" bead protruding out from between components such as timing cover and heads. If more than that you applied too much. It's a balancing act of using enough to properly seal yet not so much as to have sealant oozing out or worse, inside and engine. One of my pet peeves are popping a hood and seeing RTV oozing out everywhere.
buick74.jpg

Old components set aside to show the owner the wear in the system.
buick75.jpg

Engine fired up and purring like a kitten and ready to provide many more years and miles of service.
buick78.jpg

That completes another repair.

Thanks for looking.

Mike
 

anderson750

I'm working on it Rose
Location
Price, Utah
Continuing on with the LaCrosse timing job.

The timing cover is in place and all fasteners are torqued to spec.
View attachment 159475

The harmonic balance can now be installed. This fastener is a torque to yield bolt so it should be replaced at this time. Torque spec on this bolt is 74 ft/lbs. plus 150-degrees so be prepared to lock the crank very securely in order to achieve this torque as even with the spark plugs in this will easily roll the engine over without ever even coming close to spec. I locked a screwdriver through the balancer under the block to prevent movement of the crankshaft rather than dealing with pulling the starter to gain access to the flywheel but either method will work fine.
View attachment 159476

Another thing I like to do with any job where the cooling system has been opened is as soon as possible get the cooling system closed up so I can pull a vacuum on it and ensure there are no leaks and then fill the cooling system. Many years ago I had a couple bite me where I was completely done with the repair only to find I had a hose or fitting that was leaking and access was denied because the entire thing was put back together. Now I test as soon as possible so in the event I need to get access back to a component I can do so without complete disassembly again. I must also mention that I did a coolant flush and replaced both upper and lower radiator hoses as well as thermostat while the system was open. Here you can see the upper radiator hose sucked flat due to the vacuum on the cooling system.
View attachment 159477

Cooling system holding steady. I like to leave them in this state for a good 20+ minutes while I do something else. Here I could see rather soon that the system was tight so I went about reinstalling the accessory drive, serpentine belt and upper motor mount assembly while the system held vacuum. Then once the motor mount was installed the blocking could be removed from under the engine I went ahead and filled the cooling system with a fresh charge of coolant.
View attachment 159478

Rocker cover seals and gaskets were quite brittle and in need of replacement prior to reassembly.
View attachment 159479

The seals for the spark plug standoffs pressed into the covers. These don't require a lot of force so be careful not to crack or break the rocker cover. I used my EZ Driver more to ensure I got the seal in squarely and not canted in the bore. A couple of light taps ensured they were fully seated. The Fel-Pro gaskets are also of a new redesign for this engine.
View attachment 159480

Rocker covers, wire loom and coil packs all installed and torqued to spec.
View attachment 159481

Upper intake plenum installed and the last of the wiring laid into its proper location. My goal on a repair is to make it look like no one has been under the hood. Things like properly reinstalling the wiring looms and hoses back where they go are paramount and even small details like seeing the proper amount of sealant coming out from between components. Most GM's (and others for that matter) you should see about a 1/16" to 1/8" bead protruding out from between components such as timing cover and heads. If more than that you applied too much. It's a balancing act of using enough to properly seal yet not so much as to have sealant oozing out or worse, inside and engine. One of my pet peeves are popping a hood and seeing RTV oozing out everywhere.
View attachment 159482

Old components set aside to show the owner the wear in the system.
View attachment 159483

Engine fired up and purring like a kitten and ready to provide many more years and miles of service.
View attachment 159484

That completes another repair.

Thanks for looking.

Mike
I will assume you don't charge enough for the work you do ;), but if you charged the labor rate for the quality of your work deserves, it would probably be $250 an hour
 
Top