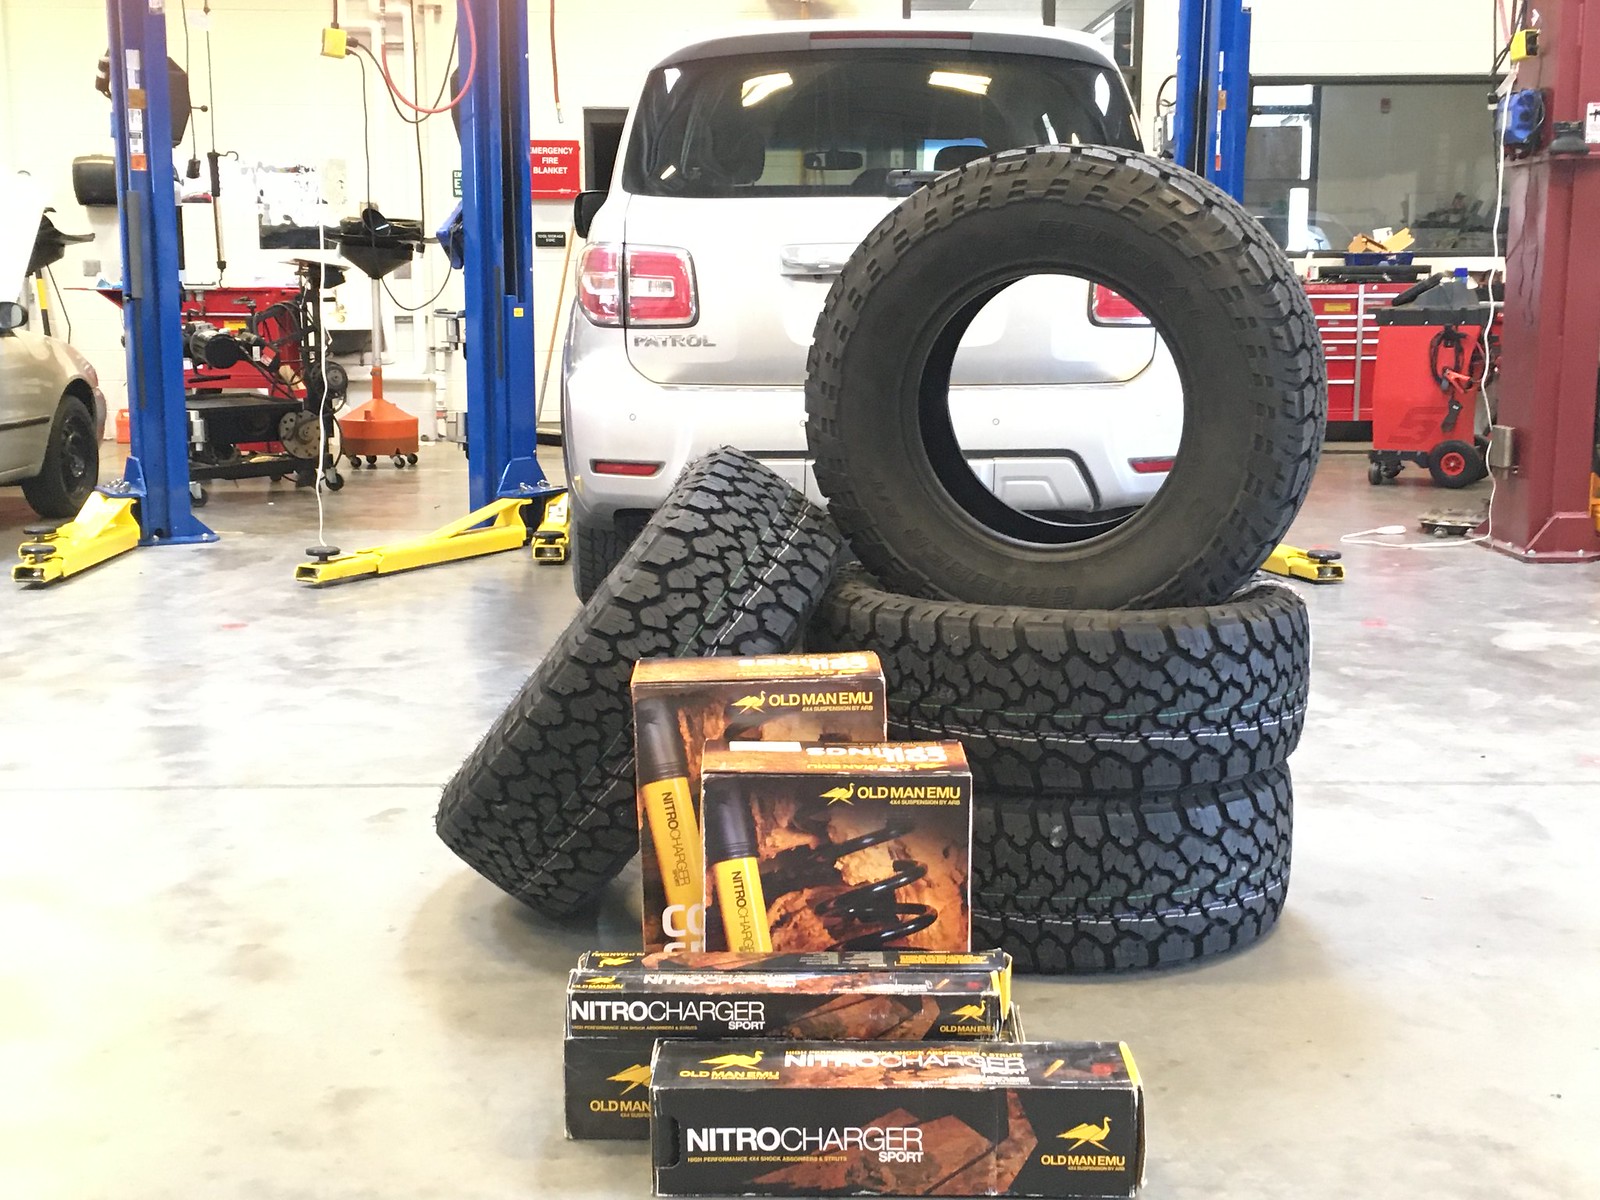
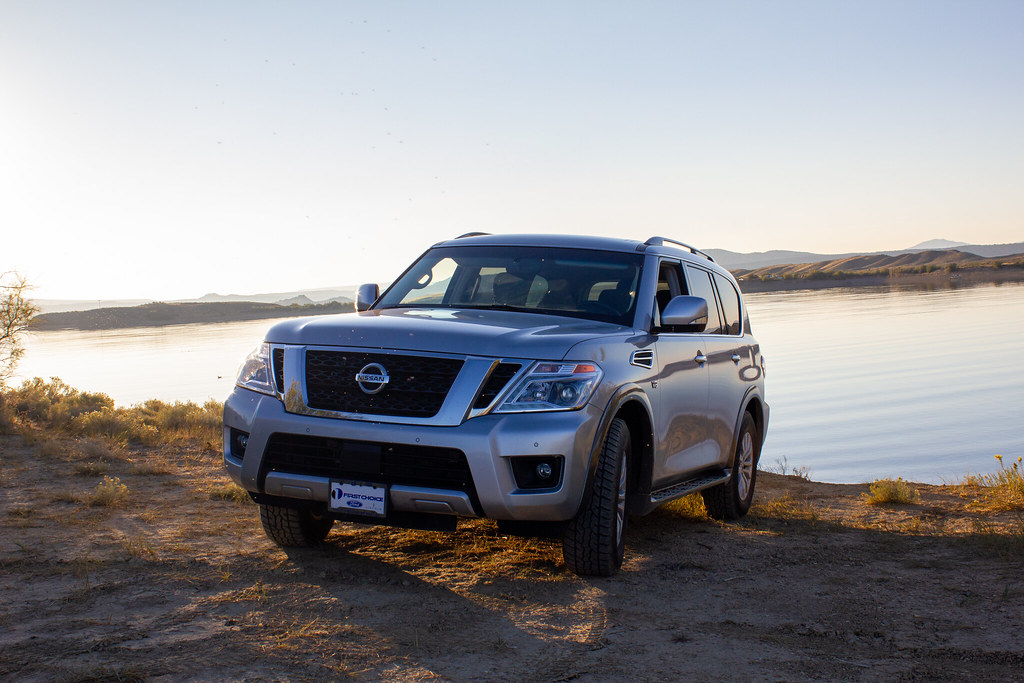
Stephen's 2017 Nissan Patrol err… Armada
Engine: Nissan VK56VD 5.6L V8
Transmission: Stock 7-Speed Automatic
Transfer Case: Stock
Front Axle: Stock
Rear Axle: Stock
Suspension:
Front: Alldogs Offroad Y62-F-M springs, OME 90015 struts, SPC 25560 upper control arms
Rear: Alldogs Offroad Y62-R-M Springs, OME 60084 shocks
Steering: Stock
Wheels and Tires: 35"x12.50 R18 General Grabber ATx's
Communication:
HAM: ICOM ID-4100A
GMRS: Midland MXT-275


______________________________________________________________________
I've loved my Trooper over the last eight and a half years, but I just got the itch about a month ago to get something new. Even with all the work and upgrades I've done to the Trooper, its still a 26-year old vehicle at heart. I wanted something newer and yes, more comfortable. So yesterday I pulled the trigger on this Armada. These have been on my radar since Nissan started basing them on the global Patrol platform in 2017. Yes, the Infiniti QX56/80 have been based on the Patrol since 2011; but those are just ugly.
Now an Armada is 80% Patrol. In Nissan's infinite wisdom, they deleted the factory locker, tuned the suspension to be more road biased, and didn't include the "Rock, Sand, and Mud" transmission modes. And the good ol'Federal impact standards mean the bumpers are totally different. All that said, the Armada is still a very competent off-road vehicle. And its freaking huge. Globally, the Patrol is a direct competitor to the 200-Series Land Cruiser, but the Patrol is actually slightly larger than that. So for me, who generally enjoys small vehicles like Samurai's and Miata's; its like driving a bus! But boy; its a bus with guts! That 390hp (equivalent to ~6 Samurais, in case you're wondering) and 401 lb-ft of torque MOVES.
So what are my plans with this barge? Well, its more or less going to replace the Trooper as my backcountry adventure vehicle. I'm still teasing out exactly what I want to do and where to get it from. As mentioned, since this isn't fully a Patrol, the aftermarket is a bit scattered. Some Patrol stuff bolts right on, some (like bumpers) do not. And the Armada specific aftermarket seems to just be spinning up. A number of companies have products that are in development right now.
In broad strokes, though, a mild lift (2"-3"), better all-terrain tires, ARB air locker in the rear, rock rails, front and rear bumpers (when they're available), and some interior stuff to make camp life a bit more luxe.
And yes, @bryson, part of the motivation in getting an Armada was because its different from a Land Cruiser. I just can't help myself.
Engine: Nissan VK56VD 5.6L V8
Transmission: Stock 7-Speed Automatic
Transfer Case: Stock
Front Axle: Stock
Rear Axle: Stock
Suspension:
Front: Alldogs Offroad Y62-F-M springs, OME 90015 struts, SPC 25560 upper control arms
Rear: Alldogs Offroad Y62-R-M Springs, OME 60084 shocks
Steering: Stock
Wheels and Tires: 35"x12.50 R18 General Grabber ATx's
Communication:
HAM: ICOM ID-4100A
GMRS: Midland MXT-275
______________________________________________________________________
I've loved my Trooper over the last eight and a half years, but I just got the itch about a month ago to get something new. Even with all the work and upgrades I've done to the Trooper, its still a 26-year old vehicle at heart. I wanted something newer and yes, more comfortable. So yesterday I pulled the trigger on this Armada. These have been on my radar since Nissan started basing them on the global Patrol platform in 2017. Yes, the Infiniti QX56/80 have been based on the Patrol since 2011; but those are just ugly.
Now an Armada is 80% Patrol. In Nissan's infinite wisdom, they deleted the factory locker, tuned the suspension to be more road biased, and didn't include the "Rock, Sand, and Mud" transmission modes. And the good ol'Federal impact standards mean the bumpers are totally different. All that said, the Armada is still a very competent off-road vehicle. And its freaking huge. Globally, the Patrol is a direct competitor to the 200-Series Land Cruiser, but the Patrol is actually slightly larger than that. So for me, who generally enjoys small vehicles like Samurai's and Miata's; its like driving a bus! But boy; its a bus with guts! That 390hp (equivalent to ~6 Samurais, in case you're wondering) and 401 lb-ft of torque MOVES.
So what are my plans with this barge? Well, its more or less going to replace the Trooper as my backcountry adventure vehicle. I'm still teasing out exactly what I want to do and where to get it from. As mentioned, since this isn't fully a Patrol, the aftermarket is a bit scattered. Some Patrol stuff bolts right on, some (like bumpers) do not. And the Armada specific aftermarket seems to just be spinning up. A number of companies have products that are in development right now.
In broad strokes, though, a mild lift (2"-3"), better all-terrain tires, ARB air locker in the rear, rock rails, front and rear bumpers (when they're available), and some interior stuff to make camp life a bit more luxe.
And yes, @bryson, part of the motivation in getting an Armada was because its different from a Land Cruiser. I just can't help myself.
Last edited: