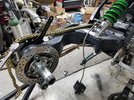
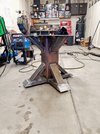
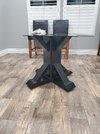
I love itThis is what those bolts became. Bored out a pocket in the face of a hockeypuck to make industrial adjustable table feet.
View attachment 134444View attachment 134445
You are using an out of date browser. It may not display this or other websites correctly.
You should upgrade or use an alternative browser.
You should upgrade or use an alternative browser.
General Tech What did you work on Today?
- Thread starter Gravy
- Start date
you should check out the bump stop pads on my XJHockey pucks are super useful and pretty cheap 😎
Play it again sports FTW
- Location
- West Haven, UT
I'm a little late in posting up some recent work as I've been kind of busy.
Last week when we had those hellacious winds here along the Wasatch front, my son’s gate leading to his RV pad took a beating. He said it’s been kind of questionable and flimsy since he bought the house in early 2019 but the wind definitely did it in.
He brought it by the shop last week so we could disassemble it and come up with a plan. The steel framework is beyond repair so I ordered some new square tubing to start from scratch. The frame appears to have been broken in several areas for quite some time by the looks of the rust on the failed welds.


I also had a friend from my duning and sledding days hit me up and ask if I’d do some work on his old Dodge truck so he brought it by the shop and dropped it off Friday night.

It’s got quite a list of things I spotted that need attention besides the brakes he brought it over for so I’ll have to see exactly what he wants me to fix and what he doesn’t.
Mike
Last week when we had those hellacious winds here along the Wasatch front, my son’s gate leading to his RV pad took a beating. He said it’s been kind of questionable and flimsy since he bought the house in early 2019 but the wind definitely did it in.
He brought it by the shop last week so we could disassemble it and come up with a plan. The steel framework is beyond repair so I ordered some new square tubing to start from scratch. The frame appears to have been broken in several areas for quite some time by the looks of the rust on the failed welds.


I also had a friend from my duning and sledding days hit me up and ask if I’d do some work on his old Dodge truck so he brought it by the shop and dropped it off Friday night.

It’s got quite a list of things I spotted that need attention besides the brakes he brought it over for so I’ll have to see exactly what he wants me to fix and what he doesn’t.
Mike
- Location
- West Haven, UT
Since we had to start over on the gate we opted to incorporate some "kustom" touches for improving the design and definitely to extend the life. Saturday I got to hang out with my son in the shop so it was a good day.
We opted to machine some items to allow us to bolt the last section together on the gate vs. the entire thing being fully welded. It should be easier to assemble after paint and hold up much longer.
Machined and threaded a block to receive the end piece.

Added a little extra thickness to the end of the tubing to prevent breaking out like the last one.

Drilled a hole through the leg to allow the use of a socket head cap screw to secure everything together.


The ID of the wheel was 1/2" but very sloppy. We also wanted to use something larger than .5" rod as the axle so I drilled out the wheel to .625" and then used an appropriate rod.


Single point threading 1/2"-13 threads so allow the rod to thread into the other leg.


Machined another block but this one threaded to 1/2"-13 to receive the axle.

Opposite side beefed up like the previous one but a .625" recess machined to a depth of .125" which will allow the .625" axle to sit in for extra rigidity.

Axle completed with one end threaded and the other drilled & tapped to receive a 3/8"-16 socket head cap screw.

Axle test fitting.

Wheel test fit.

Bolted together and just enough clearance to allow the wheel to turn freely but with much less "wobble".

Clamped to the welding table to true up and weld.

Fabrication completed.

All that’s left is to prime & paint it then assemble the vinyl before reinstalling it.
Mike
We opted to machine some items to allow us to bolt the last section together on the gate vs. the entire thing being fully welded. It should be easier to assemble after paint and hold up much longer.
Machined and threaded a block to receive the end piece.

Added a little extra thickness to the end of the tubing to prevent breaking out like the last one.

Drilled a hole through the leg to allow the use of a socket head cap screw to secure everything together.


The ID of the wheel was 1/2" but very sloppy. We also wanted to use something larger than .5" rod as the axle so I drilled out the wheel to .625" and then used an appropriate rod.


Single point threading 1/2"-13 threads so allow the rod to thread into the other leg.


Machined another block but this one threaded to 1/2"-13 to receive the axle.

Opposite side beefed up like the previous one but a .625" recess machined to a depth of .125" which will allow the .625" axle to sit in for extra rigidity.

Axle completed with one end threaded and the other drilled & tapped to receive a 3/8"-16 socket head cap screw.

Axle test fitting.

Wheel test fit.

Bolted together and just enough clearance to allow the wheel to turn freely but with much less "wobble".

Clamped to the welding table to true up and weld.

Fabrication completed.

All that’s left is to prime & paint it then assemble the vinyl before reinstalling it.
Mike
- Location
- West Haven, UT
Monday night I made a little headway on the 1996 Dodge 2500 V10.
Removed the battery cables.

They’re in pretty bad shape. Lots of green crusties on both.

Then moved on to brakes. Started by pulling all the tires & wheels.

Leaking axle seal.

Disassembling.

Hub removed.

Hub bearings & seal disassembled and cleaned.

I was able to compile a list of parts in which I picked up the next day.
Mike
Removed the battery cables.

They’re in pretty bad shape. Lots of green crusties on both.

Then moved on to brakes. Started by pulling all the tires & wheels.

Leaking axle seal.

Disassembling.

Hub removed.

Hub bearings & seal disassembled and cleaned.

I was able to compile a list of parts in which I picked up the next day.
Mike
- Location
- West Haven, UT
Last night I only had a couple of hours in the shop so I tackled the passenger rear brakes on the Dodge as they would require some serious attention to clean.
Started with this nasty oily mess.


Cleaned the drum in the solvent tank.

Then the hardware went to the solvent tank.

Hub, bearings and axle shaft cleaned and ready for reassembly.

Backing plate cleaned.

Brakes reassembled.

It’s been a while since I changed drum brakes. I had to dig out my 35+ year old brake tools that don’t see too much action these days.
Thanks for looking.
Mike
Started with this nasty oily mess.


Cleaned the drum in the solvent tank.

Then the hardware went to the solvent tank.

Hub, bearings and axle shaft cleaned and ready for reassembly.

Backing plate cleaned.

Brakes reassembled.

It’s been a while since I changed drum brakes. I had to dig out my 35+ year old brake tools that don’t see too much action these days.
Thanks for looking.
Mike
If vinyl gates were made this way by the fence people, they might actually justify the prices they charge for them. I cannot believe how flimsy, crappy, unpainted, and generally shitty they are for the cubic dollars. Yours looks SO MUCH better.Since we had to start over on the gate we opted to incorporate some "kustom" touches for improving the design and definitely to extend the life. Saturday I got to hang out with my son in the shop so it was a good day.
We opted to machine some items to allow us to bolt the last section together on the gate vs. the entire thing being fully welded. It should be easier to assemble after paint and hold up much longer.
Machined and threaded a block to receive the end piece.

Added a little extra thickness to the end of the tubing to prevent breaking out like the last one.

Drilled a hole through the leg to allow the use of a socket head cap screw to secure everything together.


The ID of the wheel was 1/2" but very sloppy. We also wanted to use something larger than .5" rod as the axle so I drilled out the wheel to .625" and then used an appropriate rod.


Single point threading 1/2"-13 threads so allow the rod to thread into the other leg.


Machined another block but this one threaded to 1/2"-13 to receive the axle.

Opposite side beefed up like the previous one but a .625" recess machined to a depth of .125" which will allow the .625" axle to sit in for extra rigidity.

Axle completed with one end threaded and the other drilled & tapped to receive a 3/8"-16 socket head cap screw.

Axle test fitting.

Wheel test fit.

Bolted together and just enough clearance to allow the wheel to turn freely but with much less "wobble".

Clamped to the welding table to true up and weld.

Fabrication completed.

All that’s left is to prime & paint it then assemble the vinyl before reinstalling it.
Mike
- Location
- West Haven, UT
If vinyl gates were made this way by the fence people, they might actually justify the prices they charge for them. I cannot believe how flimsy, crappy, unpainted, and generally shitty they are for the cubic dollars. Yours looks SO MUCH better.
Thanks Carl. Yeah, I was surprised when we took the vinyl off. I thought it would have been built better than it was, especially with how many of them I see driving around. I would imagine they must all be built in a similar manner which means all are built like crap.
I hope this one lasts longer than the original. His house was built in 2010 and he bought it in March 2019 where he said the gate was already on the flimsy side. He had it on his "to-do" list but hadn't gotten to it yet. The windstorm last week bumped it to the top of the list. I sure hope this one lasts longer than 9~ish or so years.
Mike
Pile of parts
Well-Known Member
- Location
- South Jordan
That truck looks to be in amazing shape! Hard to believe it's a '96.Monday night I made a little headway on the 1996 Dodge 2500 V10.
Removed the battery cables.

They’re in pretty bad shape. Lots of green crusties on both.

Then moved on to brakes. Started by pulling all the tires & wheels.

Leaking axle seal.

Disassembling.

Hub removed.

Hub bearings & seal disassembled and cleaned.

I was able to compile a list of parts in which I picked up the next day.
Mike
Pile of parts
Well-Known Member
- Location
- South Jordan
I have two gates that I'll be rebuilding this spring. I put in wider gates last summer and the old ones are going to be repurposed. I don't think my work will even compare to yours but it was great to see what you did. As @I Lean said, if built like yours, they'd be worth the price they charge.Since we had to start over on the gate we opted to incorporate some "kustom" touches for improving the design and definitely to extend the life. Saturday I got to hang out with my son in the shop so it was a good day.
We opted to machine some items to allow us to bolt the last section together on the gate vs. the entire thing being fully welded. It should be easier to assemble after paint and hold up much longer.
Machined and threaded a block to receive the end piece.

Added a little extra thickness to the end of the tubing to prevent breaking out like the last one.

Drilled a hole through the leg to allow the use of a socket head cap screw to secure everything together.


The ID of the wheel was 1/2" but very sloppy. We also wanted to use something larger than .5" rod as the axle so I drilled out the wheel to .625" and then used an appropriate rod.


Single point threading 1/2"-13 threads so allow the rod to thread into the other leg.


Machined another block but this one threaded to 1/2"-13 to receive the axle.

Opposite side beefed up like the previous one but a .625" recess machined to a depth of .125" which will allow the .625" axle to sit in for extra rigidity.

Axle completed with one end threaded and the other drilled & tapped to receive a 3/8"-16 socket head cap screw.

Axle test fitting.

Wheel test fit.

Bolted together and just enough clearance to allow the wheel to turn freely but with much less "wobble".

Clamped to the welding table to true up and weld.

Fabrication completed.

All that’s left is to prime & paint it then assemble the vinyl before reinstalling it.
Mike
- Location
- West Haven, UT
That truck looks to be in amazing shape! Hard to believe it's a '96.
Yeah, it is pretty decent condition. I worked on it for this guy since it was nearly new when he bought it but haven't touched it since late 2013. It needs some love now but still in good condition for a 25 year old truck with 177k on the clock.
I have two gates that I'll be rebuilding this spring. I put in wider gates last summer and the old ones are going to be repurposed. I don't think my work will even compare to yours but it was great to see what you did. As @I Lean said, if built like yours, they'd be worth the price they charge.
Good luck on your gate. I am dumfounded by what they charge for such shitty workmanship.
Thanks for the comments.
Mike
- Location
- West Haven, UT
Made some pretty good progress on the Dodge last night while helping my son reassemble his gate.
Seal, bearings, gear oil and driver ready to assemble the rear hub.

On this vintage of Dana 70 they use a nylok style nut with a tapered wedge that gets tapped into place one the preload is set.
The procedure calls for a torque of between 120-140 ft/lbs., then back off 1/3 revolution or 120-degrees.

I like to go one step further and adjust the preload to the actual spec which is .001”-.004”. I try to shoot for only .001”-.002”. Here is a fat .001”.

Wedge driven into the nylok nut.

New axle flange gasket and torquing to spec.

With rear reassembled and drums adjusted it was time to move on to the front. After removing the caliper I checked the turnout which was right at .001” on the passenger front and less than .0005” on the left.


The owner definitely hit his monies worth out of these brakes.


A little Fluid Film to aide in installation of the rubber bushings into the caliper for the guide pins.

This is why it pays to think through even the simplest of jobs to ensure long service life. I did these brakes in late 2013, just over 73k miles ago. The brakes have worn extremely even and the caliper bolts/glide pins came out easily and the calipers still floated freely in the mounting brackets.
Here you can see the purple Permatex brake assembly lube that I have been using for the past 25+ years now.


Thanks for looking.
Mike
Seal, bearings, gear oil and driver ready to assemble the rear hub.

On this vintage of Dana 70 they use a nylok style nut with a tapered wedge that gets tapped into place one the preload is set.
The procedure calls for a torque of between 120-140 ft/lbs., then back off 1/3 revolution or 120-degrees.

I like to go one step further and adjust the preload to the actual spec which is .001”-.004”. I try to shoot for only .001”-.002”. Here is a fat .001”.

Wedge driven into the nylok nut.

New axle flange gasket and torquing to spec.

With rear reassembled and drums adjusted it was time to move on to the front. After removing the caliper I checked the turnout which was right at .001” on the passenger front and less than .0005” on the left.


The owner definitely hit his monies worth out of these brakes.


A little Fluid Film to aide in installation of the rubber bushings into the caliper for the guide pins.

This is why it pays to think through even the simplest of jobs to ensure long service life. I did these brakes in late 2013, just over 73k miles ago. The brakes have worn extremely even and the caliper bolts/glide pins came out easily and the calipers still floated freely in the mounting brackets.
Here you can see the purple Permatex brake assembly lube that I have been using for the past 25+ years now.


Thanks for looking.
Mike
Vonski
nothing to see here...
- Location
- Payson, Utah
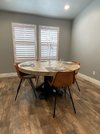
...maybe “table bases and coffee” meets should be a thing. 🤔🤷♂️They don’t call you Kitchen Table Ryan for nothin’
anderson750
I'm working on it Rose
- Location
- Price, Utah
Did you have to put a support beam in the basement to hold the weight of that thing.......looks pretty stout for sure.
- Location
- West Haven, UT
Holy SHIT!!!
Now THAT is a kitchen table. I'll bet it took three men and a boy to move that thing.
Beautiful work on it.
Mike
Now THAT is a kitchen table. I'll bet it took three men and a boy to move that thing.
Beautiful work on it.
Mike
- Location
- Draper, UT
for real stability, fill the center void with concrete 
the only chunk of 8" square tube I could find was 1/2" thick so I would guess the base alone weighs 125 Lbs. 2 guys can pretty easily get in and out of the bed of the truck.for real stability, fill the center void with concrete


