- Location
- Smithfield Utah
You are using an out of date browser. It may not display this or other websites correctly.
You should upgrade or use an alternative browser.
You should upgrade or use an alternative browser.
General Tech What did you work on Today?
- Thread starter Gravy
- Start date
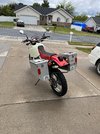
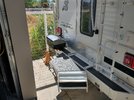
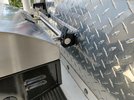
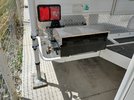
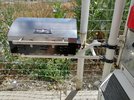
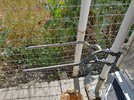
Since room is at a premium in a camper, I made this swing-out BBQ mount for it. The Quick Fist just needs to keep it from swinging out while driving, no real load on it at all.
I also modified the BBQ to hook directly up to the onboard propane, no little green Coleman bottles.
Sorry for the poor pics, since it's parked close to a fence everything is tight.
I also modified the BBQ to hook directly up to the onboard propane, no little green Coleman bottles.
Sorry for the poor pics, since it's parked close to a fence everything is tight.


jeepin4x4james
WAAAAA
- Location
- Bluffdale, UT
I wish I had a Fox landing on mine… I want to copy your bbq mount, that’s BA!
Side note: are you in Riverton? Your fence looks identical to my brothers…
Side note: are you in Riverton? Your fence looks identical to my brothers…
Copy away!I wish I had a Fox landing on mine… I want to copy your bbq mount, that’s BA!
Side note: are you in Riverton? Your fence looks identical to my brothers…
Not Riverton. Magna.
- Location
- The Land Northward (Bountiful), Utah
The best part is any overspray is beneficial to that fence. 
- Location
- West Haven, UT
Since room is at a premium in a camper, I made this swing-out BBQ mount for it. The Quick Fist just needs to keep it from swinging out while driving, no real load on it at all.
I also modified the BBQ to hook directly up to the onboard propane, no little green Coleman bottles.
Sorry for the poor pics, since it's parked close to a fence everything is tight.
View attachment 149657View attachment 149658View attachment 149659View attachment 149660View attachment 149661
Awesome idea and execution. Very nice.👍
anderson750
I'm working on it Rose
- Location
- Price, Utah
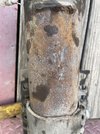
Having to do some work on the motorhome. This is the 2nd leveling jack that has had the weld that joins the mounting bracket and ram break. You can see that there is outstanding penetration between the 2 parts. 

The system also uses an individual pump for each jack. This one has been giving me some intermittent problems. A new one costs about $600 and is on a 3 month back order. Fortunately I have a friend with 30+ years of hydraulic repair experience. Hopefully he can figure out what is wrong with it.

The system also uses an individual pump for each jack. This one has been giving me some intermittent problems. A new one costs about $600 and is on a 3 month back order. Fortunately I have a friend with 30+ years of hydraulic repair experience. Hopefully he can figure out what is wrong with it.
TurboMinivan
Still plays with cars
- Location
- Lehi, UT
Yesterday was maintenance day for my Corvette--I drained its old coolant and refilled with new. While I was at it, I also performed a throttle body bypass, plus I replaced the stock 195^ thermostat with a 180^ one. All good stuff.
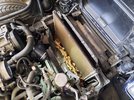
The C4 has a quirk where guys have overheating issues only to discover debris between the radiator and the condenser. My car always ran properly and the temperature was never a problem, so at first I wasn't gonna bother... but since both hoses were already removed from the radiator, why not take a quick peek anyway? Okay, fine. I pulled the top half cover, and when I looked down in the gap I could not believe what I saw--lots of leaves, some old dot matrix printouts, and I think an entire newspaper was also in there. Even worse, there was a *blanket* of fuzz stuck to the front of the radiator itself. Blowing compressed air through the fins didn't even phase it--I had to carefully brush it off with an old soft (garage) toothbrush. Considering all this, I am AMAZED the car was able to cool itself at all. Seriously.
The C4 has a quirk where guys have overheating issues only to discover debris between the radiator and the condenser. My car always ran properly and the temperature was never a problem, so at first I wasn't gonna bother... but since both hoses were already removed from the radiator, why not take a quick peek anyway? Okay, fine. I pulled the top half cover, and when I looked down in the gap I could not believe what I saw--lots of leaves, some old dot matrix printouts, and I think an entire newspaper was also in there. Even worse, there was a *blanket* of fuzz stuck to the front of the radiator itself. Blowing compressed air through the fins didn't even phase it--I had to carefully brush it off with an old soft (garage) toothbrush. Considering all this, I am AMAZED the car was able to cool itself at all. Seriously.
Attachments
- Location
- West Bountiful, UT
This made a barely perceptible difference. Maybe. It probably looks like that again by now though, too.

- DAA
- DAA
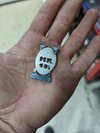
Still plugging away at prepping everything for primer, my brother cut out the Mr.40s logos on my inner fenders and patched since we modified them to be able to remove my radiator without tearing the front end apart and are now one off.
Moved the final bit of large stuff over to the paint booth, running boards, front fenders, inner fenders and started small weld repairs and sanding for the primer.
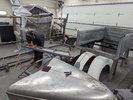
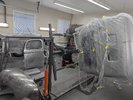
I also spent a bunch of time disassembling a bunch of small parts and oh boy are there a lot of them.

Moved the final bit of large stuff over to the paint booth, running boards, front fenders, inner fenders and started small weld repairs and sanding for the primer.


I also spent a bunch of time disassembling a bunch of small parts and oh boy are there a lot of them.
Die Blaue Ziege
Working on a Ford somewhere
- Location
- Logan ut
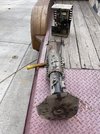
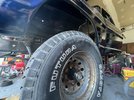
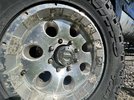
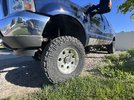
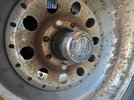
I went on the Ghost town tour a few weeks ago with the folks at Expedition Utah, it was a good time, however I took my Superduty and somehow one of the stock hubs broke, so there I am sliding all over the place flipping rock and dust everywhere, trying to figure out wtf is going on. Damn plastic hubs. So as soon as I got home I ordered a new set of Mile marker hubs for the 01 Superduty, then as I was rebuilding my 68 f250 front end the vintage selectro hub crumbled. So I order a set of mile markers for it as well, at this point I feel like opera, you get a mile marker, you get a mile marker, everyone gets a mile marker.
Attachments
Die Blaue Ziege
Working on a Ford somewhere
- Location
- Logan ut
- Location
- The Land Northward (Bountiful), Utah
Thought I'd share my interesting repair with everyone today.
Gentleman brought me a UTV with a stripped drain plug. Only 1000 miles on the thing... No depth to retap threads larger and the engine case itself was in places only 1/8" so neither a helicoil nor timesert was going to work (the case is so thin which is why it stripped in the first place).
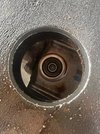
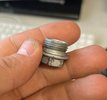
The estimate to pull the motor is 9hrs. Plus replacing a case half made the estimated repair given at multiple places similar in price to an actual motor ($3500).
Here's what we ordered.

After removing the plastic skid plate I found another 1/8" steel skid to contend with; that got cut out as well.
This motor has already sat for nearly a week at another repair shop with the plug out in order to drain the remaining oil out. Not good enough.
After cleaning and torching the AL around the plug hole in preparation for the weld in extension bung and trying to tack it in- oil still kept bubbling out of the pourous cast AL. (Put this on repeat for hours).
And upsidedown TIG welding dirty material sucks.
Ugly fusion tack weld
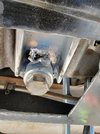
Unacceptable- cut it off, clean it, try again...
At this point I made no further attempt to photograph this fix LoL
Upsidedown won't work so...
4- 40's on the ground and tip it on its side...
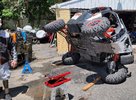
Anyway, after much welding and cleaning and welding and grinding; I finally got the weld bung on with no more pin holes from bubbling oil. It actually looked pretty decent, but my vanity kept me from photos LoL.
Welded up the skid plate and added some 1 3/4" 0.120 DOM around the skid plate drain hole to extend the skid lower than the new plug.
And surprisingly between the two of us- we pushed it back on all 4 wheels. Then loaded it up with the winch (he got a lesson on how to use it ).
).
A complicated fix. But when the 2 options are
1). A new motor
Or
2.) 9 hours to pull the motor and 9 hrs to replace it -after welding in position on the bench
This 4.5 hr fix was pretty good.
And with 4 times the thread depth than stock; it should be the least of his worries.
Cross your fingers and say a prayer for him that it doesn't leak
Thanks for watching.
Gentleman brought me a UTV with a stripped drain plug. Only 1000 miles on the thing... No depth to retap threads larger and the engine case itself was in places only 1/8" so neither a helicoil nor timesert was going to work (the case is so thin which is why it stripped in the first place).


The estimate to pull the motor is 9hrs. Plus replacing a case half made the estimated repair given at multiple places similar in price to an actual motor ($3500).
Here's what we ordered.

After removing the plastic skid plate I found another 1/8" steel skid to contend with; that got cut out as well.
This motor has already sat for nearly a week at another repair shop with the plug out in order to drain the remaining oil out. Not good enough.
After cleaning and torching the AL around the plug hole in preparation for the weld in extension bung and trying to tack it in- oil still kept bubbling out of the pourous cast AL. (Put this on repeat for hours).
And upsidedown TIG welding dirty material sucks.
Ugly fusion tack weld

Unacceptable- cut it off, clean it, try again...
At this point I made no further attempt to photograph this fix LoL
Upsidedown won't work so...
4- 40's on the ground and tip it on its side...

Anyway, after much welding and cleaning and welding and grinding; I finally got the weld bung on with no more pin holes from bubbling oil. It actually looked pretty decent, but my vanity kept me from photos LoL.
Welded up the skid plate and added some 1 3/4" 0.120 DOM around the skid plate drain hole to extend the skid lower than the new plug.
And surprisingly between the two of us- we pushed it back on all 4 wheels. Then loaded it up with the winch (he got a lesson on how to use it
A complicated fix. But when the 2 options are
1). A new motor
Or
2.) 9 hours to pull the motor and 9 hrs to replace it -after welding in position on the bench
This 4.5 hr fix was pretty good.
And with 4 times the thread depth than stock; it should be the least of his worries.
Cross your fingers and say a prayer for him that it doesn't leak
Thanks for watching.
Last edited:
Tonkaman
Well-Known Member
- Location
- West Jordan
Awesome! I love that you just dive in head first on these types of problems. I would have over complicated everythingThought I'd share my interesting repair with everyone today.
Gentleman brought me a UTV with a stripped drain plug. Only 1000 miles on the thing... No depth to retap threads larger and the engine case itself was in places only 1/8" so neither a helicoil nor timesert was going to work (the case is so thin which is why it stripped in the first place).
View attachment 149870
View attachment 149866
The estimate to pull the motor is 9hrs. Plus replacing a case half made the estimated repair given at multiple places similar in price to an actual motor ($3500).
Here's what we ordered.
View attachment 149865
After removing the plastic skid plate I found another 1/8" steel skid to contend with; that got cut out as well.
This motor has already sat for nearly a week at another repair shop with the plug out in order to drain the remaining oil out. Not good enough.
After cleaning and torching the AL around the plug hole in preparation for the weld in extension bung and trying to tack it in- oil still kept bubbling out of the pourous cast AL. (Put this on repeat for hours).
And upsidedown TIG welding dirty material sucks.
Ugly fusion tack weld
View attachment 149868
Unacceptable- cut it off, clean it, try again...
At this point I made no further attempt to photograph this fix LoL
Upsidedown won't work so...
4- 40's on the ground and tip it on its side...
View attachment 149869
Anyway, after much welding and cleaning and welding and grinding; I finally got the weld bung on with no more pin holes from bubbling oil. It actually looked pretty decent, but my vanity kept me from photos LoL.
Welded up the skid plate and added some 1 3/4" 0.120 DOM around the skid plate drain hole to extend the skid lower than the new plug.
And surprisingly between the two of us- we pushed it back on all 4 wheels and loaded it up.
A complicated fix. But when the 2 options are
1). A new motor
Or
2.) 9 hours to pull the motor and 9 hrs to replace it -after welding in position on the bench
This 4.5 hr fix was pretty good.
And with 4 times the thread depth than stock; it should be the least of his worries.
Cross your fingers and say a prayer for him that it doesn't leak
Thanks for watching.
- Location
- The Land Northward (Bountiful), Utah
- Location
- The Village of Kay

