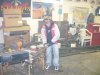
Maverick
old-school
- Location
- Anywhere, thanks to my geeky droid
Hey Brett, while cleaning out the garage Saturday, I found a pigtail for your tail lights. Do you still need to hook those up?
Why yes, yes I do. Thank you!
Last edited:
Hey Brett, while cleaning out the garage Saturday, I found a pigtail for your tail lights. Do you still need to hook those up?
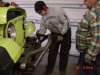
Lookin good buddy. I might hit the auto show tomorrow. If I do, I'll swing by Ian's and drop off that wiring and air tank.
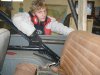
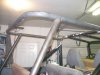
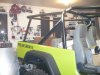
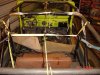
RedJeep said:Ian says: Russ take a look at what you get to bend next. Brett spent about an hour sitting in his Joop to come up with this the other night. The yellow straps is where the Bar will go.
The idea with the Y bar is to provide some more protection to the kids heads, in the event of a rollover and a big round rock or bolder wants to come in the top of the Halo. The y design is to help keep the bar out of the way so bouncing kids won't smack heads as easily.
This is Brett's Rodeo, I'm just along for the ride.
Ian
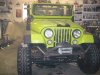
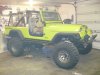
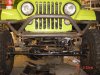
Nice... what size tubing is the front bumper? 2"? Almost looks a bit bigger?
Thanks!
It is 2"...the plan was to use 1.5" but we had 2" on hand and as it turns out, I really like it. Kind of fun and cartoony but not in an 80's kind of way.

I like it... I'm planning to buy a 2" die, while it looks cartoonish on smaller builds, I think its fitting on vintage rigs. Can't wait to see it out on the trail. We'll have to do a trail hug in the Swell when your done
EDIT: Russ better be there too!
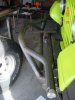
Let me know where you find those brake hose clips. Checker says they don't carry them, even though I found a part number on their web site.
I've got a handful of the brakeline clips as well as the weld-on tabs for the axle
Let me know where you find those brake hose clips. Checker says they don't carry them, even though I found a part number on their web site.
Great, I was just about to ask you....
I've got a handful of the brakeline clips as well as the weld-on tabs for the axle
I plan to work on it tomorrow and Saturday.
To do list:
Install brake line (see above post)
I need to find a return line from the steering box (again...I lost the first two). Hopefully I can get that plumbed (and ready to flush), the PS needs to be flushed because some grindage got in there (YUCK).
Get the brake lines bled,
Hook the fuel pump up,
Check the engine and fire it.
Also prop up the cage and get it welded up.
Find the bottom halves of all the body mounts, find some bodymount bolts.
Mount and wire up the relays.
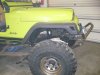
Don't under estimate how hard that cage is going to be to lift out of there, you're going to need a few bodies (as we found out the hard way).