General Tech What did you work on Today?

NYCEGUY01

Well-Known Member
Location
Willard, UT
Drug home the next project last week.

It was living at sea level so it ran pretty crappy up here in the cold.
Checked the Choke and adjusted the hi idle, then set the idle mixture.
Went to check the timing and it had like 34 degrees at idle and the distributor was super loose.
The crappy china chrome holddown was bent and too thin.
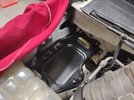
Grabbed a stock hold down from the parts bin and of course the starter that had been grinding now refused to engage at all.
Had a brand new crappy full size starter because the previous owner had swapped it twice already.
I had one in the shed for a 99 Vortec 5.7 motor, these all had nice mini starters that work 1000 times better then the old giant models.
Swapped in the new starter and then finally got the timing and idle set again.
Still running pretty lean, I didnt have any springs on hand but clearly it has a super light secondary spring in it now.

Anyway, I can at least drive it around a little while I wait for spring so swap in the 6.0/4l80/241 I have here for it...

Also getting front and rear Deaver springs, Fox Bypasses, new 37's. Parts have been piling up..lol
 

Attachments

  • bm.jpg
    bm.jpg
    136.8 KB · Views: 48
  • 317416392_6056093531102483_7562714556916132815_n.jpg
    317416392_6056093531102483_7562714556916132815_n.jpg
    117.4 KB · Views: 48

zmotorsports

Hardcore Gearhead
Vendor
Location
West Haven, UT
Drug home the next project last week.

It was living at sea level so it ran pretty crappy up here in the cold.
Checked the Choke and adjusted the hi idle, then set the idle mixture.
Went to check the timing and it had like 34 degrees at idle and the distributor was super loose.
The crappy china chrome holddown was bent and too thin.
Grabbed a stock hold down from the parts bin and of course the starter that had been grinding now refused to engage at all.
Had a brand new crappy full size starter because the previous owner had swapped it twice already.
I had one in the shed for a 99 Vortec 5.7 motor, these all had nice mini starters that work 1000 times better then the old giant models.
Swapped in the new starter and then finally got the timing and idle set again.
Still running pretty lean, I didnt have any springs on hand but clearly it has a super light secondary spring in it now.

Anyway, I can at least drive it around a little while I wait for spring so swap in the 6.0/4l80/241 I have here for it...

Also getting front and rear Deaver springs, Fox Bypasses, new 37's. Parts have been piling up..lol

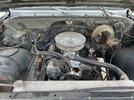
Drove by Saturday and saw it parked out front JJ. Looked pretty clean from the street. Should be another fun project.
 

Trate D

Well-Known Member
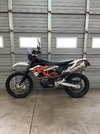
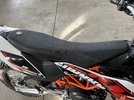
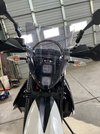
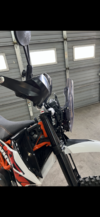
Finally after 3 months my Twalcom windshield and headlight assembly came from Italy. Luckily the seat concepts seat was only a 3 week wait. I think both these items are really going to make a big difference in the comfort department. Also threw on some carbon heat shields on the exhaust to complement yoshi end cap and seat.
 

Attachments

  • EECD1372-8465-44B2-AACD-A71704981730.jpeg
    EECD1372-8465-44B2-AACD-A71704981730.jpeg
    416.5 KB · Views: 28
  • 01D50361-4EE2-4D7E-9C1B-076B4B6E3E4D.jpeg
    01D50361-4EE2-4D7E-9C1B-076B4B6E3E4D.jpeg
    445 KB · Views: 29
  • 24CF0841-42FC-4451-97FD-4A7B8A89EAD5.jpeg
    24CF0841-42FC-4451-97FD-4A7B8A89EAD5.jpeg
    327.9 KB · Views: 27
  • 72AD41C7-E3FC-4268-80D6-CC7EEE5FADEB.png
    72AD41C7-E3FC-4268-80D6-CC7EEE5FADEB.png
    428.5 KB · Views: 28

Gravy

Ant Anstead of Dirtbikes
Supporting Member
That front end looks good! I really liked that Seat Concepts seat on mine (I have one on my Sled too). Hated the stock one. I karate kicked the stock left blinker off mine the first time I mounted the thing off-road
 

Trate D

Well-Known Member
Looks great. I’m interested in how bright the lights are
I’ll have to get some riding in and report back. I was worried about light absorption from the tint and curvature on the windshield as well. From what I can tell so far light output is still miles ahead of the stock unit. They are Vision X led so really good output.

They also offer a clear one or a solid black featuring a cut out for the lights. If the lights don’t seem to project good enough I might consider one of those options.
 

rholbrook

Well-Known Member
Location
Kaysville, Ut
I’ll have to get some riding in and report back. I was worried about light absorption from the tint and curvature on the windshield as well. From what I can tell so far light output is still miles ahead of the stock unit. They are Vision X led so really good output.

They also offer a clear one or a solid black featuring a cut out for the lights. If the lights don’t seem to project good enough I might consider one of those options.
I bought the adjustable GIVI windscreen last fall and haven't had a chance to install it. I also installed the Cyclops Auxilary light kit and that works well. I got the yellow lens cover that I pretty much keep on it, even at night if I get caught out in the dark
 

zmotorsports

Hardcore Gearhead
Vendor
Location
West Haven, UT
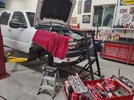
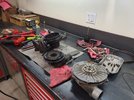
My daily is going back together after a turbo rebuild.


Passenger's front tire and inner fender removed for access.
lbz12.jpg

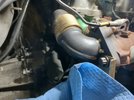
Removed the downpipe and prepping to remove both driver's and passenger's up-pipes after allowing to soak with Kroil overnight.
lbz23.jpg

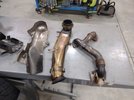
Heat shields, downpipe and passengers' up-pipe removed.
lbz24.jpg

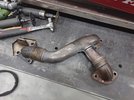
Modified passengers' up-pipe.
lbz38.jpg

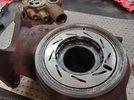
Turbo disassembled and discovered the issue was the unison ring seized on the center support. Vanes were in good condition and most were moving freely. Only had 3 that had limited movement.
lbz39.jpg

After chemically and mechanically cleaning the vanes, turbine housing and center support. I could have reused the unison ring but I had purchased a new stainless steel one with the parts so I used it. The center support required a lot of casting cleanup to ensure the same thing doesn't happen again.
lbz51.jpg

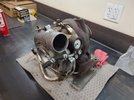
Freshly rebuilt with new bearings, 360-degree thrust washer, all new oil control rings and O-rings/seals. Also installed a new hydraulic actuator solenoid while I was this far into it.
lbz54.jpg

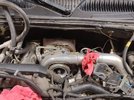
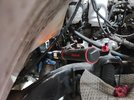
Reinstalled back onto the engine along with new coolant hoses connecting the turbo.
lbz61.jpg

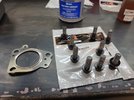
New GM exhaust gaskets and all new ARP fasteners to replace the OEM ones. A little nickel anti-seize applied and ready for installation.
lbz81.jpg

Torquing all of the exhaust fasteners to 39 ft/lbs. It's a bit tight but a torque wrench will fit between the cab and heads.
lbz85.jpg


Thanks for looking.

Mike
 

zmotorsports

Hardcore Gearhead
Vendor
Location
West Haven, UT
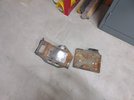
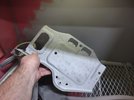
While I had it apart and with the cooling system opened, I opted to replace the thermostats as well as batteries which were getting some age on them. With the batteries removed I noticed the battery trays looked a little worse than I remember so they received the full treatment, bead blasting and POR-15 before reinstallation.

lbz65.jpg

Bead blasted.
lbz67.jpg

Both trays treated with POR-15 and left hanging to cure.
lbz71.jpg

The battery tray fasteners were also bead blasted and gave a few coats of E-coat primer before reassembling.
lbz72.jpg

Chasing the POR-15 out of the hold down threads.
lbz87.jpg

Air box tray cleaned and reassembled.
lbz89.jpg

Passenger side battery tray reinstalled.
lbz93.jpg

Prepping the upper radiator shroud as well as the duct work. All plastic components were cleaned with Power House before reinstallation.
lbz00.jpg

Air box also received proper cleaning with Power House.
lbz02.jpg

Engine bay completed with all ductwork installed, serpentine belt, upper shroud, cooling system filled and new Deka/East Penn batteries installed.
lbz07.jpg


Thanks for looking.
Mike
 

1969honda

Well-Known Member
Supporting Member
Location
Cache
@zmotorsports where are you finding Kroil locally in Ogden? Or are you purchasing it online? I found a source a little over a year ago in the Ogden/West Haven area, made a mental note, then went overseas for 8 months and forgot. 😒🤬

Thanks Mike, I deleted my post between your updates and then re-posted so others can enjoy you project updates in successive order. Always a pleasant surprise when you post your work!
 
Last edited:

zmotorsports

Hardcore Gearhead
Vendor
Location
West Haven, UT
@zmotorsports where are you finding Kroil locally in Ogden? Or are you purchasing it online? I found a source a little over a year ago in the Ogden/West Haven area, made a mental note, then went overseas for 8 months and forgot. 😒🤬

Thanks Mike, I deleted my post between your updates and the re-posted so others can enjoy you project updates in successive order. Always a pleasant surprise when you post your work!

Thank you. I appreciate the kind words. I enjoy seeing what others are working on and hope others find my projects at least entertaining if not informative.

Mike
 

moab_cj5

Well-Known Member
Supporting Member
Got all the parts I needed to put my snow thrower back together. I had to refer to some of the pictures I took and the diagram I found online, but I got it assembled and found a likely cause of my trashed auger gear.

FF4DF4D4-5207-4BB5-8D17-CBA5D5A25691.jpeg

I had never replaced my scrape plate, and over 11 years of use had worn the plate down to nothing and I was wearing out the bottom of the auger housing. The auger was hitting the ground, which I found, isn't supposed to happen. This likely added tons of stress on the brass gear, eventually leading to the catastrophic failure I experienced.

I ordered a new scrape plate and used my new to me welder to add some more metal to the bottom of the auger housing, and then rivited the new scrape plate in place. I then reassembled the auger blades and impeller on my new drive assembly. I then rejoined the 2 halves of the thrower and and adjusted the wear sliders to align with the new wear plate. The auger is a good 1/2 to 3/4" above the ground now, so I'll be sure to replace the sliders and scrape plate as they wear out to try and save the brass gear.

With everything assembled and adjusted, I fired it up to test it out.


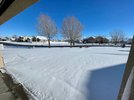
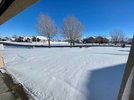
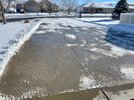
Now I just need some snow to give it a proper test.

For about $350 in parts, I hope it lasts another few years, but worth the risk over $1,800 for a whole new machine.
 

zmotorsports

Hardcore Gearhead
Vendor
Location
West Haven, UT
Got all the parts I needed to put my snow thrower back together. I had to refer to some of the pictures I took and the diagram I found online, but I got it assembled and found a likely cause of my trashed auger gear.

View attachment 156094

I had never replaced my scrape plate, and over 11 years of use had worn the plate down to nothing and I was wearing out the bottom of the auger housing. The auger was hitting the ground, which I found, isn't supposed to happen. This likely added tons of stress on the brass gear, eventually leading to the catastrophic failure I experienced.

I ordered a new scrape plate and used my new to me welder to add some more metal to the bottom of the auger housing, and then rivited the new scrape plate in place. I then reassembled the auger blades and impeller on my new drive assembly. I then rejoined the 2 halves of the thrower and and adjusted the wear sliders to align with the new wear plate. The auger is a good 1/2 to 3/4" above the ground now, so I'll be sure to replace the sliders and scrape plate as they wear out to try and save the brass gear.

With everything assembled and adjusted, I fired it up to test it out.


Now I just need some snow to give it a proper test.

For about $350 in parts, I hope it lasts another few years, but worth the risk over $1,800 for a whole new machine.


I'm not sure how you set your wear plate but I like to keep it just off the concrete so it gets the snow but doesn't actually scrape along the concrete as it's more prone to catching cracks/seams. The process I use it so raise the side shoes up and then adjust the scrape plate down so it barely contacts the smooth and level shop floor and tighten it in place. I then place a piece of cardboard under the full width of the scrape plate and adjust the side shoes down to where they contact the shop floor. When doing this set the scrape plate down onto the cardboard gently to keep a small gap vs. dropping the plate onto the cardboard.

I do this adjustment as part of my post-season preventive maintenance routine in the spring so it is ready to go come winter and then during a normal winter snowfall year I'll double check after half a dozen uses but this year alone I've already had to adjust mine a bit more due to side shoe wear.
 

bryson

RME Resident Ninja
Supporting Member
Location
West Jordan
Drug home the next project last week.

It was living at sea level so it ran pretty crappy up here in the cold.
Checked the Choke and adjusted the hi idle, then set the idle mixture.
Went to check the timing and it had like 34 degrees at idle and the distributor was super loose.
The crappy china chrome holddown was bent and too thin.
Grabbed a stock hold down from the parts bin and of course the starter that had been grinding now refused to engage at all.
Had a brand new crappy full size starter because the previous owner had swapped it twice already.
I had one in the shed for a 99 Vortec 5.7 motor, these all had nice mini starters that work 1000 times better then the old giant models.
Swapped in the new starter and then finally got the timing and idle set again.
Still running pretty lean, I didnt have any springs on hand but clearly it has a super light secondary spring in it now.

Anyway, I can at least drive it around a little while I wait for spring so swap in the 6.0/4l80/241 I have here for it...

Also getting front and rear Deaver springs, Fox Bypasses, new 37's. Parts have been piling up..lol
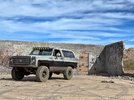
That's a rad Blazer! 73?


My daily is going back together after a turbo rebuild.


Passenger's front tire and inner fender removed for access.
View attachment 156049

Removed the downpipe and prepping to remove both driver's and passenger's up-pipes after allowing to soak with Kroil overnight.
View attachment 156050

Heat shields, downpipe and passengers' up-pipe removed.
View attachment 156051

Modified passengers' up-pipe.
View attachment 156052

Turbo disassembled and discovered the issue was the unison ring seized on the center support. Vanes were in good condition and most were moving freely. Only had 3 that had limited movement.
View attachment 156053

After chemically and mechanically cleaning the vanes, turbine housing and center support. I could have reused the unison ring but I had purchased a new stainless steel one with the parts so I used it. The center support required a lot of casting cleanup to ensure the same thing doesn't happen again.
View attachment 156054

Freshly rebuilt with new bearings, 360-degree thrust washer, all new oil control rings and O-rings/seals. Also installed a new hydraulic actuator solenoid while I was this far into it.
View attachment 156055

Reinstalled back onto the engine along with new coolant hoses connecting the turbo.
View attachment 156057

New GM exhaust gaskets and all new ARP fasteners to replace the OEM ones. A little nickel anti-seize applied and ready for installation.
View attachment 156058

Torquing all of the exhaust fasteners to 39 ft/lbs. It's a bit tight but a torque wrench will fit between the cab and heads.
View attachment 156059


Thanks for looking.

Mike

Why did you have to mod the passenger side up pipe?
 

Gravy

Ant Anstead of Dirtbikes
Supporting Member
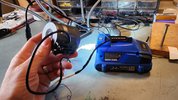
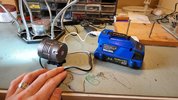
Threw this contraption together today so I could use drill batteries to power a headlamp.
20230118_125628.jpg
24v battery to USB adapter.
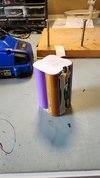
Old USB cord soldered to the original battery cord. (8.4v max output) (this garbage battery pack had one fake battery cell in the pack of 4! And crapped out after maybe 3 or 4 uses).
20230118_125910.jpg
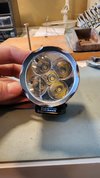
Then mounted a GoPro mount to the 5 (advertised as T6 cree) LED light, so I can helmet mount it.


Cheaper than $100 OXbow setup (that only runs for 3hrs max)
And with a 6AH 24v drill battery I aught to be able to run the light for at least a half dozen hours at max power (1200 lm advertised: maybe 650-850 truly @ 5v).
20230118_130841.jpg
 

Attachments

  • 20230118_124817.jpg
    20230118_124817.jpg
    314.5 KB · Views: 1
Last edited:

moab_cj5

Well-Known Member
Supporting Member
I'm not sure how you set your wear plate but I like to keep it just off the concrete so it gets the snow but doesn't actually scrape along the concrete as it's more prone to catching cracks/seams. The process I use it so raise the side shoes up and then adjust the scrape plate down so it barely contacts the smooth and level shop floor and tighten it in place. I then place a piece of cardboard under the full width of the scrape plate and adjust the side shoes down to where they contact the shop floor. When doing this set the scrape plate down onto the cardboard gently to keep a small gap vs. dropping the plate onto the cardboard.

I do this adjustment as part of my post-season preventive maintenance routine in the spring so it is ready to go come winter and then during a normal winter snowfall year I'll double check after half a dozen uses but this year alone I've already had to adjust mine a bit more due to side shoe wear.
I put the wear plate in roughly the spot it would have been before I wore it away. Then, after I had the whole machine back together, I adjusted the shoes to flat with the ground. I like your idea of putting cardboard under the scrape plate to help keep it slightly elevated and adjust more than once every 11 years... I will certainly be watching that more closely going forward.
 

jeeper

I live my life 1 dumpster at a time
Location
So Jo, Ut
I’ve got a vacant unit that I am signing contract on tomorrow. It needs a smoke alarm and a shower head. Figured I’d just knock that out tonight. 10-15 minutes tops. Give it a quick over to make sure it looks presentable.

Hit the Home Depot, grab parts, head to the condo.

Get them installed, but when testing the shower head I see that the tub diverter is bad, leaking and missing the top of the stem.

Back to Home Depot. Grab parts and head back to the condo.

Get the diverter installed. Works great. Take a celebratory pee, notice that the toilet tank is cracked and leaking on the floor behind the toilet 🤬

Pull the toilet off, see that the flange is rotted/rusted.

Toss toilet in dumpster, head BACK to Home Depot again.

MADE SURE to buy every part to every problem I can imagine. Extra toilet bolts, upgraded wax ring, supply line, new toilet flange, Bolts to hold new flange.. EVERYTHING.

Back to the condo, haul in toilet and parts. (Mind you, it’s like 50 yards from parking to front door, 4 flights of stairs)

Back to the truck for drill to screw new toilet flange down. No battery in the drill. 🤦🏼‍♂️
No worries, grab it from radio.. no battery.
From the fan? No battery. From the tool box of extra drill bits and batteries.. MISSING!

🤬🤬WTF!!!🤬🤬 the box and all my batteries are in the other truck from a different project I did last week.

Call the wife, get batteries on the way.

*batteries arrive*

Install toilet flange.

Ready the toilet bowl, and Realize I bought the WRONG wax ring.
These units are prone to water leaks, so I am extra paranoid. Worth the trip back to the Home Depot for the right one.

New wax ring is missing the bolts.. but no worry, I’ve got like 3 sets sitting here now 🤣

Install bowl, tank, supply line.

5 hours and $350 later, 10 minute project done.

By a rental property. They are awesome.
 
Top