
You are using an out of date browser. It may not display this or other websites correctly.
You should upgrade or use an alternative browser.
You should upgrade or use an alternative browser.
'97 tacoma build: Abner
- Thread starter sixstringsteve
- Start date
-
- Tags
- abner build build thread tacoma toyota
Spork
Tin Foil Hat Equipped
- Location
- Saratoga Springs, UT
sixstringsteve- you gonna be running any top of lockers? or no
I believe he already put a e-locker in the rear and he's leaving the front open.
On second thought, bring me a hub body rather than the dial/cap...it'll be easier to get the hole spacing that way, plus I can test-fit the thing after.
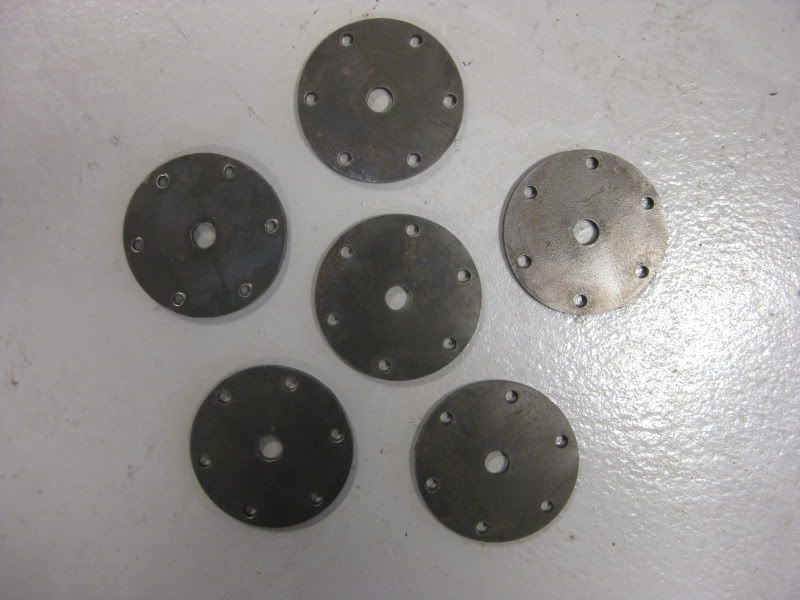
Essentially I'm just making a disc with 6 holes in it, right? Then you'll weld a nut on it to screw the slide hammer into? (just making sure the image in my head is the right one...)
I'll cut 4 out, that way I have an extra just in case.
Essentially I'm just making a disc with 6 holes in it, right? Then you'll weld a nut on it to screw the slide hammer into? (just making sure the image in my head is the right one...)
I'll cut 4 out, that way I have an extra just in case.
sixstringsteve
Well-Known Member
- Location
- UT
On second thought, bring me a hub body rather than the dial/cap...it'll be easier to get the hole spacing that way, plus I can test-fit the thing after.
You got it. I'll bring the hub body, hub dial, and a hub dial gasket (you can keep it). I've never checked, but I assume the '79-85, ifs, and taco aisin hubs all have the same dial on them. Can anyone confirm?
Essentially I'm just making a disc with 6 holes in it, right? Then you'll weld a nut on it to screw the slide hammer into? (just making sure the image in my head is the right one...)
That's how I understand it. I'd love a hole in the center of mine if possible for me to run a bolt through the middle for my slide hammer (rather than welding a nut to it).
You got it. I'll bring the hub body, hub dial, and a hub dial gasket (you can keep it). I've never checked, but I assume the '79-85, ifs, and taco aisin hubs all have the same dial on them. Can anyone confirm?
I know the solid axle and IFS years are the same, and I'll compare your Taco hub when it gets here.
That's how I understand it. I'd love a hole in the center of mine if possible for me to run a bolt through the middle for my slide hammer (rather than welding a nut to it).
Can do. What size bolt?
On second thought, bring me a hub body rather than the dial/cap...it'll be easier to get the hole spacing that way, plus I can test-fit the thing after.
Essentially I'm just making a disc with 6 holes in it, right? Then you'll weld a nut on it to screw the slide hammer into? (just making sure the image in my head is the right one...)
I'll cut 4 out, that way I have an extra just in case.
I don't even know that you would have to go as far as having all six holes, I think 4 would be fine. Or even just 4 quarters of a large circle so that it's easy on off. Lots of different ways you could do it, could even make a larger disk with different patterns for different axles.
But for exclusive toyota use I guess 4 or 6 holes would be most simple :greg:
- Location
- Stinkwater
Make me one Carl
Fwiw I use a brass drift on directly on the end of the studs with light taps from a brass tipped hammer on the edge of the hub body. Even on 40+ year old stubborn LC axles they pop out easy enough. That said if this tool makes it so you do less damage to the stud and don't have to mar up the hub at all, I'd love to give it a try.
This is what I do, and now I've got flat spots all along the outer rim of my hubs. You'd better keep that pattern handy, Carl, I want one too...
sixstringsteve
Well-Known Member
- Location
- UT
I got the diffs pulled last night and I delivered them to Carl. He'll work his magic, then I can put it all back together and get it rolling down the street.
sixstringsteve
Well-Known Member
- Location
- UT
I got the diffs back. Thanks Carl! I didn't expect them to be done so quickly, I really appreciate it. He also made me the little hub puller tool. I'll check it out tomorrow and see what it's like.
Cascadia
Undecided
- Location
- Orem, Utah
Does this mean you'll be going on your shakedown run this weekend then? What's left on the docket?
Please post pics and results of this. I have always had good luck with heat (butane) and then severely beating the lockout with a rubber mallet back and forth. This seems to work better than chisels, small screwdrivers etc.I made several of the hub puller plate thingys for whoever else wants to try 'em out. I'm interested to see if they'll work, or if you'll just be fighting against the cone washers in futility.
- Location
- Grand Junction, CO
Far as the cone washers go, I was taught (by a Toyota trained tech) to knock them out with a ball peen hammer, by smacking the hub right above the offending, tight cone washer. Just keep the nut threaded on the end of the stud prevent the cone from flying out across the garage (or from hitting you). They pop out real easy with a decent smack and usually come right out.
Pretty simple on my end, I'm looking forward to hearing how well it works with the slide hammer.
In the past, I've always either used a drift on the end of the stud, (slower but works well) or the hammer-on-side-of-hub-body method. (faster but dents the edge of the hub)
In the past, I've always either used a drift on the end of the stud, (slower but works well) or the hammer-on-side-of-hub-body method. (faster but dents the edge of the hub)
sixstringsteve
Well-Known Member
- Location
- UT
I don't have to remove my hubs, so I haven't tested the tool Carl built (and hopefully I never have to)
Not much to report in the way of pictures, but I got both diffs installed, and the rear end is sitting on the ground now, on 35s. I got the front pass CV in and hub installed. Now I just need the driver's front (tomorrow), sway bar hookup, bleed brakes, fill diffs with fluid, break in the gears, drain fluid, fill fluid, and then I should be able to drive it out of the garage.
Not much to report in the way of pictures, but I got both diffs installed, and the rear end is sitting on the ground now, on 35s. I got the front pass CV in and hub installed. Now I just need the driver's front (tomorrow), sway bar hookup, bleed brakes, fill diffs with fluid, break in the gears, drain fluid, fill fluid, and then I should be able to drive it out of the garage.
sixstringsteve
Well-Known Member
- Location
- UT
Does this mean you'll be going on your shakedown run this weekend then? What's left on the docket?
I should be able to make the shakedown run next weekend as planned (16-17th). I still have a lot to do. Thankfully none of it is heavy lifting, just a lot of little things to tidy up:
- install elocker guard and new drain plugs
- figure out how to mount the lower front fenders
- trim front bumper
- finish rear lower shock mounts and install with appropriate washers
- trim rear fenders
- put the interior back together, modify the kick panels
- apply another coat of herculiner
- wire elocker
- tighten a squeaky belt
- adjust clutch pedal height
- paint side marker bezels
- paint pass inner front fender
- install new CB
- install plastic inner fenders (I can get by without this, but I'd really like to get it done before the shakedown run)
- cap my sliders
- paint and install front skids (this can wait)
- install new air filter
- install diff guard
- look for a shell that fits (I've been looking for weeks, but now that the truck is mobile I can actually act on some of the ads I've found)
Last edited:
sixstringsteve
Well-Known Member
- Location
- UT
I got a bit more done tonight: Got the sway bar connected, driver's axle and hub put together, and wheels on. I painted the side markers. It's off of jackstands, under its own weight.
Despite the messy garage, this deserves a pic. Nothing sexy, but it's got me excited:


Despite the messy garage, this deserves a pic. Nothing sexy, but it's got me excited: